background image

SBI-7126T-SH Blade Module User’s Manual

4-2

4-1

Control Panel

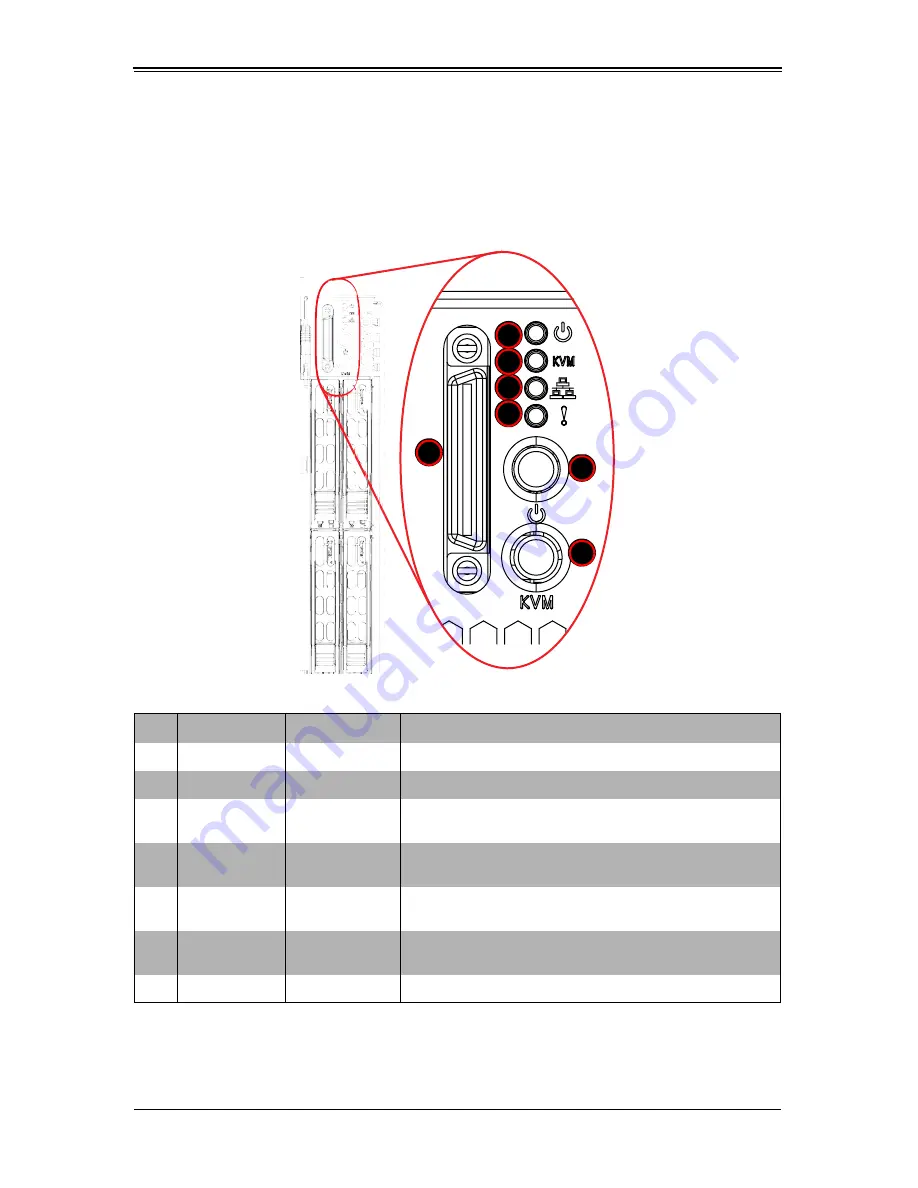
Each blade has a similar control panel (

Figure 4-2

) with power on/off button, a KVM 

connector, a KVM button and four LEDs on the top front of the unit. The numbers 
mentioned in 

Figure 4-2

are described in 

Table 4-2

.

Figure 4-2. Blade Control Panel

Table 4-2. Blade Control Panel 

Item Function

State

Description

1

Power Button

N/A

Turns blade module on and off

2

KVM Button

N/A

Initiates KVM function

3

Power LED

Green/Amber/
Red

See 

Table 4-3

 for details.

4

KVM/UID LED

Blue/Flashing 
Blue

See 

Table 4-3

 for details.

5

Network/IB LED

Flashing Green/
Flashing Orange

See 

Table 4-3

 for details.

6

System Fault 
LED

Red

See 

Table 4-3

 for details.

7

KVM Connector N/A

Connector for SUV/KVM cable

1

5

4

3

6

7

2

Summary of Contents for SBI-7126T-SH

Page 1: ...SBI 7126T SH Blade Module User s Manual Revison 1 0a...

Page 2: ...esolution of any such disputes Super Micro s total liability for all claims will not exceed the price paid for the hardware product FCC Statement This equipment has been tested and found to comply wit...

Page 3: ...safety precautions that should be followed when installing and servicing the SBI 7126T SH blade module Chapter 3 Setup and Installation Refer to this chapter for details on installing the SBI 7126T SH...

Page 4: ...SBI 7126T SH Blade Module User s Manual iv Notes...

Page 5: ...Overview 3 1 3 2 Installing Blade Modules 3 1 Powering Up a Blade Unit 3 1 Powering Down a Blade Unit 3 1 Removing a Blade Unit from the Enclosure 3 1 Removing Replacing the Blade Cover 3 2 Installin...

Page 6: ...4 3 Blade Unit Components 4 7 Memory Support 4 8 Hard Disk Drives 4 8 Chapter 5 BIOS 5 1 5 1 Introduction 5 1 System BIOS 5 1 How To Change the Configuration Data 5 1 Starting the Setup Utility 5 1 5...

Page 7: ...igure 3 5 8 Slot DIMM Numbering 3 9 Figure 3 6 Installing a DIMM into a Memory Slot 3 10 Figure 3 7 Installing a Hard Drive in a Carrier 3 12 Figure 3 8 Attaching Add On Card to Cover Shield 3 13 Figu...

Page 8: ...SBI 7126T SH Blade Module User s Manual viii Notes...

Page 9: ...5 2 Advanced Setup Menu Options 5 4 Table 5 3 CPU and Clock Configuration Sub menu 5 5 Table 5 4 IDE Configuration Menu 5 6 Table 5 5 PCIPnP Configuration Sub menu 5 7 Table 5 6 SuperIO Configuration...

Page 10: ...SBI 7126T SH Blade Module User s Manual x Notes...

Page 11: ...lade 1 2 Product Checklist of Typical Components Your blade module ships with its mainboard already installed in its chassis Memory hard disk drives and the CPU must all be installed by the user after...

Page 12: ...essor into the SBI 7126T SH blade module are found in Chapter 3 Setup and Installation on page 3 1 Table 1 1 SBI 7126T SH Blade Specification Features Mainboard B8DTP proprietary form factor Chassis D...

Page 13: ...asy removable carriers See Chapter 3 Setup and Installation on page 3 1 for storage installation details Table 1 2 RDIMM Population for the SBI 7126T SH w 5500 Processors Installed DIMMSlots per Chann...

Page 14: ...enclosures with sixty blade modules or the equivalent of sixty 1U servers With the inclusion of six CMM modules twelve Gigabit Ethernet switches and six InfiniBand switches this would occupy up to 84...

Page 15: ...per Micro Computer B V Het Sterrenbeeld 28 5215 ML s Hertogenbosch The Netherlands Tel 31 0 73 6400390 Fax 31 0 73 6416525 Email sales supermicro nl General Information support supermicro nl Technical...

Page 16: ...SBI 7126T SH Blade Module User s Manual 1 6 Notes...

Page 17: ...electrical shock Use extreme caution when using metal tools which can easily damage any electrical components or circuit boards they come into contact with Do not use mats designed to decrease electro...

Page 18: ...mponents and printed circuit boards The following measures are generally sufficient to neutralize this difference before contact is made to protect your equipment from ESD Use a grounded wrist strap d...

Page 19: ...ng Down a Blade Unit A blade unit may be powered down in either of five ways Press the power button on the blade unit Use IPMIView or the web browser based management utility to power down if you have...

Page 20: ...e cover toward the front of the blade to lock it into place Installing a Blade Unit into the Enclosure Make sure the cover of the blade unit has been replaced first before installing a blade unit in t...

Page 21: ...3 3 Chapter 3 Setup and Installation Figure 3 1 Inserting a Blade into the Enclosure Figure 3 2 Locking the Blade into Position...

Page 22: ...socket up until the processor is released from the socket then lift the silver cover plate and remove the processor Installing a Processor 1 If present remove the protective black PnP cap from the pro...

Page 23: ...ff the old thermal grease with a clean lint free cloth 9 Place the heatsink on the processor then tighten two diagonal screws until snug then the other two screws 10 When all four screws are snug tigh...

Page 24: ...SBI 7126T SH Blade Module User s Manual 3 6 Figure 3 3 Installing a Processor in a Socket Align CPU Keys with Socket...

Page 25: ...memory and our web site www supermicro com products superblade for recommended memory Populating Memory Slots The mainboard of a SBI 7126T SH blade module has twelve memory slots depending upon the b...

Page 26: ...1A 2A 6 DIMMs 1A 2A 3A 1A 2A 3A 8 DIMMs 1A 1B 2A 3A 1A 1B 2A 3A 10 DIMM 1A 1B 2A 2B 3A 1A 1B 2A 2B 3A 12 DIMM 1A 1B 2A 2B 3A 3B 1A 1B 2A 2B 3A 3B NOTE The DIMM slot number specified in Table 3 1 equal...

Page 27: ...9 Chapter 3 Setup and Installation Figure 3 5 8 Slot DIMM Numbering Edge of Board Toward CPU DIMM3B DIMM2A DIMM3A DIMM1B DIMM2B DIMM1A Edge of Board Toward CPU DIMM3B DIMM2A DIMM3A DIMM1B DIMM2B DIMM1...

Page 28: ...tly see Figure 3 6 Figure 3 6 Installing a DIMM into a Memory Slot 5 Gently press down on the DIMM until it snaps into place in the slot Repeat for all modules see Table 3 1 for installing DIMMs into...

Page 29: ...to the carrier with the PCB side facing down and the connector end toward the rear of the carrier 3 Align the drive in the carrier so that the screw holes of both line up Note that there are holes in...

Page 30: ...allows the add on card to be properly installed parallel to the blade module s mainboard There is also cover shield that you must attach to the add on card in order to maintain proper air flow to the...

Page 31: ...d on card pushing down with your thumbs evenly on both sides of the card Figure 3 9 Figure 3 9 Attaching Add On Card to Riser Card 4 Install the riser card and add on card combination into the blade m...

Page 32: ...and a mouse to the USB hub You will also need to connect a monitor to the video connector on the SUV cable Turn on the blade module 3 Insert the CD containing the OS into the CD ROM drive 4 Follow th...

Page 33: ...ctions of these two utility programs 3 9 Management Software System management may be performed with either of three software packages IPMIview IPMItool or a Web based Management Utility These are des...

Page 34: ...SBI 7126T SH Blade Module User s Manual 3 16...

Page 35: ...scription Processors Supports single or dual 1366 pin Intel Xeon 5500 5600 series processors Memory Supports up to 192 GB of ECC Registered ECC and 48 GB of Unbuffered ECC DDR3 1333 1066 800 SDRAM Sto...

Page 36: ...re 4 2 Blade Control Panel Table 4 2 Blade Control Panel Item Function State Description 1 Power Button N A Turns blade module on and off 2 KVM Button N A Initiates KVM function 3 Power LED Green Ambe...

Page 37: ...the new blade See the Web based Management Utility User s Manual on your Superblade system CD ROM for further details on using the KVM function remotely Table 4 3 Blade Module LED Indicators LED State...

Page 38: ...it is a proprietary design which is based on the Intel IOH 36D Tylersburg chipset See Figure 4 4 for a block diagram of this chipset Figure 4 3 for a view of the B8DTP Mainboard and Figure 4 5 for an...

Page 39: ...ogic to backplane 7 ICH10 South Bridge chip 8 Intel IOH 36D Tylersburg North Bridge chip 9 Onboard Battery 10 KVM Module 11 BIOS Chip 12 LSI 2008 SAS2 Controller 13 PCI E 2 0 x16 Expansion Slot PROCES...

Page 40: ...will also clear any passwords JBT1 consists of two contact pads located near the BIOS chip Clearing CMOS 1 First power down the blade and remove it from the enclosure 2 Remove the blade cover to acce...

Page 41: ...e module are shown in Figure 4 5 and described in Table 4 5 Table 4 5 Main Components of SBI 7126T SH Blade Module Item Description 1 Blade Unit Module 2 SAS2 SATA Hard Drive two per blade module 3 SA...

Page 42: ...h is mounted in a drive carrier The drive is hot swappable and can be removed or replaced without powering down the blade unit it resides in These drives use a yellow color for the Blade HDD active LE...

Page 43: ...ata The CMOS information that determines the system parameters may be changed by entering the BIOS Setup utility This Setup utility can be accessed by pressing the DELETE key at the appropriate time d...

Page 44: ...ncluded with the system 1 Copy the contents of the zip file to a bootable USB pen drive 2 Connect the KVM dongle CBL 0218L to the KVM connector at the front of the blade you will be flashing the BIOS...

Page 45: ...described in this section are selected by choosing the appropriate text from the MAIN BIOS SETUP screen All displayed text is described in this section although the screen display is often all you ne...

Page 46: ...l sub menus found in the ADVANCED SETUP menu Table 5 1 Main BIOS Setup Menu Options Menu Option Description System Time To set the system date and time key in the correct information in the appropriat...

Page 47: ...both cache lines for 128 bytes as comprised if Enabled For UP platforms leave it enabled for DP MP servers this setting may be used to tune performance to the specific application MPS and ACPI MDAT Or...

Page 48: ...and DISABLED C3 Auto Demotion When enabled the CPU will conditionally demote C6 C7 requests to C3 based on uncore auto demote information Options include Enabled and DISABLED Spread Spectrum Mode Thi...

Page 49: ...M A R T Self Monitoring Analysis and Reporting Technology SMART can help predict impending drive failures Select Auto to allow BIOS to auto detect hard disk drive support Select Disabled to prevent AM...

Page 50: ...ct 3F8 IRQ4 to allow the serial port to use 3F8 as its I O port address and IRQ 4 for its interrupt address Options are DISABLED 3F8 IRQ4 3E8 IRQ4 and 2E8 IRQ3 Serial Port2 Address Same as above but o...

Page 51: ...Max Payload size as either 128B or 256B Active State Power Management This setting allows you to ENABLE or Disable PCI Express L0s and L1 link power states Intel VT d This setting allows you to ENABL...

Page 52: ...ure Advanced Configuration and Power Interface ACPI power management setting for your system Please refer to ACPI s website http www acpi info for more information ACPI Version Features This option al...

Page 53: ...the status of auto detection of IDE devices SATA Port0 Port5 For this setting select the type of device connected to the system Select Auto to allow the AMI BIOS to automatically detect a hard disk d...

Page 54: ...shows the channel status for the channel number It will either display CHANNEL NUMBER IS OK or WRONG CHANNEL NUMBER IP Address Source Use this option for selecting the IP Address source Options inclu...

Page 55: ...f each three digit number separated by dots should not exceed 255 Parameter Selector This static display shows the parameter of your Gateway Address configuration Gateway Address The BIOS will automat...

Page 56: ...ption to enable VT UTF8 Combination Key support for ANSI VT100 terminals Options include Enabled and DISABLED Sredir Memory Display Delay This option gives the delay in seconds to display memory infor...

Page 57: ...ives USB devices CD ROM drives Network drives and so on The menu options are for 1ST BOOT DEVICE 2ND BOOT DEVICE and 3RD BOOT DEVICE 4TH BOOT DEVICE and 5TH BOOT DEVICE Each numbered boot device can b...

Page 58: ...o Access This prevents User access to the BIOS Setup Utility NOTE This option is only available when the Supervisor Password has been set above Boot Sector Virus Protection When ENABLED the AMI BIOS d...

Page 59: ...4k block at which the error was detected System RAM Failed at offset nnnn System RAM failed at offset nnnn of in the 64k block at which the error was detected Extended RAM Failed at offset nnnn Extend...

Page 60: ...n older boards check the cache jumpers You may have to replace the cache See your dealer A disabled cache slows system performance considerably CPU ID CPU socket number for Multi Processor error EISA...

Page 61: ...a has been corrupted Parity Check 2 nnnn Parity error found in the I O bus BIOS attempts to locate the address and display it on the screen If it cannot locate the address it displays Press F1 to resu...

Page 62: ...top left corner of the screen The following is a list of codes that may be written to port 80h Table A 2 Terminal POST Errors Post Code Description 02h Verify Real Mode 03h Disable Non Maskable Interr...

Page 63: ...uto size cache 3Ch Advanced configuration of chipset registers 3Dh Load alternate registers with CMOS values 41h Initialize extended memory for RomPilot 42h Initialize interrupt vectors 45h POST devic...

Page 64: ...for configuration errors 76h Check for keyboard errors 7Ch Set up hardware interrupt vectors 7Dh Initialize Intelligent System Monitoring 7Eh Initialize coprocessor if present 80h Disable onboard Sup...

Page 65: ...ne number of ATA and SCSI drives A0h Set time of day A2h Check key lock A4h Initialize typematic rate A8h Erase F2 prompt AAh Scan for F2 key stroke ACh Enter SETUP AEh Clear Boot flag B0h Check for e...

Page 66: ...PCMCIA and serial disk CCh Redirect Int 10h to enable remote serial video CDh Re map I O and memory for PCMCIA CEh Initialize digitizer and display message D2h Unknown interrupt Table A 3 Boot Block F...

Page 67: ...also sends the bitmap to the port 80 LED display It first displays the checkpoint code followed by a delay the high order byte another delay and then the low order byte of the error It repeats this se...

Page 68: ...SBI 7126T SH Blade Module User s Manual A 10 Notes...

Page 69: ...ected to result in significant injury or loss of life or catastrophic property damage Accordingly Supermicro disclaims any and all liability and should buyer use or sell such products for use in such...

Page 70: ...SBI 7126T SH Blade Module User s Manual 0 2 Notes...

Reviews: