background image

Appendix C: Software Installation

C-7

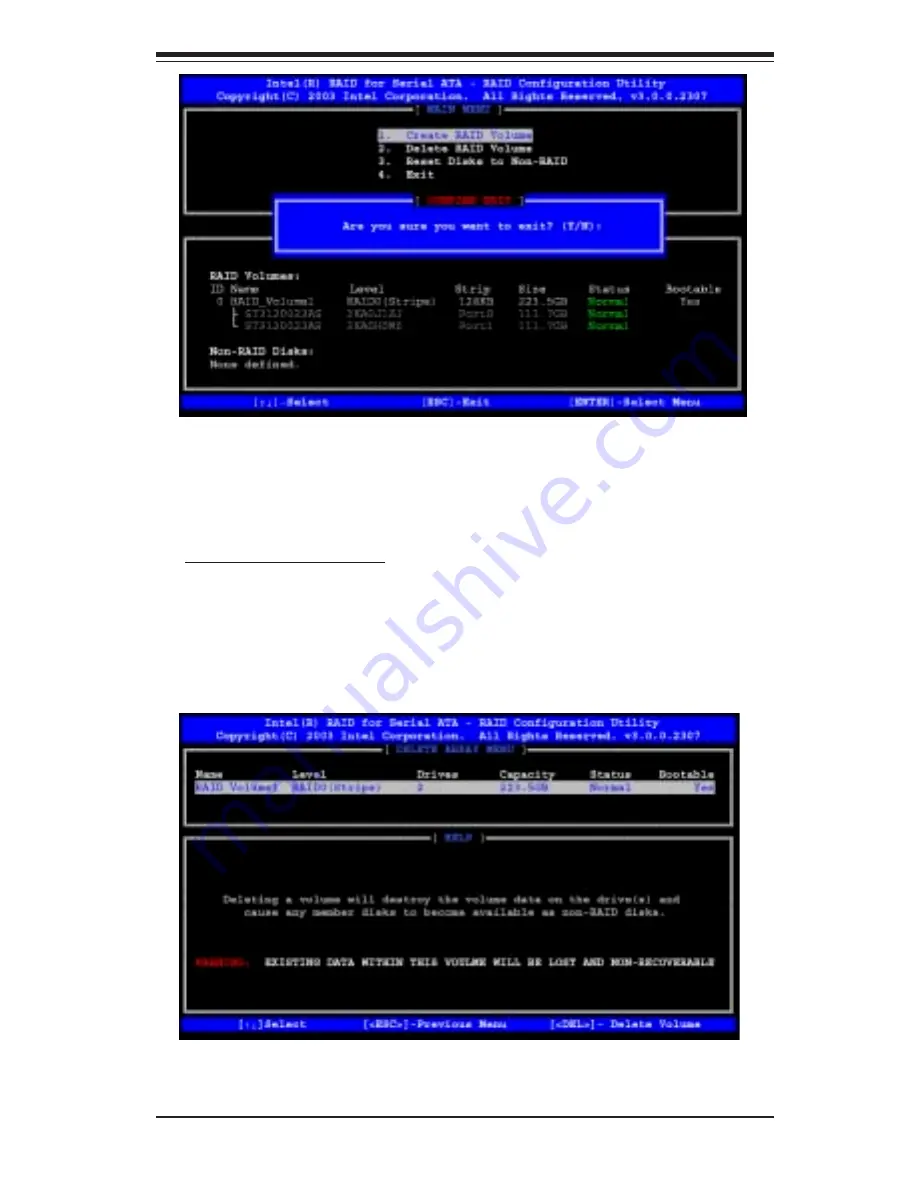
g. When asked "Are you sure you want to exit? (Y/N):  ",  type "Y" to

confirm the selections and exit the "Create RAID Volume" menu. Press the

<Enter> key to return to the main menu.

Deleting RAID Volume:

a. When you are in the main menu, use the <Down Arrow> and the

<Upper Arrow> keys to select item#2-"Delete RAID Volume" in the main

menu.

b When the item# 2 is highlighted,  press the <Enter> key to select the

item: "Delete RAIDVolume".  The following screen will appear:

c.Select the volume and press the <Delete> key to delete the RAID

volume. The following screen will appear:

Summary of Contents for P4SCA

Page 1: ...SUPER P4SCA SUPER P4SCE USER S MANUAL Revision 1 1 SUPER...

Page 2: ...ILITY TO USE THIS PRODUCT OR DOCUMENTATION EVEN IF ADVISED OF THE POSSIBILITY OF SUCH DAMAGES IN PARTICULAR THE VENDOR SHALL NOT HAVE LIABILITY FOR ANY HARDWARE SOFTWARE OR DATA STORED OR USED WITH TH...

Page 3: ...hapter 2 begins with instructions on handling static sensitive devices Read this chapter when installing the processor and DDR memory modules and when mounting the mainboard in the chassis Also refer...

Page 4: ...rview 1 13 1 3 PC Health Monitoring 1 14 1 4 Power Configuration Settings 1 15 1 5 Power Supply 1 17 1 6 Super I O 1 18 Chapter 2 Installation 2 1 Static Sensitive Devices 2 1 2 2 Processor and Heatsi...

Page 5: ...r 2 16 IDE Connectors 2 16 2 9 Installing Intel ICH5R SATA RAID Utility 2 17 2 10 Installing the Operating System and Software 2 24 SuperO Doctor II 2 29 Chapter 3 Troubleshooting 3 1 Troubleshooting...

Page 6: ...iguration 4 11 4 4 5 Hardware Monitors 4 12 4 4 6 Processor Clock Options 4 13 4 5 Security 4 14 4 6 Boot 4 15 4 7 Exit 4 17 Appendices Appendix A BIOS POST Messages A 1 Appendix B BIOS POST Codes B 1...

Page 7: ...rformance Please check that the following items have all been included with your motherboard If anything listed here is damaged or missing contact your retailer All Included with Retail Box Only One 1...

Page 8: ...ess SuperMicro Computer B V Het Sterrenbeeld 28 5215 ML s Hertogenbosch The Netherlands Tel 31 0 73 6400390 Fax 31 0 73 6416525 Email sales supermicro nl General Information support supermicro nl Tech...

Page 9: ...Chapter 1 Introduction 1 3 Notes...

Page 10: ...1 4 SUPER P4SCA P4SCE User s Manual Figure 1 1 SUPER P4SCA Image SUPER P4SCA...

Page 11: ...VGA JG1 GLAN PCI 1 PCI 2 PCI 3 PCI 4 ISA1 ISA2 ISA3 FLOPPY BATTERY JBT1 CMOS Clear BIOS J7 CH CPU Fan1 DIMM 0A DIMM 0B DIMM 1B DIMM 1A WD FRONT PANEL CTR BANK0 BANK1 ICH5R South Bridge J33 S UPER P4S...

Page 12: ...1 6 SUPER P4SCA P4SCE User s Manual SUPER P4SCE Figure 1 3 SUPER P4SCE Image...

Page 13: ...J16 SPEAKER J18 J37 SATA LED Pin 1 Pin 1 Pin 1 Pin 1 J36 Keylock J2 J5 USB 3 4 USB 7 8 USB5 6 Pin 1 Pin 1 J38 4 pinPWR J3 J4 24 pin ATX PWR Conn Conn S UPER P4SCE GLAN 2 PCI 4 DIMM 1A CHS FAN1 SATA2 S...

Page 14: ...Fan 3 4 Not monitored by BIOS CPU OH FAN CPU Overhead Fan Headers DIMM0A 0B 1A 1B Memory DIMM Slots 1 through 4 GLAN1 GLAN2 Gigabit LAN Ethernet Ports GLAN2 P4SCE J2 J5 IDE Ports J2 IDE1 J5 IDE2 J3 J...

Page 15: ...resent the features on your motherboard See the follow ing pages for the actual specifications of each motherboard Processor MCH ICH5 F W H LPC I O PCI Bus LPC BUS DDR SDRAM BUS Hub A SATA PRI SEC IDE...

Page 16: ...LAN1 2 VGA FDD KB MS SER1 2 PRINTER H W MONITOR UDMA 100 SATA USB Figure 1 6 P4SCE System Block Diagram with the 875 Canterwood Chipset Note This is a general block diagram and may not exactly represe...

Page 17: ...n DIMM0A DIMM1A and or DIMM0B DIMM1B See Section 2 4 for more details Intel Performance Acceleration Technology Chipset Latest Intel chipset technology Intel 875 Canterwood Expansion Slots P4SCA Four...

Page 18: ...igabit Ethernet Controller 33 MHz 1 EPP Enhanced Parallel Port and ECP Extended Capabilities Port supported parallel port PS 2 mouse and PS 2 keyboard ports Up to 8 USB Universal Serial Bus 2 0 ports...

Page 19: ...333 Memory Interface 533 MHz FSB 333 266 Memory Interface and 400 MHz FSB 266 MHz Memory Interface System Memory Interface The 875 Canterwood Memory Controller MCH supports two 64 bit wide DDR data ch...

Page 20: ...r management functions Environmental Temperature Control The P4SCA P4SCE has a CPU thermal trip feature A thermal control sen sor monitors the CPU temperature in real time and will send a signal to sh...

Page 21: ...ll start blinking to indicate that the CPU is in suspend mode When the user presses any key the CPU will wake up and the LED will automatically stop blinking and remain on BIOS Support for USB Keyboar...

Page 22: ...Wake On LAN is defined as the ability of a management application to re motely power up a computer that is powered off Remote PC setup up dates and asset tracking can occur after hours and on weekend...

Page 23: ...nstall a power surge protector to help avoid problems caused by power surges It also provides two high speed 16550 compatible serial communication ports UARTs one of which supports serial infrared com...

Page 24: ...te pre compensation circuitry decode logic data rate selec tion a clock generator drive interface control logic and interrupt and DMA logic The wide range of functions integrated onto the Super I O gr...

Page 25: ...hen handling chips or modules avoid touching their pins Put the motherboard and peripherals back into their antistatic bags when not in use For grounding purposes make sure your computer chassis provi...

Page 26: ...Bracket 1 2 Insert the white pegs into the black an chors Do not force the white pegs all the way in about 1 3 of the white pegs should be inside the black anchors These are for chassis that do not h...

Page 27: ...u hear it click into the locked position Socket lever in locked position 8 Apply the proper amount of thermal compound to the CPU die 9 Place the heatsink on top of the CPU and press firmly down ward...

Page 28: ...il it snaps into place 2 3 Mounting the Motherboard in the Chassis All motherboards have standard mounting holes to fit different types of chassis Make sure the location of all the mounting holes for...

Page 29: ...ual channel ECC non ECC unbuffered DDR 400 333 266 DDR SDRAM Populate DIMM0A DIMM1A and or DIMM0B DIMM1B with memory modules of the same size same type will result in the dual channel two way interlea...

Page 30: ...ard Purple Parallel Port Burgundy VGA Port USB 0 1 Ports GLAN1 GLAN2 LAN Port COM1 Port Turquoise Front Control Panel JF1 contains header pins for various front control panel connectors See Figure 2 4...

Page 31: ...round 12 V 12V 4 pin Connector J21 Required Connection IR Connector The infrared connector is located on J16 See the table on the right for pin definitions See the Tech nical Support section of our we...

Page 32: ...ition Pins 1 4 Pins 3 4 External Speaker Internal Speaker Reset Connector The reset connector is located on pins 3 and 4 of JF1 This connec tor attaches to the reset switch on the computer chassis See...

Page 33: ...Chassis Fan 4 are not monitored by BIOS Con nect the fan on your CPU heatsink to the CPU Fan header See the table on the right for pin defini tions Fan Header Pin Definitions CPU Chassis and Overheat...

Page 34: ...aders are located on the moth erboard These ports labeled USB3 to USB8 can be used to pro vide front side chassis access cables not included See the tables on the right below for pin definitions Pin D...

Page 35: ...er will display all SATA activities See the table on the right for pin definitions Pin Number 1 2 Definition Ground Wake up Wake On Ring Pin Definitions WOR SATA LED Pin Definitions J37 Pin Number 1 2...

Page 36: ...aring CMOS 2 7 Jumper Settings Explanation of Jumpers To modify the operation of the motherboard jumpers can be used to choose between optional set tings Jumpers create shorts be tween two pins to cha...

Page 37: ...tem Pins 1 2 will have WD reset the system if a pro gram freezes Pins 2 3 will gener ate a non maskable interrupt for the program that has frozen See the table on the right for jumper settings Watch D...

Page 38: ...3 Definition Enabled Disabled LAN Enable Disable Jumper Settings J34 J35 Keyboard Wake Up The JPWAKE jumper is used to al low the system to be woken up by depressing a key on the keyboard from S1 or S...

Page 39: ...to support two drives This special cable should be used to take advantage of the speed this new technology offers The blue connector connects to the onboard IDE connector inter face and the other conn...

Page 40: ...a 9 8 Host Data 10 10 Host Data 11 12 Host Data 12 14 Host Data 13 16 Host Data 14 18 Host Data 15 20 Key 22 GND 24 GND 26 GND 28 BALE 30 GND 32 IOCS16 34 GND 36 Addr 2 38 Chip Select 1 40 GND IDE Con...

Page 41: ...t all ribbon wire cables from the motherboard including those for the keyboard and mouse 5 Remove all add on cards 6 Install a CPU and heatsink making sure it is fully seated and connect the chassis s...

Page 42: ...se the CMOS setup information Refer to Section 1 6 for details on recommended power supplies 2 The battery on your motherboard may be old Check to verify that it still supplies 3VDC If it does not rep...

Page 43: ...pport Answer The P4SCA P4SCE supports up to 4 GB of ECC non ECC unbuf fered DDR 400 333 266 two way interleaved SDRAM See Section 2 4 for details on installing memory Question How do I update my BIOS...

Page 44: ...CD and install the applications you need Applications on the CD include chipset drivers for Windows and security and audio drivers Question I see some of my PCI devices sharing IRQs but the sys tem se...

Page 45: ...header and the other connector s to your hard drive s Consult the docu mentation that came with your disk drive for details on actual jumper loca tions and settings 3 4 Returning Merchandise for Servi...

Page 46: ...3 6 SUPER P4SCA P4SCE User s Manual NOTES...

Page 47: ...computer is turned off a back up battery provides power to the BIOS Flash chip enabling it to retain the system parameters Each time the computer is pow ered on the computer is then configured with th...

Page 48: ...gram can be activated in one of two ways 1 By pressing Del immediately after turning the system on or 2 When the following message appears briefly at the bottom of the screen during the POST Power On...

Page 49: ...2 88MB 3 5 in Legacy Diskette B This setting allows the user to set the type of floppy disk drive installed as diskette B The options are None 360Kb 5 25 in 1 2MB 5 25 in 720Kb 3 5 in 1 44 1 25MB 3 5...

Page 50: ...to automatically detect the status of the IDE HDD installed in the system such as the size the number of cylinders the configurations of items such as Head Precomp Landing Zone and Sector The options...

Page 51: ...up Choose Advanced BIOS Setup from the Award BIOS main menu with the Left Right arrow keys You should see the following display Select one of the items in the left frame of the screen to go to the sub...

Page 52: ...ed the option allows the user to determine the ACPI Suspend type The options are S1 POS S3 STR S1 S3 APIC Mode This setting allows you to Enable or Disable APIC APIC is used to assign interrupt signal...

Page 53: ...ed Mode to combine the functionality of Parallel ATA PATA and Serial ATA SATA with the maximum of two IDE drives available for each channel If Enhanced Mode is selected both SATA and PATA are supporte...

Page 54: ...gacy Support This setting allows you to enable or disable the functions of USB Keyboard Mouse under POST and DOS The options are Disabled and Enabled CPU THRM Throttling THRM throttling is used to low...

Page 55: ...and Normal RxD TxD Active This allows the user to change the settings for the RxD TxD Active function The options are Hi Hi Hi Lo Lo Hi and Lo Lo IR Transmission Delay If Enabled the transmission of I...

Page 56: ...ng allows you to select the setting for the Watch Dog Timer The Options are Disabled 10 Sec 20 Sec 30 Sec 40 Sec I min 2 min and Enabled Power On Function This setting allows the user to decide which...

Page 57: ...Auto ESCD and Manual Enter Yes if are you are using an OS that is PnP Plug and Play compatible Enter No if your OS does not support PnP Reset Configuration Data Enabling this setting resets the exten...

Page 58: ...is allows you to set the CPU warning temperature If the CPU temperature reaches this threshold an alarm will activate and a warning message will be displayed onscreen The options are Disabled 600 C 14...

Page 59: ...on Key in a number between 8x to 50x to set the clock ratio of the processor The default setting is 8x 8x is only available for retail CPUs 4 4 6 Processor Clock Options Spread Spectrum Spread Spectru...

Page 60: ...hen prompted type the User Password in the dialogue box to set or to change the User Password Password Check 4 5 Security Choose Security from the Award BIOS main menu with the Left Right arrow keys Y...

Page 61: ...PCI Card First Boot Device This item allows the user to set the first boot up device The options are Floppy LS120 HDD CDROM ZIP100 USB FDD USB ZIP USB CDROM USB HDD LAN and Disabled Second Boot Devic...

Page 62: ...e BIOS to load the OS from another device rather than the ones that have been specified as the first second and third boot up devices The settings are Enabled and Disabled Save Exit Setup When the ite...

Page 63: ...imized Defaults Highlight this item and hit Enter to load the optimized settings for all items in the BIOS Setup These settings provide you with optimal system performance Discard Changes When the ite...

Page 64: ...SUPER P4SCA 4SCE User s Manual 4 18 Notes...

Page 65: ...he Power On Self Test POST the BIOS will check for problems If a problem is found the BIOS will activate an alarm or display a message The following is a list of such BIOS messages 1 long beep Memory...

Page 66: ...A 2 SUPER P4SCA P4SCE User s Manual Notes...

Page 67: ...ck to E000 F000 shadow RAM 0h1 Expand the Xgroup codes locating in physical address 1000 0 02h Reserved 03h Initial Superio_Early_Init switch 04h Reserved 05h 1 Blank out screen 2 Clear CMOS error fla...

Page 68: ...Initial EARLY_PM_INIT switch 1Eh Reserved 1Fh Load keyboard matrix notebook platform 20h Reserved 21h HPM initialization notebook platform 22h Reserved 23h 1 Check validity of RTC value e g a value of...

Page 69: ...ed 46h Reserved 47h Initialize EISA slot 48h Reserved 49h 1 Calculate total memory by testing the last double word of each 64K page 2 Program writes allocation for AMD K5 CPU 4Ah Reserved 4Bh Reserved...

Page 70: ...t registers according to items described in Setup Auto configuration table 6Ch Reserved 6Dh 1 Assign resources to all ISA PnP devices 2 Auto assign ports to onboard COM ports if the corresponding item...

Page 71: ...s 6 Assign IRQs to PCI devices 7 Initialize APM 8 Clear noise of IRQs 86h Reserved 87h Reserved 88h Reserved 89h Reserved 90h Reserved 91h Reserved 92h Reserved 93h Read HDD boot sector information fo...

Page 72: ...SUPER P4SCA P4SCE User s Manual B 6 APPENDIX A NOTES...

Page 73: ...ng System Serial ATA SATA Serial ATA SATA is a physical storage interface It uses a single cable with a minimum of four wires to create a point to point connection between devices It is a serial link...

Page 74: ...the use of HDD Up to 4 ATA devices are support by this mode Within Legacy Mode the following three modes are supported Non Combined Mode Parallel ATA only with the maximum of 4 devices supported Non...

Page 75: ...elect OK to confirm the selection Press the Enter key to load the default settings for the BIOS 3 Use the arrow keys to select the Advanced in the BIOS 4 Scroll down to the item Advanced Chipset Contr...

Page 76: ...y The following screen will appear 1 Creating Deleting and Reseting RAID Volumes a After the system exits from the BIOS Setup Utility the system will auto matically reboot The following screen appears...

Page 77: ...the previous menu c Use the Tab Upper Arrow Down Arrow and Enter keys to enter the appropriate values for the items selected and go to the next field d When asked Are you sure you want to create this...

Page 78: ...You will return to the main menu with DISK VOLUME INFORMATION updated as shown in the following screen f Once the above screen appears use the Down Arrow key to select item 4 Exit and press the Enter...

Page 79: ...e main menu Deleting RAID Volume a When you are in the main menu use the Down Arrow and the Upper Arrow keys to select item 2 Delete RAID Volume in the main menu b When the item 2 is highlighted press...

Page 80: ...to return to the main menu Note the Esc key is used to select the previous menu Reset Disks to Non RAID a When you are in the main menu use the Down Arrow and the Upper Arrow keys to select item 3 Res...

Page 81: ...2000 Setup CD in the CD Driver and the system will start booting up from CD b Press the F6 key when the message Press F6 if you need to install a third party SCSI or RAID driver displays c When the Wi...

Page 82: ...install everything here except for the SUPER Doctor utility and the LAN SCSI driver diskettes which are optional The bottom icon with a CD on it allows you to view the entire contents of the CD Insta...

Page 83: ...Appendix C Software Installation C 11 b When the above screen appears click on the icon marked Next on the screen and the following screen will appear...

Page 84: ...own in the following screen and click on the icon marked Next d Specify the folder that you want the program to be installed in and then click on the icon marked Next to begin the installation process...

Page 85: ...dition Installation g Once the Application Accelerator RAID Edition installation is completed the following screen will appear and the system will start to re boot Note Once the XP 2000 Operating Syst...

Page 86: ...Software Please follow the instructions listed below to workaround this issue 1 Click Start and select Programs from the Pop Up menu 2 Click Intel R Application Accelerator RAID Edition and select Int...

Page 87: ...Appendix C Software Installation C 15 4 Select the Compatibility Tab from the Intel Application Accelerator Properties Menu as shown below...

Page 88: ...C 16 SUPER P4SCA P4SCE User s Manual 5 Select the checkbox beside the item Run this program in compatibility mode for as shown below...

Page 89: ...Appendix C Software Installation C 17 6 Select the correct OS type for your system from the Pull Down menu 7 Click Apply and OK to complete your selection as shown below...

Page 90: ...Accelerator RAID Edition 1 Once a hard drive disk has failed a pop up message will appear to alert you that the RAID Volume has been degraded and the following screen will appear C 4 Rebuilding SATA R...

Page 91: ...tallation C 19 3 Unplug the bad HDD and replace it with a new one 4 After you have replaced the bad HDD with a good one go to Disk Management of your system The following screen will appear 5 Then cli...

Page 92: ...g screen 7 Once the above screen appears right click on the new disk and It will bring up a manual for the new disk Select the item Write Signature to the new disk and the following screen will appear...

Page 93: ...a new disk available 10 Right click on the new disk and select Rebuild to disk and the following screen will appear 11 Once you ve made your selection you can go up to the setting of RAID Volume to s...

Page 94: ...to Page C 14 Driver Tool Installation Display Screen Note Click the icons showing a hand writing on paper to view the readme files for each item Click the computer icons to the right of these items t...

Page 95: ...ent is called SD III Client The Supero Doctor III program included on the CDROM that came with your motherboard allows you to monitor the environment and operations of your system Supero Doctor III di...

Page 96: ...d from our Website at ftp ftp supermicro com utility Supero_Doctor_III You can also download SDIII User s Guide at http www supermicro com PRODUCT Manuals SDIII UserGuide pdf For Linux we will still r...

Reviews: