


5-2
S
UPER
S
ERVER 8014T-T User's Manual
IMPORTANT!
Always connect the power cord last and remove it fi rst before add-
ing, removing or changing any hardware components. Make sure that you install
the each processor into its CPU socket
before
you install the heatsink and fan. The
X6QTE+ can support either two or four Xeon 7100 type processors. If installing
two processors only, install them into CPU sockets #1 and #2.
Notes:
1. Intel's boxed Xeon CPU package contains a CPU fan and heatsink assembly. If
you buy a CPU separately, make sure that you use only Intel-certifi ed multi-direc-
tional heatsinks and fans.
2. When purchasing a Xeon 7100 CPU or when receiving a serverboard with a CPU
pre-installed, make sure that the CPU plastic cap is in place and none of the CPU
pins are bent; otherwise, contact the retailer immediately.
!
5-2 Processor and Heatsink Installation
When handling the processor, avoid placing direct pressure on the label
area of the fan. Also, do not place the serverboard on a conductive
surface, which can damage the BIOS battery and prevent the system
from booting up.
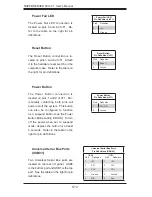
Installing the Processor
1. A black PnP cap is attached to the
load plate to protect the CPU socket.
Press the load lever down and away
from the retention clasp to release the
load plate from its locked position.
Load lever
2. Gently lift the load lever to open the
load plate.
PnP cap
Load plate released
Summary of Contents for 8014T-T
Page 1: ... SUPERSERVER 8014T T SUPER USER S MANUAL 1 0 ...
Page 5: ...v Preface Notes ...
Page 10: ...Notes x SUPERSERVER 8014T T User s Manual ...
Page 24: ...2 8 SUPERSERVER 8014T T User s Manual Figure 2 4 Accessing the Inside of the System ...
Page 26: ...2 10 SUPERSERVER 8014T T User s Manual Notes ...
Page 30: ...3 4 SUPERSERVER 8014T T User s Manual Notes ...
Page 58: ...5 24 SUPERSERVER 8014T T User s Manual Notes ...
Page 68: ...6 10 SUPERSERVER 8014T T User s Manual Figure 6 6 Removing Replacing the Power Supply ...
Page 90: ...A 2 SUPERSERVER 8014T T User s Manual Notes ...
Page 98: ...B 8 SUPERSERVER 8014T T User s Manual Notes ...
Page 120: ...C 22 SUPERSERVER 8014T T User s Manual Notes ...
Page 124: ...D 4 SUPERSERVER 8014T T User s Manual Notes ...