SuperMax 19-38 DRUM SANDER Owner'S Manual Download Page 15

15

OPERATING THE 19-38 DRUM SANDER 


Your sander will be able to perform an infinite variety of sanding projects all designed to your specifications. With 

some time and experimentation the proper setting and technique for each job will become apparent. 

DRUM DEPTH OF CUT 


Determining the depth of cut is the most important operating procedure decision. It may take some experimen

-

tation to determine the proper depth of cut. The crucial variables to keep in mind are abrasive grit, type of wood, 

project type, and conveyor feed rate. We recommend practicing on a scrap of wood prior to sanding a project. 

• 

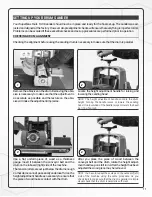
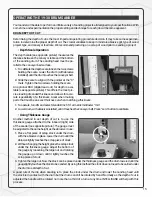
Depth Scale Operation 


The depth scale (see opposite picture) measures the 

distance between the conveyor table and the bottom 

of the sanding drum. The sanding head must be pa-

rallel to the conveyor bed surface. 

1. 

To calibrate the depth scale, loosen the two screws 

holding the scale. Lower the drum (with abrasive 

installed) until the drum touches the conveyor belt. 

2. 

Slide the scale to align with the pointer at the “0” 

mark. Tighten the two screws holding the scale. 

An optional DRO (digital read out) for depth is avai-

lable (see opposite picture). This offers the most pre-

cise reading of sanded thickness and allows for accu-

rate repeatability of a thickness. Great when making 

parts that must be an exact thickness or when matching a thickness. 

1. 

To operate, turn ON and select standard inch “in” or metric millimeter “mm”. 

2. 

Lower drum, with abrasive installed, until it touches the conveyor belt. Press “zero” button to calibrate.

• 

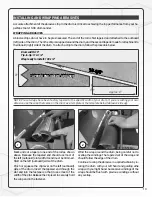
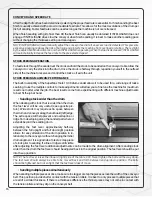
Using Thickness Gauge   

Another method to set depth of cut is to use the 

thickness gauge attached to the inboard (right) side 

of the sander (see opposite picture). The gauge must 

be adjusted to the same height as the abrasive in use. 

1. 

Place a flat piece of scrap stock under the drum 

with the abrasive in place. Lower the durm until the 

abrasive lightly touches the scrap piece of stock. 

2. 

Without changing the height, place the scrap stock 

under the thickness gauge. Adjust the bottom of 

the gauge by loosening the large nut and rotating 

the gauge up or down until it lightly touches the 

scrap piece of stock. 

3. 

Tighten the large nut. Now the stock can be placed under the thickness gauge and the drum lowered until the 

gauge lightly touches the stock to be sanded. By using this method the stock does not need to be carried under 

the drum to set depth of cut.

A good rule of thumb when sanding is to place the stock under the drum and lower the sanding head until 

the stock is in contact with the drum but the drum can still be rotated by hand. Normally as the depth of cut is 

adjusted the handle will be rotated no more than a third of a turn at any time. INTELLISAND will help with this 

process. 

Summary of Contents for 19-38 DRUM SANDER

Page 1: ...OWNER S MANUAL C US SuperMaxTools com sales SuperMaxTools com P 888 454 3401 F 651 454 3465 03 2017 SuperMax Tools 269049 19 38 DRUM SANDER...

Page 2: ...ts comparable to industrial size sanders at a fraction of the cost For future reference find the model stock and serial numbers on the back of machine base and write them in below Model Stock Number S...

Page 3: ...Wrap Position 14 Abrasive Wrap Tension Adjustment 14 Maximizing Abrasive Longevity 14 operating your Drum Sander 15 Drum Depth of Cut 15 Conveyor and Speed Rate 16 Stock Feeding Operation 16 Stock Fe...

Page 4: ...REACH Keep proper footing and balance at all times 14 MAINTAIN TOOLS WITH CARE Keep tools sharp and clean for best and safest performance Fol low instructions for lubricating and changing ac cessories...

Page 5: ...stood or if in doubt as to whether the tool is properly grounded Use only 3 wire extension cords that have 3 prong grounding plugs and 3 pole receptacles that ac cept the tool s plug Repair or replace...

Page 6: ...arranty We will provide all replacement parts which are found to be defective in materials or work manship Manufacturers warranties on conveyor belts Register the warranty for your new machine by fill...

Page 7: ...UNPACKING YOUR SUPERMAX TOOLS DRUM SANDER Your 19 38 drum sander has been shipped mostly assembled from the factory If any damage has occurred as a result of shipment notify the transportation company...

Page 8: ...NOTE There will be a small container of hardware included with your sander This container will include everything you need to set up your sander see above Remove the two wooden packing plates from bot...

Page 9: ...the outboard left side of the conveyor belt NOTE Leave the silver plate which is near the fast lever and under the motor in place when removing bolts Open box 2 and remove conveyor from packaging and...

Page 10: ...stall into flange of conveyor bed on inboard right motor side Keep supportplateinplaceoninboard right sideandmake sure the fast lever is positioned up Plug the short power cord that is attached to the...

Page 11: ...belt and the drum on the inboard right side of the machine The tension rollers are set just below the drum enough so that items cannot pass easily underneath Use the height adjustment handle as necess...

Page 12: ...e it is the least restrictive for airflow If straight pipe is not possible Y s and elbows are preferred because they are less restrictive to airflow than T s NOTE Some applications will require more d...

Page 13: ...ver on the left outboard side of the drum Insert the tapered end through the slot and into the fastener so that it uses most of the width of the slot Release the clip lever to securely hold the wrap e...

Page 14: ...as needed see opposite picture If enough space is not left between the wrap and the inside of the slot the take up fastener will not operate properly ABRASIVE WRAP TENSION ADJUSTMENT The abrasive wrap...

Page 15: ...ess Great when making parts that must be an exact thickness or when matching a thickness 1 To operate turn ON and select standard inch in or metric millimeter mm 2 Lower drum with abrasive installed u...

Page 16: ...atter what the job The best results come from experimenting with different machine adjustments to best fit the job at hand Sanding stock wider than the drum When dealing with stock that is wider than...

Page 17: ...an provide for more effective sanding Final pass sanding should be done following the grain pattern TENSION ROLLER PRESSURE The tension roller pressure is factory set and should be adequate However th...

Page 18: ...out affecting belt tension Note Adjust the take up screw nuts only 1 4 turn at a time Then allow time for the belt to react to the adjustments before proceeding further Avoid over adjustments MAINTENA...

Page 19: ...eavy duty roll swivel lock used with open stand 71938 7 Infeed outfeed tables 71938 DRO DRO digital read out depth scale CONVEYOR BELTS 60 0322 Type 1 100 grit abrasive surface with reinforced backing...

Page 20: ...if so equipped Fig 5 Circuit fuse blown or circuit breaker tripped Replace fuse or retrip breaker after determining cause BRUSH MOTOR OVERLOADS Inadequate circuit Check electrical requirements Machin...

Page 21: ...LY Improper adjustment of height control Readjust height control KNOCKING SOUND WHILE RUNNING Bearing worn Replace bearing Contact distributor SNIPING OF WOOD GOU GING NEAR END OF BOARD Inadequate sup...

Page 22: ...TO GEAR MOTOR GROUND STUD CONVEYOR 22 19 38 WIRING DIAGRAM...

Page 23: ...SCALE POINTER 1 20 480BS 120 KNOB 1 21 480BS 121 HEIGHTADJUSTMENTHANDLE 1 22 480BS 122 NYLON INSERTLOCK NUT 5 8 11 1 23 480BS 123 HEIGHTADJUSTMENTSCREW 1 24 480BS 124 E RING E12 1 25 480BS 125 THRUST...

Page 24: ...BS 166 ROUND SOCKETHEAD CAP SCREW 5 16 18X1 2 4 67 480BS 167 LOCK WASHER 5 16 5 68 480BS 168 SPRING 3 69 480BS 169 NYLON INSERTLOCK NUT 1 4 20 1 70 480DS 170 SOCKETHEAD CAP SCREW M8X1 25X40 1 71 480DS...

Page 25: ...25 19 38 HEAD ASSEMBLY...

Page 26: ...80BS 113 SETSCREW 1 4 20X1 4 2 22 480BS 222 BRACKET BASE CONTROLLER 1 23 480BS 223 COVER BASE CONTROL HOUSING 1 24 480BS 224 HEX CAP SCREW 1 4 20X3 4 12 25 480BS 225 WASHER WAVE 1 4 4 26 480BS 145 FLA...

Page 27: ...19 38 CONVEYOR AND MOTOR 27...

Page 28: ...P 1 888 454 3401 F 1 651 454 3465 SuperMaxTools com sales SuperMaxTools com...

Reviews: