


Superabrasive User Manual Original Language Lavina®13G-E
2/2019
12
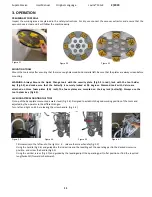
ADJUSTING HANDLE
Unscrew the handle (Fig. 3.8) till it reaches the ager (Fig. 3.9). Pull up
the ager (Fig. 3.9) and turn the handle to the desired position.
TOOL PROTECTING GUARD
The protecting guard has free movement and is self-adjusting according to the height of the tool abrasion and is turning in the
range of 45
°
clockwise or anti clockwise following the wall (Fig 3.11).
The height of the brush is adjusted only when using the Foam
plate (Fig.4.3).
The adjustment is made by unscrewing the bolts on the side of the guard (Fig 3.12) and pulling out the brush to
the desired position.
The plastic rolls on the protecting guard serve to protect the wall from damages (Figure 3.11). By moving the roll in the hole
(Figure 3.13) can be adjusted the distance of the working tool to the wall.
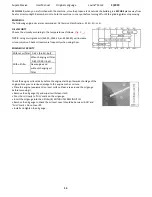
THE CONTROL BOARD
1 Throttle control lever Controls engine
2 Digital RPM/workings hours indicator When the motor runs it indicates the
revolutions per minute of the motor, see the conversion table to know the rpm of the
tools. When the motor does not run, it indicates the worked hours.
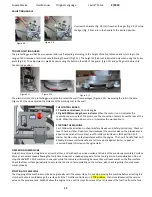
STARTING THE MACHINE
First, follow the directions in chapter Safety Devices and Safety Instructions. Check oil
level. Check air filter. Open (counterclockwise) the service valve on the propane tank
about one and a half turns. Next, put Throttle control lever in IDLE position. Pull
starter handle until you feel resistance within the engine.
Then pull handle fast and
steady.
Release starter handle and let it snap back against starter, repeat as
required. Repeat this step until engine starts.
OPERATING THE MACHINE
Guide the machine in straight lines across the floor, and with each new line overlap a little bit of the previously completed surface.
Work at a constant speed allowing the tools time to work at a speed appropriate for the tools’ grit size. Avoid vibrations. Do not
stop the LAVINA® 13G-E machine in one spot while the tools are still working because they will leave marks on the floor surface.
Check the floor surface periodically to ensure that dust is not accumulating on the surface, also check regularly if your vacuum
works properly.
STOPPING THE MACHINE
The stopping of the machine must be done gradually until the motor stops. Do not stop moving the machine before arresting the
clutch as the tools could damage the surface. Pull the Throttle control lever in STOP position, then close (clockwise) the service
valve on the propane tank. ALWAYS allow the engine to run until it stops from lack of fuel. Disconnect the fuel line from the tank.
Figure 3.8
Figure 3.9
Figure 3.11
Figure 3.12
Figure 3.13