background image


32 


INSTALLATION 


Installation of the exhaust pipe 

 
This unit is a PORTABLE AIR CONDITIONER. It can be moved from room to room, so the cooling can follow you 
anywhere. The mounting is easy, beneath a window or wall. Please refer to either of the following steps:  
 

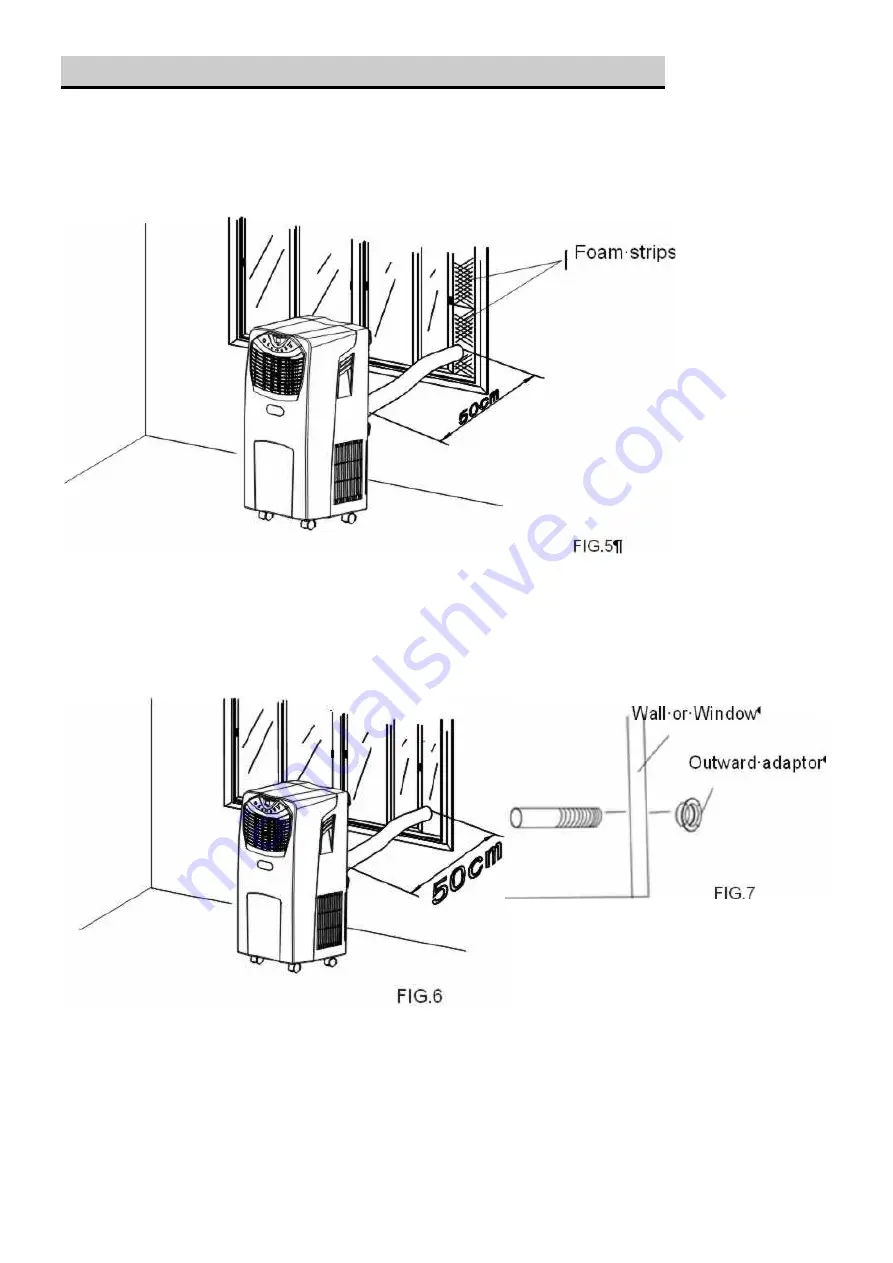
1. Using the foam strips 


Connect the supplied foam strips with the exhaust pipe to let hot air flow to the outside. If necessary cut off the 
extra part to fit the window. 


Feed exhaust hose through the foam strip and insert strip into window gaps as shown and slide window across so 
that foam is held securely. This technique may also be used for sash windows. Note: Take care to maintain 
protection against intruders. 


2. Using the adaptor 


Cut a 130mm diameter hole in the wall or window. 


Feed exhaust hose through the window or wall and attach the threaded adaptor from the outside as shown. 


When not in use, plug the hole with the cover provided. 


Summary of Contents for Klimatronic Dynamic 6.0 plus

Page 1: ...Dynamic Read and retain these instructions for future reference Dynamic 6 0 plus Dynamic 8 0 plus...

Page 2: ...wer supply 230V 50Hz 1phase Recommended room size 10 18m2 14 14m2 Compressor rotary Power supply 230V 50Hz 1phase Refrigerant R 410 A Refrigerant load 340 g 380 g Fan speed 2 Timer 1 8 hours Working t...

Page 3: ...utlet Grilles FIG 2 Do not use the product in a wet room such as bathroom or laundry room FIG 3 Keep an air path of at least 50 cm from walls furniture and curtains FIG 4 Do not sit or place objects o...

Page 4: ...e filter Especially younger elder and disabled people are often not aware of the danger that might occur from the usage of electrical appliances Therefore the product should never be used without supe...

Page 5: ...l window 14 Exhaust hose 15 Foam strip for filling the open window space and with hole for connection to exhaust hose 16 Foam strip for filling the open window space 17 Round cap for filling the hole...

Page 6: ...ir flow to the outside If necessary cut off the extra part to fit the window Feed exhaust hose through the foam strip and insert strip into window gaps as shown and slide window across so that foam is...

Page 7: ...ngth 2 Avoid kinks and bends in the exhaust hose as this will cause expelled moist air to build up causing the unit to overheat and shut down WARNING The length of the exhaust pipe is specially design...

Page 8: ...unit will work in ventilation model below 20oC the unit will work in heating function This is for cooling heating models only 2 Indicators of the functions in progress come on at the same time NOTE Th...

Page 9: ...12 hours the timer indicator will light on When the set time has been reached the machine will turn off automatically The display window will show the hour s you set as you press TIMER button If the t...

Page 10: ...han the set one The ventilation however keeps working on the set level If the ambient temperature rises above the selected level the cooling will return to work Installation of the carbon filter 1 Rem...

Page 11: ...en the container is almost full replace the rubber plug in the drain hole to stop the water and empty the water tray 5 Repeat until the unit is emptied 6 Replace the rubber plug and tighten the drain...

Page 12: ...rinse thoroughly under running water no hotter than 40 C Dry thoroughly before replacing Notice Never operate the unit without the filters End of season storage Unplug the unit Drain the condensed wat...

Page 13: ...any people in the room Is there something in the room producing lots of heat The machine seems to do nothing Is the filter dusty contaminated Is the air intake or output blocked up Is the room tempera...

Reviews: