10
18
2
6
HANDLEBAR ADJUSTMENT:
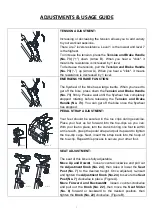
To adjust the height of
Handlebar (No. 6)
, loosen
counter-clockwise
and pull out the
L
Knob (No. 18)
, then slide
the
Handlebar Post (No. 2)
up or down to the desired height
(Figure A). Once adjusted, tighten the
L Knob (No. 18)
to
clockwise
secure the
Handlebar Post (No. 2)
in place.
A
B
9
33
4
102
B S13-14-15
BALANCE ADJUSTMENT:
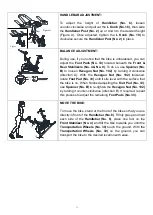
During use, if you notice that the bike is unbalanced, you can
adjust the
Foot Pads (No. 33)
located beneath the
Front &
Rear Stabilizers (No. 4 & No. 9)
.
To do so, use
Spanner (No.
B)
to loosen
Hexagon Nut (No. 102)
by turning it
clockwise
(direction A). With the
Hexagon Nut (No. 102)
loosened,
rotate
Foot Pad (No. 33)
until it sits level with the surface that
the bike is on. When finished adjusting the
Foot Pad (No. 33)
,
use
Spanner (No. B)
to re-tighten the
Hexagon Nut (No. 102)
by turning it
counter-clockwise
(direction B). If required, repeat
this process to adjust the remaining
Foot Pads (No. 33)
.
6
30
18
4
MOVE THE BIKE:
To move the bike, stand at the front of the bike so that you are
directly in front of the
Handlebar (No. 6)
. Firmly grasp and hold
each side of the
Handlebar (No. 6)
, place one foot on the
Front Stabilizer (No. 4)
and tilt the bike towards you until the
Transportation Wheels (No. 30)
touch the ground. With the
Transportation Wheels (No. 30)
on the ground, you can
transport the bike to the desired location with ease.
Figure A
Figure
B
Summary of Contents for SF-B1970
Page 14: ...13 ...


