background image

Fig.1:

 Insert the Screen (B) and Screen (C) into the hole of screen, then the 

Screen (B) and Screen (C) with rotating the sealed strip on the Screen. 

Fig.2: 

Attach and fix the Hook (J) to Big Top Connector (D). 

Fig.3: 

Assemble the Support Pole (E) and Big Top Connector (D).Please note 

that the Support Pole (E) should be inserted into the longer tubes. 


Fig.4: 

Insert Support Pole 1(F) and Support Pole 2 (G) into the Support Pole (E). 

Support Pole 1 (F) should be assembled near to Short Beam (C), Support Pole 2 (G) is 
opposite. 

Fig.5: Connect Support Pole 1 (F) and Support Pole 2 (G) to Screen (A), please note 
the direction when assembling. Support Pole 1 (F) should be connected with Screen 
for long side (C), Support Pole 2 (G) should be connected with Screen for Long Side 
(B). 

Fig.6

Insert Arch Beam 1 (H) and Arch Beam 2 (I) into Big Top Connector (D), please 

note the direction when assembling, Arch Beam 1 (H) should be connected with 
Screen for Short Side (C), Arch Beam 2 (I) should be connected with Screen for Long 
Side (D). 

Fig.7


Insert the lower part of Arch beam 1 (H) and Arch Beam 2 (I) into the 

Screen for Long Side (B) and Screen For Short Side (C), please note that Arch 
beam 1 (H) should be connected with Screen For Short Side (C), Arch Beam 2 
(I) should be connected with Screen For Long Side (B). 

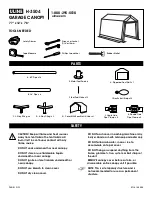
Summary of Contents for L-GZ120PST-2

Page 1: ...Operation Important Please do not return this product to the store For technical assistance on assembly or replacement parts Please call Sunjoy Industries at 1 866 578 6569 from 8 00 am EST to 8 00 pm PST or fax the replacement part form which is in the box to 1 740 283 3549 or Email customer care sunjoygroup com for assistance ...

Page 2: ...nd inclement weather including high winds rain and snow Gazebo fabric is water resistant not water proof and may leak during exposure to precipitation Please lay out all parts before assembling checking to make sure all parts are there If any parts are missing please call 1 866 578 6569 and parts will be expedited to you KEEP ALL FLAME AND HEAT SOURCES AWAY FROM THIS TENT FABRIC This Tent meets th...

Page 3: ...aint that protects them from rusting However due to the nature of steel surface oxidation rusting will occur once these protective coatings are scratched This is a natural process and is not a defect To minimize this condition we recommend care when assembling handling the product to prevent scratching the paint Should any scratching or damage occur it is strongly recommended that consumers buy to...

Page 4: ...N QTY A Screen 4 B Screen for long side 2 C Screen for short side 2 D Big Top Connector 1 E Support Pole 4 F Support Pole 1 4 G Support Pole 2 4 H Arch beam 1 2 I Arch beam 2 2 J Hook 1 K Big canopy 1 L Small canopy 1 M Mosquito netting 1 ...

Page 5: ...Assembly Instructions ...

Page 6: ...Pole 1 F and Support Pole 2 G to Screen A please note the direction when assembling Support Pole 1 F should be connected with Screen for long side C Support Pole 2 G should be connected with Screen for Long Side B Fig 6 Insert Arch Beam 1 H and Arch Beam 2 I into Big Top Connector D please note the direction when assembling Arch Beam 1 H should be connected with Screen for Short Side C Arch Beam 2...

Page 7: ...and tie of Big Canopy together Spread the Big Canopy K completely and fix it into Beam and Screen Made in China 2016 6 Fig 10 Connect the Mosquito Netting to Big Screen A Right Screen B and Left Screen C with the Hook EE please note the long and short side of the Mosquito Netting and Frame when assembling Fig 11 Attach the Gazebo to ground with Stake DD ...

Reviews: