


9
Operation
Intended Use
This machine is intended for breaking up and tilling coarse
soil for the purpose of mixing in fertilizer, peat and compost in
domestic areas. Any use other than that specifically named in
this manual may lead to damage to the tool and represents a
serious injury hazard for the operator.
The operator or user of the tool is responsible for any damage
or injury caused to other persons or property. Adults should
only operate the machine. Children and persons unfamiliar with
the manual must not be allowed to use the tool. Do not use
the tool in rain or damp surroundings. The manufacturer shall
not be held liable for damage arising from improper use or
incorrect operation of the tiller.
Wheel Adjustment
m
WARNING!
Always switch the product off and
disconnect it from the power supply before making any
adjustments.
The wheels can be adjusted to 7 different positions to control
the cultivating depth.
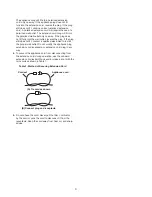
To change from transport position to the tilling position
1. Pull out the cotter pin and slide out the bolt, then remove
the wheel assembly completely, as indicated by the arrow
(Fig. 8).
2. Flip the wheel assembly over, and re-insert the wheel
setting into the bracket hole assembly, this time from the
top of the unit, as indicated by the arrow (Fig. 9).
3. Adjust and align the wheel setting hole to the bracket hole,
then insert the bolt and secure it with the cotter pin
(Fig. 10).
m
WARNING!
Always ensure the wheels are securely
locked. Do not attempt to use the product with the wheels in
unlocked positions.
Connecting to Power Supply
NOTE: Before using this machine, make sure that the power
source you will use complies with the specifications detailed in
this manual.
m
WARNING!
Carelessness, mishandling or error on
the part of the operator may result in bodily injury (e.g.:
amputation, projectile impact), or death. The tiller must be
operated according to the warnings and guidelines in this
manual.
Fig. 8
Cotter pin
Bolt
Wheel
assembly
Fig. 9
Bolt
Wheel
assembly
Wheel
setting
Bracket
hole
Fig. 10
Tilling setting
Summary of Contents for TJ601E
Page 14: ...14 NOTES ...
Page 16: ...snowjoe com ...


