5.
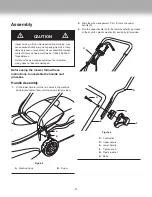
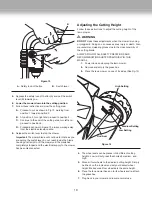
Depress the safety lock-off button (A) and pull the switch
lever (B) towards you.
6.
Lower the mower down into the cutting position.
7.
Follow these instructions to mow the cutting area:
A.
Proceed to cut as shown in Fig 12, working from
position 1 towards position 2.
B.
At position 2, turn right and proceed to position 3.
C.
Continue to the end of the cutting area, turn left and
proceed to position 4.
D.
Proceed as shown in Figure 12, always working away
from the electric extension cable.
8.
Release the switch lever to stop the mower.
Important:
The mower blade will continue to rotate as you
are pulling the switch lever. Do not reach inside the blade
housing or attempt to lift the mower until the blade has
completely stopped and the electrical supply to the mower
has been disconnected.
Adjusting the Cutting Height
Follow these instructions to adjust the cutting height of the
lawn mower.
m
WARNING
DO NOT
make these adjustments when the mower is running
or plugged in. Doing so can cause serious injury or death. Also,
we recommend wearing gloves due to the close proximity of
the cutting blade.
ALWAYS FOLLOW ALL SAFETY PRECATIONS AND
RECOMMENDATIONS LISTED PREVIOUSLY IN THIS
MANUAL.
1.
Power down and unplug the lawn mower.
2.
Remove and empty the grass box.
3.
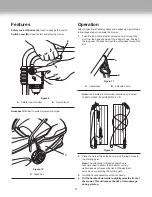
Place the lawn mower on one of its sides. (See Fig.14)
4.
The wheel axels can be places into 3 different cutting
heights: Low (will cut grass the shortest), medium, and
high.
5.
Move all four wheels to the desired cutting height. Simply
pull back on the rod axel and set your desired wheel
height. Make sure all four wheels are the same height.
6.
Place the lawnmower back on to its wheels and re-attach
the grass box.
7.
Plug back in your mower and resume normal use.
Figure 13
A
B
A.
Safety lock-off button
B.
Switch lever
STAR
T
STOP
High Setting
Medium Setting
Low Setting
Rod Axel
Figure 14
10


