3.9) INSTALLAZIONE SONDA
LA SONDA DEVE ESSERE INSERITA DALLA PARTE DELLA
MANDATA DEL PANNELLO, CIOÈ DALLA PARTE DELL’ USCI-
TA DI ACQUA CALDA. IN UN COLLEGAMENTO IN SERIE SU
UNA FILA LA SONDA DEVE ESSERE INSERITA SULL’ ULTI-
MO PANNELLO DALLA PARTE DELLA MADATA. SE VI SONO
PIÙ FILE DI PANNELLI LA SONDA DEVE ESSERE INSERITA
NELL’ ULTIMO PANNELLO DELLA FILA PIÙ VICINA AL TUBO
DI MANDATA DELL’ IMPIANTO.
Per un corretto inserimento della sonda eseguire le seguenti
operazioni:
•
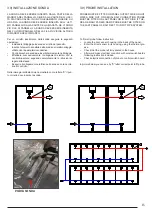
Individuare l’alloggio porta sonda nel retro del pannello.
•
Inserire l’elemento sensibile della sonda nel relativo alloggio,
utilizzando la pasta termoconduttiva.
•
Controllare che la sonda sia inserita fermamente nell’alloggio.
•
Effettuare successivamente i collegamenti elettrici con la
centralilna solare, seguendo accuratamente le istruzioni al-
legate alla stessa.
•
Eseguire il collegamento elettrico della sonda con la centra-
lina di controllo.
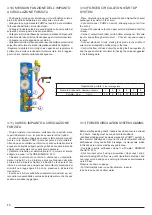
Nelle immagini sottostanti viene mostrato con la lettera “S” il pun-
to corretto dove inserire la sonda.
3.9) PROBE INSTALLATION
PROBE MUST BE FITTED ON PANEL OUTPUT SIDE ON HOT
WATER SIDE OUT. ON SERIAL RAW CONNECTION PROBE
MUST BE FITTED ON LAST PANEL ON IN PUT SIDE. IF THE-
RE ARE MANY PANELS RAWS PROBE MUST BE FITTED ON
THE LAST PANEL OF RAW NEXT TO INPUT PIPE SYSTEM.
To fit well probe follow instruction:
•
Locate the door sensor housing in the back of the panel.
•
Enter the direct sensor in its housing, using the thermal gre-
ase.
•
Check that the probe is firmly seated in the house.
•
Afterward make electrical connction with solar switchboards
following instruction included.
•
Check electrical connection of probe to control switch board.
In picture below you can see by “S” letter correct point to fit probe.
PORTA SONDA
15


