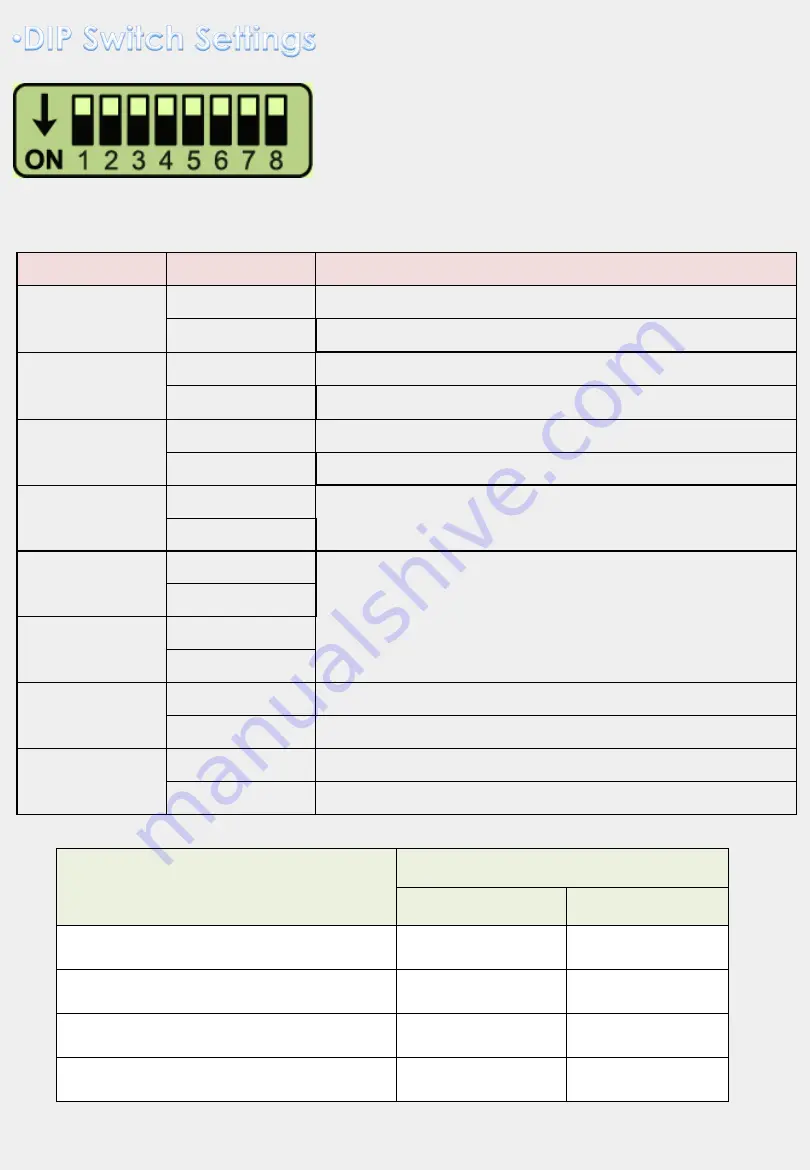
background image

ON: DOWN / OFF: UP 

* Please make sure to disconnect the power cable
of interface and reconnect to apply dip switch 
setting whenever changing DIP switch. 

8POL DIP SWITCH SETTING

DIP S/W 

STATUS 

DESCRIPTION 

DIP1 

OFF 

LVDS Navigation Mode 

ON 

LVDS Navigation Mode Skip 

DIP2 

OFF 

Ext. Front Camera Mode 

ON 

Ext. Front Camera Mode Skip 

DIP3 

OFF 

NTG5.0 CAN Speed 

ON 

NTG5.1 CAN Speed 

DIP4 

OFF 

No Use 

ON 

DIP5 

OFF 

Please refer below chart


ON 

DIP6 

OFF 

ON 

DIP7 

OFF 

OEM Rear Camera Mode 

ON 

Ext. Rear Camera Mode 

DIP8 

OFF 

CAN Data In/Out Mode for Jog Dial 

ON 

CAN Data Bypass Mode for Jog Dial 

MONITOR TYPE 

DIP S/W SETTING 

DIP #5 

DIP #6 

7”/8” 

800*480 

ON 

OFF 

8.4” 

965*540 

OFF 

OFF 

12.3” 

1440*540 

OFF 

ON 

12.3” 

1440*540 DUAL 

ON 

ON 

Summary of Contents for NTG5.0

Page 1: ...Installation Manual Multimedia Interface for Mercedes Benz NTG5 0 NTG5 1 ...

Page 2: ...put Output specification Input LVDS 1 CVBS Front Camera 1 CVBS Rear Camera 1 Output To LCD 1 Power Spec Input Power 8VDC 18VDC Consumption 5WATT Switch input mode 1 External video sources skip function Able to control input videos on and off via Dip switches 2 Able to switch videos via the remote button switch and original OEM button 3 Able to detect the rear view camera by CAN or rear lamp cable ...

Page 3: ...WER0240 UART T S Out Cable HTOUCH0015 Button Cable HARETC0001 Remote Controller REMOTE0001 IR Cable HIRCAB0002 Sub Board QCPASS1403 T S Out Cable HTOUCH0009 Res T S Cable HTOUCH0029 Cap T S Cable HTOUCH0036 LCD Out Cable HLCDCA0017 QLI J BY J Cable HPOWER0248 3 ...

Page 4: ...on Mode Skip DIP2 OFF Ext Front Camera Mode ON Ext Front Camera Mode Skip DIP3 OFF NTG5 0 CAN Speed ON NTG5 1 CAN Speed DIP4 OFF No Use ON DIP5 OFF Please refer below chart ON DIP6 OFF ON DIP7 OFF OEM Rear Camera Mode ON Ext Rear Camera Mode DIP8 OFF CAN Data In Out Mode for Jog Dial ON CAN Data Bypass Mode for Jog Dial MONITOR TYPE DIP S W SETTING DIP 5 DIP 6 7 8 800 480 ON OFF 8 4 965 540 OFF OF...

Page 5: ...ng a selection changing image display Moving upward Moving downward Moving leftward If you press this button 2 seconds long you can access the factory mode Moving rightward If you press this button 2 seconds long you can reset all the data about user environment ...

Page 6: ...N Use Flexible Parking Lines PAS OFF Use fixed parking line PAS SETUP You can move the position of parking line REAR TYPE Choose rear camera recognition CAN Detecting the rear view camera by CAN signal Installer must connect CAN cable of the power cable to the CAN cable of the car LAMP Detecting the rear view camera via Grey Rear wire Installer must connect Rear C cable of the power cable to the r...

Page 7: ...the usage of handle button FACTORY RESET Factory mode reset YES NO INFO System version information IMAGE PARK UTIL1 UTIL2 INFO LVDS MODEL CAR MODEL Menu of FACTORY MENU to Return SEL to Select Save IMAGE PARK UTIL1 UTIL2 INFO HANDLE BUTTON FACTORY RESET Menu of FACTORY MENU to Return SEL to Select Save IMAGE PARK UTIL1 UTIL2 INFO SYSTEM VERSION MAIN 191107 Menu of FACTORY MENU to Return SEL to Sel...

Page 8: ...8 Press high lighted OEM button for 3 seconds long to mode switch S Class C Class ...

Page 9: ...tor 3 QDIS supplied LVDS cable from sub board LVDS OUT to interface LVDS OUT B Supplied Res Touch in cable EXT touch screen Power CAN in out Rear camera input 1 Front camera input 1 UART Touch Cable Pin assignment RX TX GND Please refer to next page for power CAN connection Supplied Cap touch in cable Supplied touch out cable from sub board Res T S OUT to interface T S IN ...

Page 10: ...les to the supplied CAN IN OUT cables Put the black plastic cover and the supplied CAN IN OUT cables together Insert the supplied CAN cables into the marked place Find the connector behind the command Remove the black connector which is marked in Red 10 ...

Page 11: ... Short press Selection Enter Long press 3sec Si ri Call 2 IDRV WHEEL DOWN Moving left Left 3 IDRV WHEEL UP Moving right Right 4 IDRV LEFT Short press Left Track 5 IDRV RIGHT Short press Right Track 6 IDRV UP Short press Up Long press 3sec Home 7 IDRV DOWN Short press Down Long press 3sec Moving to Android Auto Down Side Menu 8 IDRV BACK Short press ...

Page 12: ...es not work inform to manufacturer Q I cannot watch the rear camera on the screen A Set the DIP switch 7 as state ON Q Set mode not appear A Check DIP Switch Q OEM image is not displayed A Check interface s LCD In Out cable connection If the status keeps on inform to manufacturer Q Screen only displays white color A Check LCD out cable is connected well if this status keeps inform to manufacturer ...

Page 13: ... ⓒ 2019 by SUNE TECHNOLOGY SUNE TECHNOLOGY CO LTD No 9 Lane 606 Anping Rd Tainan City 70849 TAIWAN TEL 88662292246 FAX 88662288104 Http www sune tech com Shop http www carnavi tech com SKYPE sune_tech or hsin_han99 ...

Reviews: