SunBriteTV SB-3214HD Operator'S Manual Download Page 10

Page 10

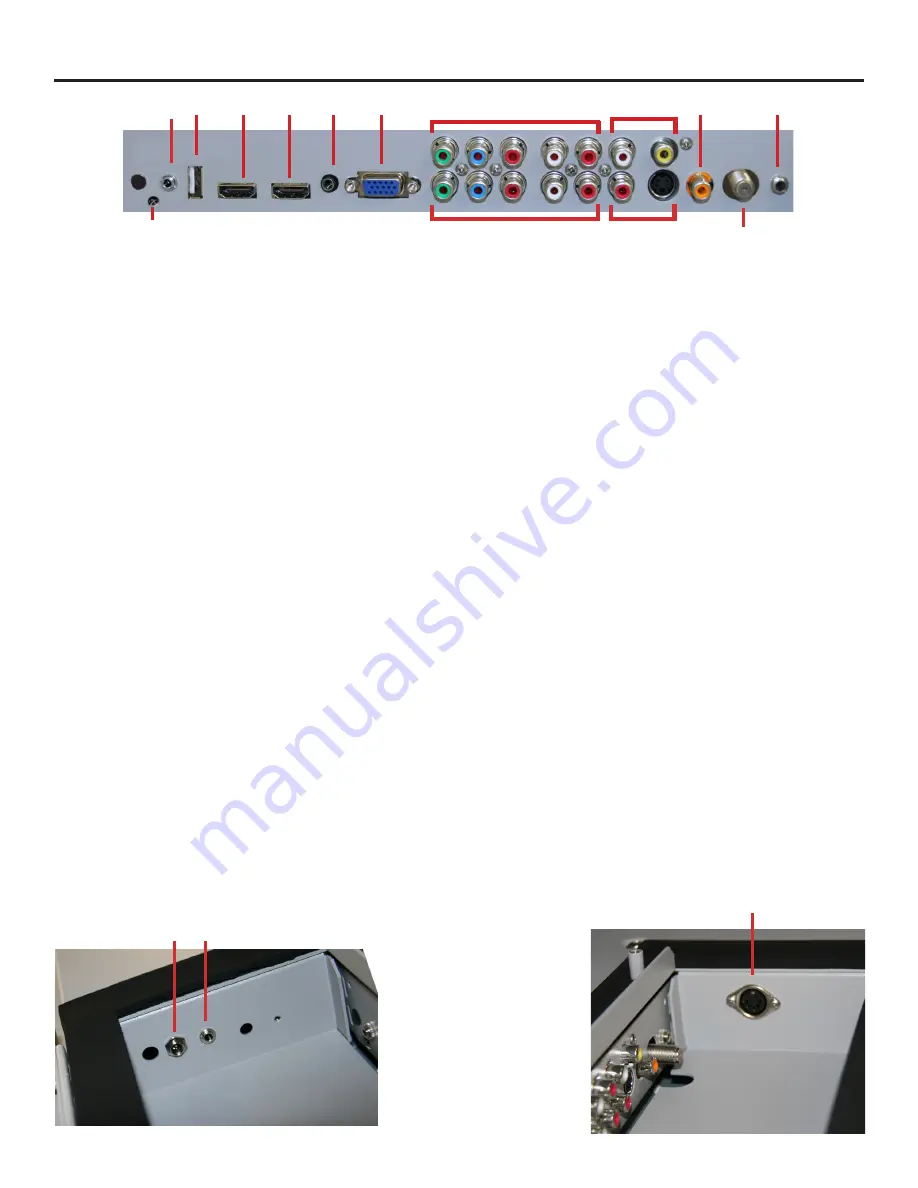
TV Installation – Rear Panel Connections

1.  IR WINDOW

 - For remote control using IR commands.

2.  SERVICE PORT

 - This port is for factory service only...DO NOT USE

3.  USB SERVICE PORT - This port is for factory service only, DO NOT USE

4.  HDMI 1 - 

Connects to devices that use HDMI cables such as Blu-ray or HD DVD player or HD cable / satellite set-top box. This connection 

port receives pure digital audio and high definition signal through one single cable. This port also can accept a HDCP video device for video 

or PC for monitor display usage. Use the SOURCE button to select HDMI1 on your MAIN SOURCE to view this connection. Please note: when 

using HDMI, your sound signal must be PCM for the TV to decode digital audio. When using this source for PC display, you must connect the 

audio cable to VGA Stereo Input for audio.

5.  HDMI 2 - 

Same as HDMI 1

6.  VGA STEREO INPUT - 

This connection port is for people who want to provide audio to the TV when using a PC or a DVI video device. Use a 

3.5mm mini-jack audio cable (headphone jack) to provide audio for a HDCP enabled DVI video device or PCs with VGA or DVI connection.

7.  VGA - 

This connection port connects to a PC for video using VGA cable. Be sure to connect your audio cable to the VGA Stereo input if you 

want sound out of the VGA video source. Use the SOURCE button to select VGA on your MAIN SOURCE to view this connection.

8.  COMPONENT 1 (Lower)

 - This connection ports  are for DVD players or satellite/cable set-top boxes that use component cables. From left 

to right, connect green, blue and red for video, and then connect white for left channel audio, red for right channel audio. Use the Source 

Button to select YPbPr1 to review this connection.

9.  COMPONENT 2 (Upper)

 - his connection ports  are for DVD players or satellite/cable set-top boxes that use component cables. From left 

to right, connect green, blue and red for video, and then connect white for left channel audio, red for right channel audio. Use the Source 

Button to select YPbPr2 to review this connection.

10.  AV 1

 (CVBS or S-Video) - Connects to devices that use composite or s-video cables such as VCR or camcorder or video game consoles. 

Connect the video portion with either the yellow connector or the S-Video connector. Do NOT connect both video connectors. Use the 

SOURCE  button to select AV1 (CVBS) on your MAIN SOURCE if you are using the yellow plug for video, use the SOURCE button to select AV1 

(S-Video on your MAIN SOURCE if you are using the S-Video connector to view this connection.

11.  DIGITAL AUDIO OUT

 - This connection port is used for sending out audio signals to other audio devices such as stereo/surround sound 

receivers. The orange (SPDIF OUT) connector sends out either bit-stream or PCM digital sound signal to a home theater receiver with digital 

input.

12.  ATSC/NTSC/QAM – 

This connection is for digital or analog cable without the cable box or over-the-airwave antennas. The tuner is a hybrid 

tuner that tunes to both analog and digital channels.  This connection uses coaxial RF cable.  For over- the airwave digital stations please 

check http://www.antennaweb.org.

13.  ANALOG AUDIO OUT (Variable) - 

Used to connect headphones, stereo receivers and amplified speakers via a 3.5mm headphone jack.

14.  12 VOLT - 

This connector is to be used with SunBriteTV Radio FM only

15.  RS232 - 

The  RS232 connection allows the TV to be controlled from a remote system using RS232 commands. 

16.  SPEAKER - 

Connection to SunBriteTV speaker module only

1

4


5

3

7

8

9

10

11

12

13

10

2

6

14 15

16

Summary of Contents for SB-3214HD

Page 1: ...Operator s Manual Model SB 3214HD Revision SB 3214HD 11 11 2014 PN M32 005 01...

Page 2: ...uld void the user s authority to operate this equipment NOTE TO CATV SYSTEM INSTALLER This reminder is provided to call the CATV system installer s attention to Article 820 40 of the National Electric...

Page 3: ...provide reasonable protection against harmful interference in a residential installation This equipment generates uses and can radiate radio frequency energy and if not installed and used in accordan...

Page 4: ...not pressure wash SunBriteTV SunBriteTV will resist water exposure from normal rain sprinklers garden hoses etc However it is not designed to withstand pressure washers high pressure water jets or hu...

Page 5: ...Control Guide On Screen Display Controls Adjusting On Screen Displays Picture Menu Sound Menu Setting Menu Channel Menu Trouble Shooting Care of SunBriteTV Specifications Features Information and Inst...

Page 6: ...g items are included in the carton and that they are in good condition If items are damaged or missing contact your dealer immediately SunBriteTV LCD Television Model SB 3214HD Remote Control with Bat...

Page 7: ...Screen About the Direct Sunlight Readable Viewable Screen Model 3214 s high temperature EST Enhanced Solar Tolerance technology prevents isotropic blackout in on the screen when placed in direct sunli...

Page 8: ...Page 8 This page is intentionally left blank...

Page 9: ...the Cable Cover located on the back of the unit Figure1 1 Unscrew the two gray Thumb Screws Figure 1 and pull the cover towards you 2 Route the cables to the proper inputs and place the cable cords o...

Page 10: ...Button to select YPbPr1 to review this connection 9 COMPONENT 2 Upper his connection ports are for DVD players or satellite cable set top boxes that use component cables From left to right connect gr...

Page 11: ...SunBriteTV Model SB 3214HD Operator s Manual Page 11 Connection Descriptions TV Installation Rear Panel Connections Cable Descriptions Blue Green Red Yellow Green White Red Orange...

Page 12: ...Use the On Screen Display to scan for channels Connecting to Digital Cable without Cable Box or Antenna Connecting to Cable or Antenna 1 Make sure the power of the TV is turned off 2 Connect the Coaxi...

Page 13: ...or the source button on the TV to switch to HDMI Please Note Refer to the DVD player s manual to make sure the DVD player is configured to output correctly to the TV 1 Make sure the power ofTV and yo...

Page 14: ...layer is turned off 2 Obtain a Yellow Video Cable Connect the Yellow Video connector to both your DVD player and Composite s Yellow Video connector port off the back of your TV 3 Obtain a RCA Audio Ca...

Page 15: ...ort off the back of your TV 3 Connect the blue color connector to both your set top box and Component 1 s blue connector port off the back of your TV 4 Connect the red color connector to both your set...

Page 16: ...es in your universal remote s hand book 4 This TV will turn off automatically if there s no signal present for more than 15 minutes 1 Make sure the power of the TV and your DVD player is turned off 2...

Page 17: ...ease Note 1 For the best picture set your PC resolution to 1920 x 1080 at 60 Hz Refer to the PC or graphic card manual for further instructions on how to set your resolution and refresh rate 2 Refer t...

Page 18: ...TV features a power saving mode which will automatically turn off the TV if there is no signal provided for more than 15 minutes TV Installation Rear Panel Connection Diagrams CONNECTING TO A PC Cont...

Page 19: ...d to navigate within the menu Vol Vol Adjusts volume In OSD menu both keys are used to navigate within menu Vol is used to select the highlighted options IR Sensor Connect the power cord to a GFCI pro...

Page 20: ...put and resolution SHIFT Used with the 0 9 numeric pad to select inputs ASPECT Selects different screen sizes FAVORITE Cycles the favorite channels FAVORITE ADD DEL Adds or deletes the current channel...

Page 21: ...ing to the previous level of the OSD This button exits the OSD entirely Via the Remote Control Adjusting the On Screen Display OSD from the Remote Control Via the TV Side Panel Buttons Adjusting the O...

Page 22: ...rpness then use t u to adjust the sharpness level of picture Advanced Video see below Press qp buttons to Advanced Video then use t u to adjust the selections for Color Temper Zoom Mode Noise Reductio...

Page 23: ...el of the Bass response Treble Press qp buttons and then use t u buttons to increase or decrease the level of the Treble sounds Balance Pressd qp buttons and then use t u buttons to adjust the audio o...

Page 24: ...ime then use u button to change Time settings Follow sub menu directions on following pages Closed Caption Press qp buttons to Time then use u button to change Closed Caption settings Follow sub menu...

Page 25: ...word and confirm it The password will be changed Note If you change the password write down the new password and keep it in a safe place System Lock The TV is set with the System Lock in the Off posit...

Page 26: ...ch with guardian TV 14 Need parent guide TV MA Only for adult ALL Select all functions above FV Fantasy Violence L Language abusive sexual S Sexual V Violence D Dialog sexual MPAA From the US Menu pre...

Page 27: ...nd then use t u buttons to select Daylight Saving Time ON or OFF When Daylight Saving Time is ON the clocks are set one hour ahead of local standard time Clock The time is decoded from the digital sig...

Page 28: ...Defaults and from Font0 to Font7 Font Size press t u to select one of Default Normal Large Small Font Edge Style press t u keys to select one of Default None Raised Depressed Uniform Left Shadow Righ...

Page 29: ...s TV from the Input Select option To search Air Cable Press t u buttons to select Air or Cable Auto Scan Press the u button to enter the submenu list below 1 Press qp buttons to move the cursor to the...

Page 30: ...select Show Hide Press the u button to enter the submenu shown left Press qp keys to your desired channel Press OK to show or hide the specified channel If the channel is Hidden user will be unable to...

Page 31: ...er cord Wait up to 8 minutes to plug the power back in to see if that works HDCP video has no audio Make sure you have a 3 5 mm mini jack cable connected from your HDCP video device sound output to th...

Page 32: ...OFTHETV To Order Replacement Filters contact SunBriteTV s Customer Care Center at 800 331 4626 Figure 1 Figure 3 Fiber Filter Intake Vent Fiber Filter Intake Vent Figure 2 Lower Channel Upper Channel...

Page 33: ...PbPr x2 and audio L R channels x2 15 pin D subVGA plus Stereo Audio Control Set RS232Serial DiscreteIR ConcealedIRWindow Audio Out Digital SPDIF Audio fixed Analog 1 8 Headphone Jack variable Speakers...

Page 34: ...D screens are manufactured with rigorous standards to maintain optimal viewing However the LCD screen may have minor defects that appear as a small bright or dark pixel This is common to all LCD scree...

Page 35: ...CVBS S Video Input 2 ESC G 1B 47 G AV2 S VIDEO Component1 Input ESC H 1B 48 H YpbPr1 Component2 Input ESC I 1B 49 I YpbPr2 HDMI Input 1 ESC J 1B 4A J HDMI1 VGA Input ESC K 1B 4B K VGA HDMI Input 2 ESC...

Page 36: ...www sunbritetv com...

Reviews: