background image

Page 46

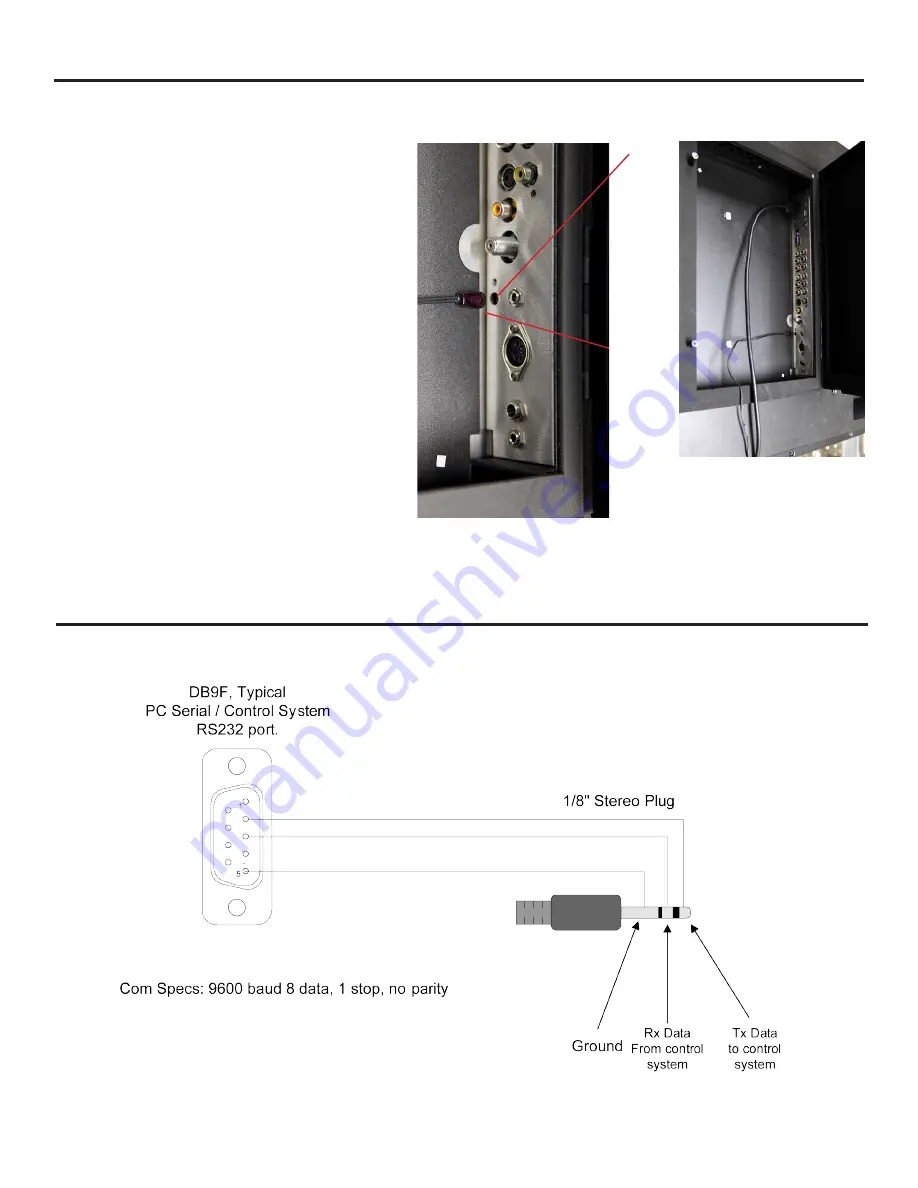
Appendix A - RS232 Control Cable Pinout

IR Emitter Installation

To install the IR Emitter: 

The photo to the right s

hows an IR Emitter* installed. 

The end of the Emitter is to be mounted in front of 

the IR Emitter Window. 
Place the emitter on the white tie-down block and 

use the tie-down to secure it in place. 
Place the emitter cable over the bottom of the cable 

box and connect the other end of the emitter to the 

appropriate control block*. 

Note it may be necessary to use a small amount 

of glue to secure the IR emitter in place as most IR 

emitters dual stick tape does not adhere well to 

powder coated surfaces.  Use a small amount of 

glue or RTV (Silicon) to secure the emitter in place 

yet allowing it to be removed or replaced.

Follow instructions on page 8 to close the cable door.

* Neither the emitter or control block are supplied by 

SunBriteTV. See instructions that come with your IR 

Emitter and control block to determine how to make the 

connections. 

IR Emitter

Place IR Emitter Cable 

over the bottom of the 

cable door.

IR Window

Summary of Contents for Pro 2 1K Series

Page 1: ...Operator s Manual Revision 20200604_0800 PN MSP 002 00 Pro 2 Series 1K 4K Model SB P2 32 1K SB P2 43 1K SB P2 49 4K SB P2 55 4K SB P2 65 4K ...

Page 2: ...mer service at 866 357 8688 for details SunBrite does not charge a separate fee at the time of recycling and provides free shipping and free containers as part of our recycling mailback program If you are mistakenly billed by the shipping company for any services or fees on your recycling request please contact customer service at 866 357 8688 Recycling Programs SnapAV remote management Remote Fir...

Page 3: ...ed by the manufac turer could void the user s authority to operate this equipment NOTE TO CATV SYSTEM INSTALLER This reminder is provided to call the CATV system installer s attention to Article 820 40 of the National Electrical Code that provides guidelines for proper grounding and in particular specifies that the cable ground shall be connected to the grounding system of the building as close to...

Page 4: ...provide reasonable protection against harmful interference in a residential installation This equipment generates uses and can radiate radio frequency energy and if not installed and used in accordance with the instructions may cause harmful interference to radio communications However there is no guarantee that interference will not occur in a particular installation If this equipment does cause ...

Page 5: ...arden hoses etc However it is not designed to withstand pressure washers high pressure water jets or hurricane type weather Do not service SunBriteTV yourself Removal of the television screen cover may expose you to high voltage or other dangerous risks Refer all servicing to a qualified service professional Warranty will not be honored if you service the unit yourself Repair If any of the followi...

Page 6: ...splay Controls Adjusting On Screen Displays Channel Menu Picture Menu Sound Menu Time Menu Lock Menu Option Menu Media Menu Information Menu Troubleshooting Care of SunBriteTV Filter cleaning Specifications Features Information and Instructions Extreme Climate Warning Programming Other Manufacturers Universal Remote Control Devices SunBriteTV Pixel Quality Policy Appendix A RS232 Cable Pinout Ir E...

Page 7: ...ke sure that the following items are included in the carton and that they are in good condition If items are damaged or missing contact your dealer immediately SunBriteTV LCD Television Operator s Manual Remote Control with Batteries Pro 2 Series Outdoor TV Quick Start Guide Remote Control ...

Page 8: ...zebo Remember that the position of the sun changes during the day as seen in the drawing at right This means that the quality of the picture will change during the day If you intend to install the TV in areas where direct sunlight will reach it it s best to postion the TV for optimum performance during the time of day when you do most of your TV watching If the sun shines directly on the screen fo...

Page 9: ...s as shown to provide a drip loop below the door This will prevent water from dripping down the cord and possibly entering the door area 4 Press firmly on the cover and screw the Thumb Screws tightly Figure4 Figure 1 Figure 2 Figure 4 Rubber Sealing Gasket Thumb Screws TV Installation Connecting the Power Cord Do not connect power cord until all cable connections have been made Connect the power c...

Page 10: ... mini jack audio cable headphone jack to provide audio for a HDCP enabled DVI video device or PCs with VGA or DVI connection 11 AV CVBS Connects to devices that use legacy composite cables such as older VCR or camcorder or video game consoles Connect the video portion with either the yellow connector Use the SOURCE button to select AV on your MAIN SOURCE to view this connection 12 COMPONENT Requir...

Page 11: ...unbriteTV through the HDBaseT compatible transmiter which supports IR repeating 19 Option Switches reserved for future use Swith settings do not effect the HDBaseT operation at this time HDBase T information The Pro 2 Series 4K Ultra HD incorporates an HDBaseT receiver based on the SnapAV Binary B 520 RX 320 A front IR receiver is incorporated into the design to extend the IR via the HDBaseT Trans...

Page 12: ...Manual Page 11 TV Installation Rear Panel Connections Red Green Blue Yellow Green Red White Connection Descriptions Cable Descriptions Legacy component input 3 5mm to RCA cable required for not included SunBrite Part Number CBL 35MM COMP ...

Page 13: ...On Screen Display to scan for channels Connecting to Digital Cable without Cable Box or Antenna Connecting to Cable or Antenna 1 Make sure the power of the TV is turned off 2 Connect the Coaxial RF cable from your antenna or cable to the ATSC NTSC port off the back of the TV 3 Turn on the TV 4 Select TV Air for antenna or TV Cable for cable from either your remote control s source button or source...

Page 14: ...VD player is turned off 2 Connect a HDMI cable to the HDMI port of your DVD player and the other end to the HDMI port off the back of your TV 3 Turn on the TV and your DVD player 4 Use the remote control s source button or the source button on the TV to switch to HDMI 1 Make sure the power ofTV and your DVD player is turned off 2 With a Component Cable connect the green connector to the DVD player...

Page 15: ...your DVD player and Composite s white connector port off the back of your TV 4 Connect the red color connector to both your DVD player and Composite s red connector port off the back of your TV 5 Turn on the TV and your DVD player 6 Use the remote control s source button or the source button on the right side of the TV to switch to AV1 CVBS Connecting with Composite Fair Please note 1 Reference th...

Page 16: ...ff the back of your TV 3 Connect the blue color connector to both your set top box and Component 1 s blue connector port off the back of your TV 4 Connect the red color connector to both your set top box and Component 1 s red connector port off the back of your TV 5 Obtain a RCA Audio Cable Connect the white color connector to both your set top box and Component 1 s white connector port off the ba...

Page 17: ...V 4 Connect the red color connector to both your DVD player and Composite s red connector port off the back of your TV 5 Turn on the TV and your DVD player 6 Use the remote control s source button or the source button on the right side of the TV to switch to AV1 CVBS Please Note 7 Refer to the set top box s manual to make sure the set top box is configured to output correctly to the TV 8 This mode...

Page 18: ...ure set your PC resolution to 1920 x 1080 at 60 Hz Refer to the PC or graphic card manual for further instructions on how to set your resolution and refresh rate 2 Refer to your PC manual for video output requirements of the video card 3 The TV will turn off automatically if there s no signal present for more than 15 minutes 4 If HDMI 1 is already occupied use HDMI 2 as your connection port and sw...

Page 19: ...e the remote control s source button or the source button the TV to switch to VGA Please Note 1 For the best results please set your PC resolution to 2 1920 x 1080at 60 Hz Refer to the PC or graphic card s manual for further instructions on how to set your resolution and refresh rate 3 Refer to your PC manual for video output requirements of the video card 4 The VGA port of the TV features a power...

Page 20: ...These buttons increase or decrease the volume If a sub menu is active pressing these buttons will move the selection left or right If the OSD is active Vol Vol is used to select the highlighted options IR Sensor LED power indicator Ambient light sensor Connect the power cord to a GFCI protected AC outlet the rated residual operating current shall not exceed 30mA with in use waterproof cover Warnin...

Page 21: ...8 HDMI 1 Shift 9 HDMI 2 Shift 0 TV Tuner ON Powers the TV On OFF Powers the TV Off 0 9 Allows you to set the channels directly To access a digital channel use these buttons with the button to switch channels Dash Insert the dash for selecting digital channels directly R Returns to the previous channel SLEEP Sets time for the TV to turn Off CC Selects Closed Caption CC only works under sources TV A...

Page 22: ...me and functions as right direction in the OSD If the OSD is active use Vol Vol to select a choice This button is the UP direction in the OSD This button functions as the DOWN direction in the OSD This button functions as the left direction in the OSD This button functions as the right direction in the OSD This button changes the channel in conjunction with the number pad and also functions as ent...

Page 23: ...V from the Input Select option Channel Menu This menu manages Channel functions including Antenna Select Air or Cable Auto Scan Signal Information Channel Edit Picture Menu This menu manages Picture functions including Picture Mode Color Temperature Aspect Ratio Noise Reduction Dynamic Contrast Ultra Clear Blue Light Filter Open HDR available on HDMI only Overscan Home Menu Channel option only ava...

Page 24: ...io Only Speaker On Screen Display Menu continued Time Menu This menu manages Time functions including Auto Sync Clock selectable if Auto Sync is off Sleep Timer Time Zone Time Format OSD Active Time Lock Menu This menu manages Lock functions including Lock System Change password default password is 0000 Input Block Canada Rating RRT Setting RRT Reset Block Rated TV ...

Page 25: ...parency menu Energy Mode CEC Control HDMI EDID Color Range Network Configuration Network Upgrade Local Dimming IMCP Enable Option Menu page2 of 2 This menu manages Setup functions including Quick Start Mode Power on mode Restore Factory Default Ambient Light Sensor Ambient Sensor Value Auto Backlight Floor Backlight Sensor Floor ...

Page 26: ...uto Scan will automatically build a list of the stations your TV can receive through the antenna or cable The scan process will typically take 5 to 10 minutes Signal Information Displays current channel information Example Antenna Cable Channel 7 Modulation 256QAM Signal Information Very Strong Channel Edit Press the qp buttons to highlight the Show Hide adjustment Press the u button to begin the ...

Page 27: ...hlight the desired channel and Press enter The channel will be displayed Using the Addq button on the remote you can change the text name of the learned channel Using the Deletep button on the remote you can skip the channel when using Ch You will see a character appear next to the channel in the list ...

Page 28: ...t noise reduction press enter then use t u to select off weak middle strong or auto This setting is used to determine the level of digital artifacts the TV will attempt to process resulting in a softer or sharper image Dynamic Contrast Press the qp buttons to highlight Dynamic Contrast press enter then use t u to select Off or On Ultra Clear Press the qp buttons to highlight Motion Enhancement pre...

Page 29: ...Digital Output adjustment press enter then use t u to select PCM or Raw bitstream Use Raw only if the connected audio system can decode Dolby Digital This function operates only when TV is selected as the source SPDIF Mode Press the qp buttons to highlight the Surround Sound adjustment press enter then use t u to switch the digital audio stream out from auto or PCM SRS TruSurround Press the qp but...

Page 30: ...fault Sleep Timer Press the qp buttons to highlight Sleep Timer then use qp to select Off or 10 20 30 60 90 120 180 or 240 minutes The TV will turn off automatically after the selected time has elapsed Time Zone Press the qp buttons to highlight the Time Zone adjustment then use qp to select Newfoundland Atlantic Eastern Central Mountain Pacific Alaska or Hawaii time zone Time Format Press the qp ...

Page 31: ...enu shown at left To change the password use the numeric keypad on the remote to enter the current password 0000 unless you previously changed it then enter the new password twice If you enter a new password but forget it later contact your SunBrite TV dealer for assistance Input Block Press the qp buttons to highlight Input Block then use qp to highlight the input to be blocked TV Component1 PCRG...

Page 32: ...elect On or Off On will turn on the features in CEC control including ARC Audio Return Channel HDMI EDID Press the qp buttons to highlight the EDID Switch then use qp to select EDID 1 4 or EDID 2 0 mode EDID 1 4 should be used for older devices or with 4k extenders or cables which are limited to 4k 30hz EDID 2 0 should be used for newer source devices for full 4k 60hz resolution CEC Control option...

Page 33: ...work Configuration then use enter to select then enter or wired network Use t u DHCP Auto assigned or Static network IPv4 address Network Configuration reserved for future use Local Dimming Press the qp buttons to highlight the local Dimmig then use enter to select On or Off Local dimming is supported on 65 and 75 inch sizes only This setting has no effect on 43 and 55 inch screen sizes ICMP Enabl...

Page 34: ... will not function to turn the TV on Power On Mode Press the qp buttons to highlight the Power On Mode then use t u to select on off or memory Power on Mode Off by default sets the TV to return to a standby state after AC power is lost and restored Power on Mode On sets the TV to return to a On state after AC power is lost and restored Power on Mode Memory after AC power loss and restore sets the ...

Page 35: ...t Floor This adjustment sets the level to which the backlight will be lowered when the ambient light level falls below the level set on the Backlight Sensor Floor adjustment below Press the qp buttons to highlight the Auto Backlight Floor adjustment then use t u to set the auto backlight floor value This adjustment is available only when the ambient light sensor is activated Backlight Sensor Floor...

Page 36: ...nd press enter Select Music or Photo and press enter If a USB flash drive can be accessed by the TV it will display as shown press enter to select it If there is an issue accessing the USB flash drive it will be displayed in grey Viewing Pictures from the USB Flash Use t u to highlight the picture you want to view then press to view that picture Highligh a thumbnail and press to select photo After...

Page 37: ...picture Highligh a thumbnail and press to select photo After a photo is selected a slide show will begin showing all photos in the folder During playback a menu will appear at the bottom of the screen Listening to Music from the USB Stick Use t u to highlight the tune you want to listen to then press to play the tune The music will begin playing and a text screen that shows data about the audio fi...

Page 38: ...mber of the TV main board IP Adress When properly connected to an ethernet wired network the IP V4 network address will display IP Adress Unique hardware address of the TV ethernet network port Firmware Current build date and time of the TV firmware Above items cannot be changed on this menu and are for service and reference only Software Update USB Use this feature as instructed by technical supp...

Page 39: ...audio Make sure you have a 3 5 mm mini jack cable connected from your HDCP video device sound output to theTV sVGA stereo input If your HDCP video device uses RCA audio jacks you ll need to obtain an audio cable with RCA plugs on one end and a 3 5mm plug on the other Cannot get 1920 x 1080 from PC VGA UsingVGA PC the screen s max resolution is 1920 x 1080 Your video card may not support this resol...

Page 40: ...he cloth frequently to avoid scratching the TV or screen surface Avoid using harsh chemicals abrasives or solvents when cleaning any surface on the unit Snow and Ice Use a soft brush and towel to remove snow and ice from the unit Fiber Filter Over time the fiber filter collects dirt and must be cleaned or replaced periodically The Fiber Filter is located on the back of the unit inside the Intake a...

Page 41: ...C Audio Out Digital OpticalTosLink x 1 fixed Analog 1 8 headphone jack variable Accessory DC Power Out 5vdc 3 5amps1 3mmpowerjackorusbtypeAjack Speaker Output 20 watt 10w x 2 Does not have internal speakers Optional Speaker Bar not included Exterior Powder coated aluminum Colors Silver Black andWhite Input Power 100 240VAC 50 60Hz2 5Amax OperatingTemp 24o to 122o F 31o to 50o C Non op Temp Off mod...

Page 42: ...edrearIRWindow IP Control OvrC Audio Out Digital OpticalTosLink x 1 fixed Analog 1 8 headphone jack variable Accessory DC Power Out 5vdc 3 5amps1 3mmpowerjackorusbtypeAjack Speaker Output 20 watt 10w x 2 Does not have internal speakers Optional Speaker Bar not included Exterior Powder coated aluminum Colors Silver Black andWhite Input Power 100 240VAC 50 60Hz2 5amax OperatingTemp 24o to 122o F 31o...

Page 43: ...rIRWindow IP Control OvrC Audio Out Digital OpticalTosLink x 1 fixed Analog 1 8 headphone jack variable Accessory DC Power Out 5vdc 3 5amps1 3mmpowerjackorusbtypeAjack Speaker Output 20 watt 10w x 2 Does not have internal speakers Optional Speaker Bar not included Exterior Powder coated aluminum Colors Silver Black andWhite Input Power 100 240VAC 50 60Hz2 5Amax OperatingTemp 24o to 122o F 31o to 5...

Page 44: ...ledrearIRWindow IP Control OvrC Audio Out Digital OpticalTosLink x 1 fixed Analog 1 8 headphone jack variable Accessory DC Power Out 5vdc 3 5amps1 3mmpowerjackorusbtypeAjack Speaker Output 20 watt 10w x 2 Does not have internal speakers Optional Speaker Bar not included Exterior Powder coated aluminum Colors Silver Black andWhite Input Power 100 240VAC 50 60Hz2 5Amax OperatingTemp 24o to 122o F 31...

Page 45: ...6 cable lengths Control Set RS232Serial DiscreteIRControl ConcealedrearIRWindow IP Control OvrC Audio Out Digital OpticalTosLink x 1 fixed Analog 1 8 headphone jack variable Accessory DC Power Out 5vdc 3 5amps1 3mmpowerjackorusbtypeAjack Speaker Output 20 watt 10w x 2 Does not have internal speakers Optional Speaker Bar not included Exterior Powder coated aluminum Colors Silver Black andWhite Inpu...

Page 46: ...pear dark and unchanged in size when a LCD TV screen displays a pure red green or blue pattern Adjacent dots are pixels located directly next to each other Your SunBriteTV will be replaced under warranty if it meets one of the following criteria A total of 7 defective pixels including both bright dots and dark dots are present This LCD screen has over a million pixels 2 or more pairs of adjacent b...

Page 47: ...e appropriate control block Note it may be necessary to use a small amount of glue to secure the IR emitter in place as most IR emitters dual stick tape does not adhere well to powder coated surfaces Use a small amount of glue or RTV Silicon to secure the emitter in place yet allowing it to be removed or replaced Follow instructions on page 8 to close the cable door Neither the emitter or control ...

Page 48: ...ESC L 1B 4C L HDMI2 Mute ESC X 1B 58 X MUTE Vol Up ESC Y 1B 59 Y VOL Vol Down ESC Z 1B 5A Z VOL Channel Up ESC V 1B 56 V CH Channel Down ESC W 1B 57 W CH 1 ESC 1 1B 31 1 na 2 ESC 2 1B 32 2 na 3 ESC 3 1B 33 3 na 4 ESC 4 1B 34 4 na 5 ESC 5 1B 35 5 na 6 ESC 6 1B 36 6 na 7 ESC 7 1B 37 7 na 8 ESC 8 1B 38 8 na 9 ESC 9 1B 39 9 na 0 ESC 0 1B 30 0 na ESC 1B 2D na Channel Return Previous Channel ESC r 1B 72...

Page 49: ...Page 48 www sunbritetv com ...

Reviews: