Electrical Connection
WARNING
Improper use of the grounded plug can result in the risk of electrical shock. If the power cord is
damaged, have it replaced by an authorized service center.
4
7
OPERATING YOUR FREEZER
Temperature Control
The thermostat control knob located in the right side regulates the temperature
of the freezer compartment.
The first time you turn the unit on, adjust thermostat control to required setting
and run for at least 4 hours before putting frozen foods inside. This will ensure
the cabinet is thoroughly chilled before food is put in.
The range of the temperature control is from position "1" (cold) to "7" (coldest).
Adjust the temperature control to the setting that best suits your needs.
The setting of “4” should be appropriate for home or office freezer use.
To adjust temperature to colder or warmer setting, please adjust the temperature control one numerical
increment at a time.
After each one numerical increment temperature adjustment, allow the freezer to operate at adjusted
temperature for several hours for the freezer temperature to stabilize.
To stop the freezer cooling process, turn the temperature control to "0". However, turning the temperature
control to “0” position does not shut off the power to the freezer.
0
7
6
5 4
3
2
1
This freezer should be properly grounded for your safety. The power cord of this freezer is equipped
with a three-prong plug which mates with standard three prong wall out lets to minimize the possibility
of electrical shock.
Do not, under any circumstances, cut or remove the third ground prong from the power cord supplied.
This freezer requires a standard 115/120 Volt A.C. ~/60Hz electrical outlet with three-prong ground.
This freezer is not designed to be used with an inverter.
The cord should be secured behind the freezer and not left exposed or dangling to prevent accidental
injury.
Never unplug the freezer by pulling the power cord. Always grip the plug firmly and pull straight out
from the receptacle.
Do not use an extension cord with this appliance. If the power cord is too short, have a qualified
electrician or service technician install an outlet near the appliance. Use of an extension cord can
negatively effect the performance of the unit.
CHANGING THE REVERSIBLE DOOR
CAUTION: To avoid personal injury to yourself and/or property, we
recommend someone assist you during the door reversal process.
The freezer has been built with the door hinges on the right. If you wish to change the opening direction,
follow the instruction below:
Note:
• Unplug the freezer from its electrical outlet
• Empty everything in the freezer, including all food it
ems.
• All parts removed during the process must be saved to
reinstall the door.
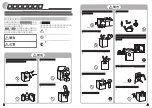
1. Remove the top hinge cover.
2. Using Phillips Head Screwdriver, loosen and remove the screws holding the top hinge in place.
3. Remove top hinge and carefully lift off the door.
4. Remove the screw hole plugs from the opposite side and insert the plugs in the screw hole openings
of the just removed screws.
5. Remove any loose items in the refrigerator and carefully turn refrigerator on its back, remove both
leveling legs and place in a secure area.
6. Loosen the screws holding the lower hinge bracket to the refrigerator and remove screws and
bracket.
7. Remove (2) screws from the other side and insert in the previously removed screw holes.
8. Remove door pin by turning counter clockwise and reinsert to the underside of the bracket and
tighten.
9. Align bracket and insert (2) remaining screws into the holes provided .
10. Align hole in the door with the door pin and washer and gently push down until firm.
11. Align upper hinge bracket with screw holes insert screws and partially secure, check that door and
cabinet are properly aligned and then secure tightly.
12. Replace hinge cap.


