background image

5

Using your Multi-Food Grinder

Before using your Multi-Food Grinder 
Attachment

Wash all attachments in warm soapy water 
using a mild detergent. Dry each part 
thoroughly before use.
Before you assemble the Multi-Food Grinder 
attachment ensure that the power cord is 
unplugged.

NOTE:

 All attachments must be firmly in 

place before using the appliance. Ensure 
that the mincing screw and blade are firmly 
in place inside the Multi-Food Grinder body 
and the mincer discs are secured with the 
fastening dial.

Fitting and using the mincing discs

1. Place the mincer body, facing you on a 

level, dry surface.

2. Fit the mincing screw inside the chute.
3. Fit the blade over the mincing screw 

ensuring that the flat/smooth side of the 
blade faces the mincing screw, away from 
the mincing disc.

4. Fit the disc (depending on the type of 

mince your require, this will either be a 
fine, medium or coarse disc).

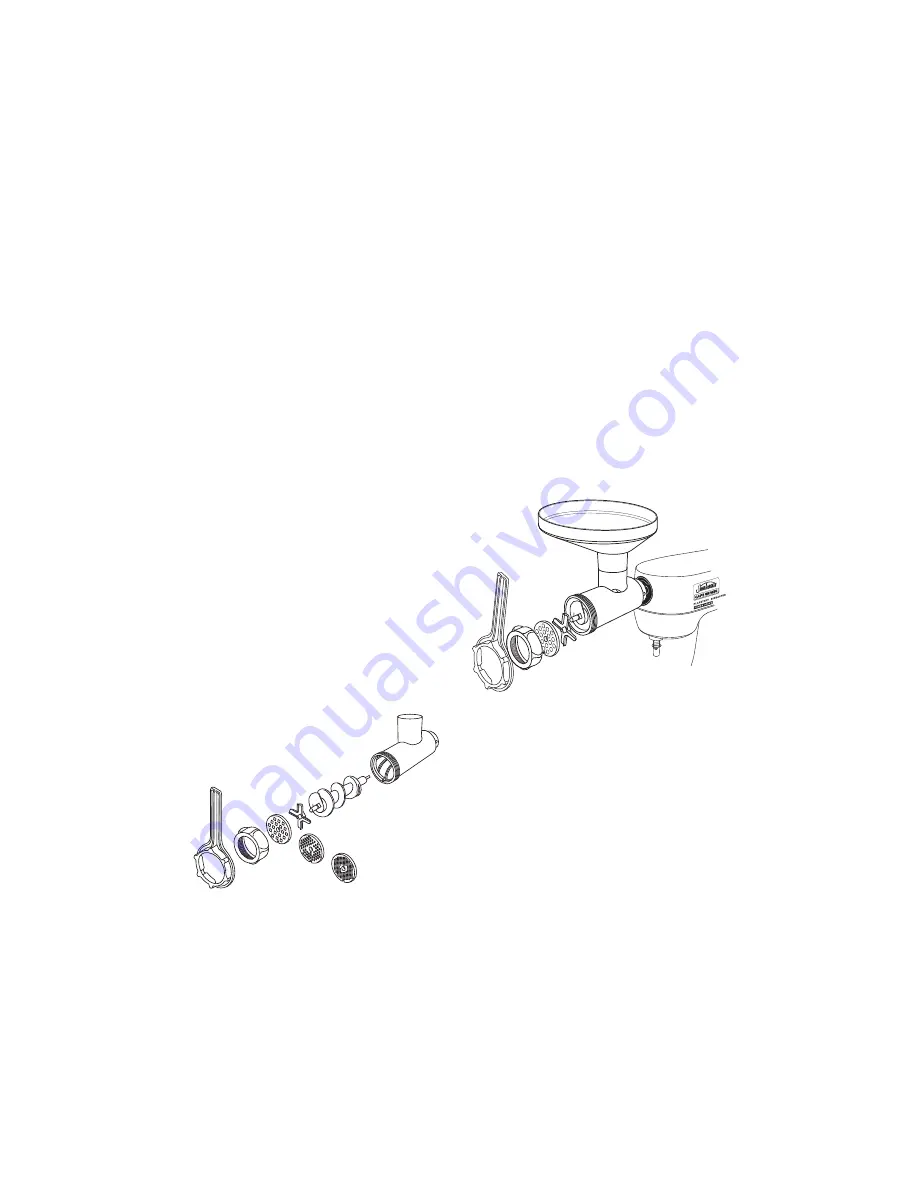
5. The fastening dial then fits over the disc 

and screws into place. Do not tighten this 
fastening dial yet as it will be harder to 
lock into the mincer body. See Fig 1.

6. Align chute into the Multi-Food Grinder 

body, using arrows as a guide. Insert the 
grinder into the power drive. Turn the 
grinder in an anti-clockwise position and 
lock into place securely. The mixer head 
should be lowered and not in an upright 
position.

7. Once the Multi-Food Grinder attachment 

is in place, tighten the fastening dial 
using the spanner to ensure all elements 
are securely in place. See figure 2.

8. Place the food catcher underneath the 

fastening dial for mince collection and 
the feeder tray on top of the Multi-Food 
Grinder chute. See figure 2. Turn the 
speed dial clockwise to commencing 
grinding. Operate at speeds no greater 
than 7. Refer to the mixer manual for 
further operating instructions.

9. Place prepared meat in feeder tray. Plug 

the power cord into a 230-240V AC power 
outlet and turn the power ‘ON’.

NOTE:

 Do not use excessive force to push 

meat through the mincing chute as it could 
damage the appliance.

CAUTION: 

Do not use anything else apart 

from the pusher supplied with this Multi-
Food Grinder to push meat through the 
chute. NEVER use your hands/fingers to 
push meat through the chute.

Figure 1

Figure 2

Summary of Contents for MX0600

Page 1: ...MULTI FOOD GRINDER Accessory for use with Planetary Mixmaster Power Drive Instruction Recipe Booklet MX0600...

Page 2: ...ny flavour 2 tablespoons topping Heading Important instructions retain for future use Contents Sunbeam s Safety Precautions 1 Features of your Multi Food Grinder 2 Attachments for your Multi Food Grin...

Page 3: ...nd tested by a qualified technician or service person Always use your appliance from a power outlet of the voltage A C only marked on the appliance This appliance is not intended for use by persons in...

Page 4: ...inder attachment Mincing screw Blade Mincing discs Fine Medium and Coarse Fastening dial Locks the mincing discs and sausage firmly into place Use the spanner to ensure it is firmly screwed onto the c...

Page 5: ...he lid Food pusher Guides meat safely through the chute to hit the mincing screw for superior mincing results Feeder tray Use the Feeder Tray to hold food ready for mincing Chute The chute houses the...

Page 6: ...4 Feeder tray Food catcher Spanner Fine disc Medium disc Coarse disc Sausage making attachment Thin nozzle Attachments for your Multi Food Grinder...

Page 7: ...t as it will be harder to lock into the mincer body See Fig 1 6 Align chute into the Multi Food Grinder body using arrows as a guide Insert the grinder into the power drive Turn the grinder in an anti...

Page 8: ...ng your Multi Food Grinder The Sunbeam Multi Food Grinder was designed so that all attachments can be stored in two unique storage components 1 Attachments can be stored inside the food pusher as show...

Page 9: ...This will push through any remaining meat and will not damage the mincer If changing mincing discs or changing to another attachment always ensure that any meat that is around the fastening dial or bl...

Page 10: ...eeded moisture but prevents the sausage from possibly splitting and being disfigured Thing to look for when making sausages Choose good quality ingredients Fat to meat ratio 30 70 Spices and seasoning...

Page 11: ...sponge and hot soapy water To remove foods from the coarse disc rinse disc under cold running water to force meat from holes Any remaining meat stuck on the mincing disc should be washed off using a s...

Page 12: ...antity bolognaise mixture 375g large instant lasagne sheets 500g blend grated mozzarella cheddar and parmesan cheese 350g fresh ricotta 1 Preheat oven to 200 c 2 Lightly grease a 40cm x 22cm approx si...

Page 13: ...is cooked and sauce has thickened Stir through green parts of green onions 7 Spoon into lettuce cups sprinkle with sesame seeds and serve immediately Tip Shoa Hsing wine oyster sauce hoisin sauce and...

Page 14: ...eggs 2 tablespoons Worcestershire sauce 2 teaspoons dried sweet basil 1 teaspoon dried oregano 2 cloves garlic crushed salt and pepper 2 tablespoons olive oil Sauce 1 onion sliced 2 cloves garlic crus...

Page 15: ...o use the product in accordance with this instruction booklet accidental damage or normal wear and tear Your warranty does not cover freight or any other costs incurred in making a claim consumable it...

Page 16: ...32 Cafe Series logo and words are registered trade marks of Sunbeam Corporation Made in China Designed and engineered in Australia Due to minor changes in design or otherwise the product may differ fr...

Reviews: