background image

11

How to Vacuum Package using FoodSaver

®

 Canisters,  

Bottle Stoppers and Deli Containers - Continued

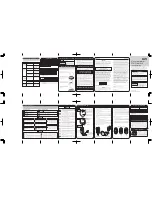
4.  Place the container adaptor over the grey 

vacuum valve on the container lid.  
See figure 4.

5.  To begin the vacuum process, press 

down firmly on corners of the lid of your 
FoodSaver

®

 appliance until the side 

latches click.

6.  Press the Canister Vacuum Button.
7.  When the Indicator lights and motor turns 

off, the vacuum process is complete.

8.  To remove accessory hose, gently twist 

and remove hose from the appliance and 
container. Unlock side latches.

ImPOrTanT:

 After vacuum packaging, put deli 

container in refrigerator or freezer. Allow hot 
foods to cool to room temperature before 
vacuum packaging. Otherwise, the contents 
may bubble up out the container.

How to Open the FoodSaver

®

 Canister

To open, press and hold down the grey rubber 
button in the centre of the lid. This will 
release the vacuum – a hissing sound can be 
heard as the air rushes in.

How to Remove the FoodSaver

®

 Bottle Stopper

To remove, simply twist and pull up on the 
Bottle Stopper to release the vacuum.

How to Open FoodSaver

®

 Deli containers

To open, lift the grey rubber cover in the 
centre of the lid. This will release the 
vacuum – a hissing sound can be heard as 
the air rushes is.
*FoodSaver

®

 Deli containers sold separately.

ImPOrTanT: 

Remember to remove the 

Accessory Hose from the Accessory Port on 
the appliance before you vacuum package in 
FoodSaver

®

 Bags.

Figure 4

Summary of Contents for FoodSaver VAC440

Page 1: ...Please read these instructions carefully and retain for future reference Home Vacuum Packaging System VAC440 28cm vacuum packaging system Instruction Booklet VS4400...

Page 2: ......

Page 3: ...cuum Package using FoodSaver Canisters Bottle Stoppers Deli Containers 10 Care and Cleaning Instructions 12 Vacuum Packaging Non Food Items 13 Food Preparation and Storage Guide 14 Guidelines for Vacu...

Page 4: ...ntal capabilities or lack of experience and knowledge unless they have been given supervision or instruction concerning use of the appliance by a person responsible for their safety 10 If the supply c...

Page 5: ...ods 7 If you are not sure whether you have achieved a complete seal simply seal the bag again about 1 cm above the first seal 8 Bulky items sometimes make it difficult to achieve a smooth sealing surf...

Page 6: ...g system 6 Rubber Gasket Sealing strip Accessory Hose Port Attach accessory hose here and use to vacuum package with FoodSaver Canisters and bottle stoppers Canister Vacuum Button Attach accessory hos...

Page 7: ...age and seal food airtight with a single touch Shuts off automatically 2 Press to cancel at any point Instant Seal Button This button has three uses 1 Press to immediately stop the vacuum process and...

Page 8: ...each latch clicks 7 Press the Seal Button When the seal indicator light turns off open lid and remove bag How to Vacuum Package with FoodSaver Bags 1 Place appliance on a flat dry surface and plug the...

Page 9: ...rate to prevent overheating If it does wait 20 minutes to allow appliance to cool off Tips on Removing Air from a Bag Make sure you ve securely latched the appliance lid When vacuuming and sealing a b...

Page 10: ...corners of the lid until the side latches click 7 Press the Canister Vacuum Button 8 When the Indicator Lights and motor turns off the vacuum process is complete 9 To remove accessory hose gently twi...

Page 11: ...or freezer Allow hot foods to cool to room temperature before vacuum packaging Otherwise the contents may bubble up out the container How to Open the FoodSaver Canister To open press and hold down the...

Page 12: ...that all surfaces are exposed to the washing water 3 Allow bags to dry thoroughly before reusing To avoid possible illness do not reuse bags after storing raw meats fish or greasy foods Do not reuse...

Page 13: ...painting vacuum package your wet paint brush between coats rather than washing out Particularly useful for oil based paints that require mineral turpentine to clean up Vacuum package your food and eq...

Page 14: ...geration slows the growth of yeast and freezing stops it completely Bacteria Frequently results in discoloration soft or slimy texture and or an unpleasant odor Clostrid ium botulinum the organism tha...

Page 15: ...tables it is best to pre freeze them for 1 2 hours or until solidly frozen To freeze vegetables in individual servings first place on a baking sheet and spread them out so they are not touching This p...

Page 16: ...eal bottles after each use Preparation Guidelines for Snack Foods Your snack foods will maintain their freshness longer when you vacuum package them For best results use a FoodSaver Canister for crush...

Page 17: ...3 years 8 months Broccoli Cauliflower Freezer FoodSaver Bag 2 3 years 8 months Cabbage Brussels Sprouts Freezer FoodSaver Bag 2 3 years 8 months Corn cob or kernel Freezer FoodSaver Bag 2 3 years 8 mo...

Page 18: ...Canister 5 6 months Prepared Liquids Sauces Soups Stews Freezer FoodSaver Bag 1 2 years 3 6 months Bottled Liquids Wine Refrigerator FoodSaver Bottle Stopper 2 4 months 1 3 weeks Oils Pantry FoodSave...

Page 19: ...to spoil discard food Lack of refrigeration or fluctuating temperatures in the Refrigerator can cause food to spoil Check the bag for a puncture or hole which may have released the vacuum Cushion sha...

Page 20: ...Notes...

Page 21: ...Notes...

Page 22: ...Notes...

Page 23: ...guarantees that cannot be excluded under the Australian Consumer Law and under the New Zealand Consumer Guarantees Act In Australia you are entitled to a replacement or refund for a major failure and...

Page 24: ...ration Limited ABN 45 000 006 771 Sunbeam Corporation is a division of GUD Holdings Ltd www sunbeam com au Units 5 6 13 Lord St Botany NSW 2019 Australia is a registered trademark Need help with your...

Reviews: