background image

IMPORTANT SAFETY INSTRUCTIONS

1. READ INSTRUCTIONS -

 All the safety and operating instructions should be read before

the product is operated.

2. RETAIN INSTRUCTIONS -

 The safety and operating instructions should be retained for

future reference.

3. HEED WARNINGS -

 All warnings on the product and in the operating instructions

should be adhered to.

4. FOLLOW INSTRUCTIONS - 

All operating and use instructions should be followed.

5. CLEANING -

 Unplug this product from the wall outlet before cleaning, Do not use liquid

cleaners or aerosol cleaners. Use a damp cloth for cleaning.

6. ATTACHMENTS -

 Do not use attachments not recommended by the product

manufacturer as they may cause hazards.

7. WATER AND MOISTURE -

 Do not use this product near water - for example, near a bath

tub, wash bowl, kitchen sink , or laundry tub; in a wet basement, or near a swimming

pool, and the like.

8. ACCESSORIES -

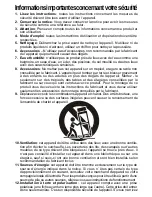
 Do not place this product on an unstable cart, stand tripod, bracket,

or table. The product may fall, causing serious injury to a child or adult, and serious

damage to the product. Use only with a cart, stand, tripod, bracket, or table recommended

by the manufacturer, or sold with the product. Any mounting of the product should follow

the manufacturer’s instructions, and should use a mounting accessory recommended

by the manufacturer.

9.

A product and cart combination should be moved with care. Quick stops, excessive

force, and uneven surfaces may cause the appliance and cart
combination to overturn.

10. VENTILATION -

 Slots and openings in the cabinet are provided for ventilation and to

ensure reliable operation of the product and to protect it from overheating, and these

openings must not be blocked or covered. The openings should never be blocked by

placing the product on a bed, sofa, rug, or other similar surface. This product should not

be placed in a built-in installation such as a bookcase or rack unless proper ventilation

is provided or the manufacturer’s instructions have been adhered to.

11. POWER SOURCES -

 This product should be operated only from the type of power

source indicated on the marking label. If you are not sure of the type of power supply to

your home, consult your product dealer or local power company. For products intended

to operate from battery power, or other sources, refer to operating instruction.

Summary of Contents for 89019

Page 1: ...XPOSURE Please read this before operating your unit The lightning flash and arrowhead within the triangle is a warning sign alerting you of dangerous voltage inside the product CAUTION TO REDUCE THE RISK OF ELECTRIC SHOCK D O N O T R E M O V E C O V E R O N B A C K N O U S E R S E R V I C E A B L E P A R T S INSIDE REFER SERVICING T O Q U A L I F I E D S E R V I C E PERSONNEL The exclamation p o i...

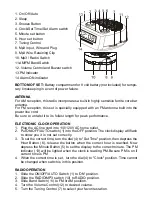
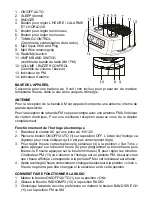
Page 2: ...CLOCK OPERATION 1 Plug the AC line cord into 110 120V AC home outlet 2 Put ON OFF AUTO switch 1 into the OFF position The clock display will flash to show you it is not set correctly 3 To set the correct time turn the dial 4 to Set Time position then depress the Hour Button 6 release the button when the correct hour is reached Now depress the Minute Button 5 to set the display to the correct minut...

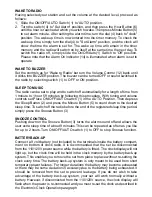
Page 3: ...1 in the AUTO Position Then depress the Sleep Button 2 and press the Minute Button 5 to count down to the desired sleep time To switch off the radio before the end of the registered sleep time period simply press the Snooze Button 3 SNOOZE CONTROL Pushing down on the Snooze Button 3 turns the alarm sound off and allows the user extra sleep time of about 9 minutes This can be repeated as often as y...

Page 4: ...eadphone jack and slide RADIO MP3 switch to RADIO position Be sure to push wire into clip 9 to keep it from being damaged GENERAL CARE The cabinet can be cleaned with a slightly damp cloth make sure power line is disconnected Avoid leaving the clock radio in direct sunlight or in hot humid dusty places Keep the set away from heating appliances and appliances that generate noise such as fluorescent...

Page 5: ...se of the product use on improper voltage or current use contrary to the operating instructions disassembly repair or alteration by anyone other than Sunbeam or an authorized service center Further the warranty does not cover Acts of God such as fire flood hurricanes and tornadoes Sunbeam shall not be liable for any incidental or consequential damages caused by the breach of any express implied or...

Page 6: ... only with a cart stand tripod bracket or table recommended by the manufacturer or sold with the product Any mounting of the product should follow the manufacturer s instructions and should use a mounting accessory recommended by the manufacturer 9 A product and cart combination should be moved with care Quick stops excessive force and uneven surfaces may cause the appliance and cart combination t...

Page 7: ...e walked on or pinched by items placed upon or against them paying particular attention to cords at plugs convenience receptacles and point where they exit from the product 14 PROTECTIVE ATTACHMENT PLUG The product is equipped with an attachment plug having overload protection This is a safety feature See Instruction Manual for replacement or resetting of protective device If replacement of the pl...

Page 8: ...owing conditions a When the power supply cord or plug is damaged b If liquid has been spilled or objects have fallen into the product c If the product has been exposed to rain or water d If the product does not operate normally by following the operating instructions adjust only those controls that are covered by the operating instructions as an improper adjustment of other controls may result in ...

Page 9: ...ement les pattes Avant de l utilisation lisez les instructions du mode d emploi Le triangle avec la foudre est un s y m b o l e d e danger en raison du haut voltage dans l appareil ATTENTION Afin de réduire le risque de choc électrique n enlève pas le couvercle du derrière Renseignez vous auprès de notre service d entretient ou auprès des professionnels autorisés L e s y m b o l e d exclamation da...

Page 10: ...de le déplier complètement Fonctionnement de l horloge électronique 1 Branchez le cordon AC sur une prise de 110 120 2 Placez le bouton ON OFF AUTO 1 sur la position OFF L écran de l horloge va clignoter pour vous indiquer qu il n est pas correctement réglé 3 Pour régler l heure correcte placez le sélecteur 4 à la position Set Time après appuyez sur le bouton heure 6 pour programmer la bonne heure...

Page 11: ...changer par la radio si vous déplacez le bouton 1 à la position OFF ou ON VOUS EN DORMIR EN ECOUTANT DE LA MUSIQUE La radio peut être programmée pour s éteindre automatiquement après une période qui peut aller de 1 minute à 1 heure 59 minutes si vous suivez les pas suivants En réglant le sélecteur de station et celui du volume déplacez le bouton ON OFF AUTO 1 à la position AUTO Après appuyez le bo...

Page 12: ...s écouteurs du lecteur MP3 Déplacez le bouton radio MP3 16 à la position MP3 Mettez le bouton ON OFF AUTO 10 à la position ON Pour délier enlevez la prise de la connexion des écouteurs et déplacez le bouton RADIO MP3 à la position RADIO Assurez vous de placer le fil dans le trombone pour le garder et ainsi éviter de l endommager ENTRETIEN GÉNÉRAL L extérieur peut se nettoyer avec un chiffon légère...

Page 13: ...ties ou les dommages dont l origine est une mauvaise utilisation du produit le branchement sur la courant ou le voltage different de celui qui est indiqué l utilisation differente de celle qui est indiquée dans les instructions d opération le démontage les réparations ou altérations faites par des personnes non autorisées par Sunbeam ou un de ses centres de services La garantie ne couvre non plus ...

Page 14: ... sur ceux qui sont vendus avec ce produit Pour le montage de ce produit vous devez suivre les instructions du fabricant et vous devez utiliser seulement les accessoires de montage conseillés par le fabricant 9 Déplacez avec soin les combinaisons appareil et chariot Des arrêts brutaux une force excessive ou des surfaces inégales peuvent causer le renversement de l ensemble de chariot et appareil 10...

Page 15: ...es articles placés au dessus d eux en faisant particulièrement attention aux fils à proximité de fiches prises de courant de service et au point où ils sortent de l appareil 14 Elément protecteur de la prise cet appareil compte avec une prise protégée contre les surcharges C est un dispositif de sécurité Si vous devez faire remplacer la prise assurez vous que le technicien utilise une prise avec l...

Page 16: ...liquide sur l appareil ou si on a introduit un objet dans l appareil C si l appareil a été exposé à la pluie ou d autres liquides D Si cet appareil ne marche pas correctement après avoir suivi les instructions réglez seulement les contrôles couverts par les instructions de service parce qu un règlement incorrect peut produire des dommages et peut demander une réparation plus détaillée de la part d...

Page 17: ... EXPOSIÇÃO DAS MESMAS Leia por favor as instruções antes de usar seu aparelho Osímbolodoflashea ponta da flecha ao interior do triangulo são um sinal de advertência que indicam voltagens perigosas neste produto PERIGO PARA REDUZIR O RISCO DE CHOQUE ELÉTRICO NÃO TIRE A TAMPA NA PARTE POSTERIOR ESTE APARELHO NÃO CONTÉM PARTES QUE POSSAM SER REPARADAS PELO USUÁRIO SE REQUER SERVIÇO CONTATE PESSOALQUA...

Page 18: ...de Para uma melhor recepção de FM este aparelho vem especialmente equipado com uma antena FM incorporada ao cabo alimentador Assegure se de desenrolar a antena por completo para seu bom funcionamento USO DO RELÓGIO ELETRÔNICO 1 Conete o fio alimentador a um toma corrente de 110 120V AC 60 Hz 2 Coloque o seletor ON OFF AUTO 1 na posição OFF A pantalha do relógio piscará indicando que a hora não é a...

Page 19: ...1 à posição de OFF Note que o indicador de Alarm ON 14 se ilumina quando o alarme do relógio se encontra ativado ACORDE COMACAMPAINHA Ajuste os controles da mesma maneira que para Acorde com Musica girando o volume 12 até que faça um click sobre a posição de BUZZER O buzzer pode ser desligado ou a fonte de som trocada a rádio colocando o selecionador 1 na posição OFF o ON DURMA COM MÚSICA Seguindo...

Page 20: ...rogramar a hora tal como se indica USO DO RELÓGIO ELETRÔNICO FIOADAPTADORPARAMP3 Para tocar um MP3 com este rádio este set inclui um cabo adaptador 8 Coloque o MP3 ao lado do rádio e insira o encaixe na tomada para audífonos do MP3 Mexa o seletor RADIO MP3 10 à posição de MP3 Mexa o botão ON OFF AUTO 1 à posição ON Para desligar tire o encaixe da tomada para audífonos e coloque o seletor RADIO MP3...

Page 21: ...duto uso de voltagem ou corrente inapropriada uso que contrarie as instruçoes operacionais ou desmontagem reparo ou alteraçao realizada por pessoas que nao pertençam ao quadro de profissionais dela Sunbeam ou aos centros de assistencia tecnica autorizados Mais ainda a garantia nao cobre Atos de Deus tais como fogo inundação furacões e tornados A Sunbeam nao sera responsavel por qualquer dano incid...

Page 22: ...e sobre mesas tripodes suportes recomendados pelo fabricante ou vendidos com o produto Toda a montagem do produto deve realizar se seguindo as instruções do fabricante e se devem utilizar somente aqueles acessórios de montagem recomendados pelo fabricante 9 Suportes ou bases O aparelho e o suporte devem ser movidos com cuidado A aplicação de força excessiva e as superfícies desiguais podem causar ...

Page 23: ... ser distribuído de modo que não se encontre em meio de lugares transitados O fio deve ser colocado sobre uma base ou num lugar afastado 15 Protetor do encaixe este aparelho está equipado com um encaixe com proteção contra sobrecargas Este é um dispositivo de segurança Veja o manual de instruções em caso de ser necessária a troca ou reprogramação do dispositivo Se a substituição do encaixe é neces...

Page 24: ...rizado se alguma das seguintes condições se apresenta a o fio alimentador ou o encaixe estão danificados b se algum líquido derramou sobre o aparelho ou objeto algum tenha sido introduzido nele c se o aparelho foi exposto à água chuva ou outros líquidos d Se o produto não funciona normalmente embora seguindo as instruções ajuste somente aqueles controles detalhados neste manual já que um ajuste in...

Page 25: ...nstrucciones antes de usar su aparato El símbolo del flash y la punta de flecha al interior del triángulo son un signo de advertencia que indican voltage peligroso en este producto PELIGRO PARA REDUCIR EL RIESGODESHOCKELECTRICO NO QUITE LA TAPA EN LA PARTE POSTERIOR ESTE APARATO NO CONTIENE PARTES QUE PUEDAN SERREPARADASPORELUSUARIO SI REQUIERE SERVICIO CONTACTE PERSONAL CALIFICADO Elsignodeexclam...

Page 26: ...a sensibilidad Para una mejor recepción de FM este aparato viene especialmente equipado con una antena FM incorporada al cable alimentador Asegurese de desenrollar la antena por completo para su buen funcionamiento USO DEL RELOJ ELECTRONICO 1 Conecte el cable alimentador a un tromacorrientes de 110 120V AC 2 Coloque el selector ON OFF AUTO 1 en la posición OFF La pantalla del reloj parpadeará indi...

Page 27: ...slize el selector ON OFF AUTO 1 a la posición de OFF Note que el indicador de Alarm ON 14 se ilumina cuando la alarma del reloj se encuentra activada DESPIERTE CON EL TIMBRE Ajuste los controles de la misma manera que para Despierte con Musica girando el volumen 12 hasta que haga un clic sobre la posición de BUZZER El buzzer puede ser apagado o la fuente de sonido cambiada a la radio colocando el ...

Page 28: ...r la hora tal como se indica en el parrafo USO DEL RELOJ ELECTRONICO CABLEADAPTADORPARAMP3 Para tocar un MP3 con este radio este set incluye un cable adaptador 8 Coloque el MP3 al lado del radio e inserte el enchufe en la toma para audífonos del MP3 Mueva el selector RADIO MP3 10 a la posición de MP3 Mueva el botón ON OFF AUTO 1 a la posición ON Para desconectar quite el enchufe de la toma para au...

Page 29: ...el desgaste como resultado del uso normal o daño de las partes como consecuencia del uso negligente o mal uso del producto utilización de un voltaje o corriente indecuados uso contrario a las instrucciones de uso desmomtaje reparación o alteración por cualesquier agente ajeno a Sunbeam o a sus Centros de Servicio Autorizados Mas aún la garantía no cubre actos de Dios tales como incendios inundació...

Page 30: ...mesas tripodes soportes recomendados por el fabricante o vendidos con el producto Todo el montaje del produto debe realizarse siguiendo ls instrucciones del fabricante y se deben utilizar solo aquellos acessorios de montaje recomendados por el fabricante 9 Soportes o bases El aparato y el soporte deben ser movidos con cuidado La aplicación de fuerza excesiva y las superficies desiguales pueden cau...

Page 31: ...que no se encuentre en medio de lugares transitados El cable debe ser colocado sobre una base o de lo contrario en un lugar apartado 14 Protector del enchufe este aparato esta equipado con un enchufe con protección contra sobrecargas Este es un dispositivo de seguridad Vea el manual de instrucciones en caso de ser necesario el cambio o reprogramación del dispositivo Si la substitución del enchufe ...

Page 32: ...izado si alguno de los siguientes condiciones se presenta A el cable alimentador o el enchufe están dañados B si algun líquido ha sido derramado sobre el aparato u objeto alguno ha sido introducido en el mismo C si es que el aparato ha sido expuesto a agua lluvia u otros liquidos D si es que al aparato no opera normalmente aún luego de haber seguido las instrucciones de operación ajuste solo aquel...

Reviews: