background image

2-10

Ultra Enterprise 6000/5000/4000 Systems Installation GuideNovember 1996

2

Note – Sun equipment conforms to the Ethernet 10/100BASE-T standard,
which states that the 10/100BASE-T Link Integrity Test function should always
be enabled on both the host and the hub. If you have problems verifying
connection between Sun equipment and your hub, verify that your hub also
has the link test function enabled. See Section 3.4, “Failure of Network
Communications,” and refer to the manual provided with your hub for more
information about the Link Integrity Test function.

2.6 Connecting an ASCII Terminal

An ASCII terminal (or workstation) must be attached to the server to display
diagnostic messages produced by the firmware (power-on self test/POST or
OpenBoot PROM/OBP) program. A terminal is not required for normal server
operations, so it may be necessary to locate a terminal to connect to the server.

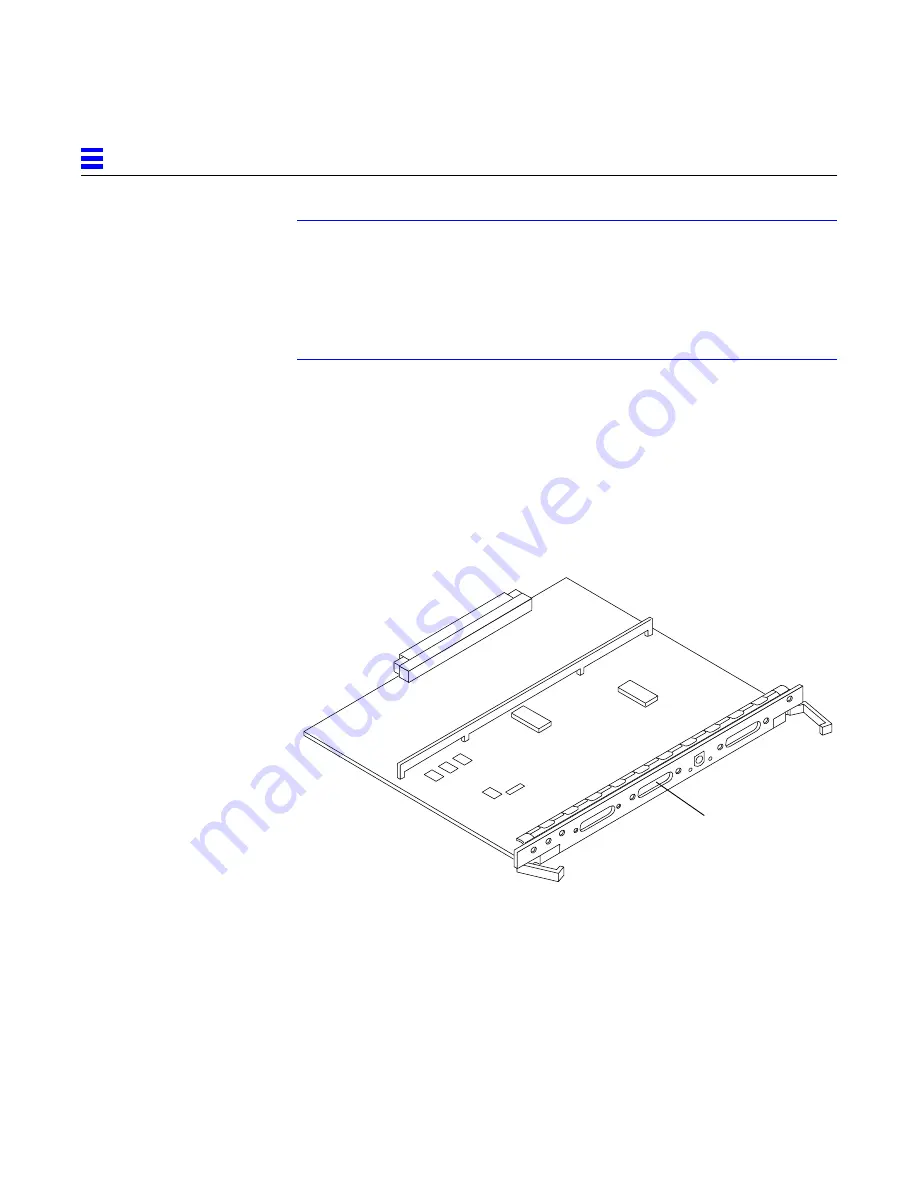
1. Connect the terminal cable into serial port A on the clock board.

See Figure 2-10.

Figure 2-10 Clock Board

Serial port A

Summary of Contents for Ultra Enterprise 4000 Systems

Page 1: ...00 5000 4000 SystemsInstallationGuide Part No 802 3844 11 Revision A November 1996 The Network Is the Computer Sun Microsystems Computer Company 2550 Garcia Avenue Mountain View CA 94043 USA 415 960 1300 fax 415 969 9131 ...

Page 2: ...S FOR A PARTICULAR PURPOSE OR NON INFRINGEMENT Copyright 1996 Sun Microsystems Inc 2550 Garcia Avenue Mountain View Californie 94043 1100 U S A Tous droits réservés Ce produit ou document est protégé par un copyright et distribué avec des licences qui en restreignent l utilisation la copie et la décompilation Aucune partie de ce produit ou de sa documentation associée ne peut être reproduite sous ...

Page 3: ...1 5 1 3 2 Enterprise 4000 System 1 7 1 4 Preparing the Air Conditioning 1 7 1 5 Preparing the Ethernet Network 1 7 1 6 Preparing the Area 1 9 1 6 1 Floorspace for the Enterprise 6000 5000 Cabinet Systems 1 9 1 6 2 Surface for the Enterprise 4000 System 1 10 1 7 Preparing the Enterprise 6000 5000 Cabinet Systems 1 11 1 7 1 Moving the Server 1 11 1 7 2 Adjusting the Levelling Pads 1 12 1 8 Preparing...

Page 4: ...Power Cord 2 5 2 4 Connecting the Network Cable to the System 2 6 2 5 Connecting the System to the Network 2 7 2 6 Connecting an ASCII Terminal 2 10 2 7 Connecting the Fiber Cable to the I O Board 2 11 2 8 Connecting External SCSI Devices 2 12 3 Powering the System On and Off 3 1 3 1 Using JumpStart Automatic Installation 3 1 3 2 Enterprise 6000 5000 Cabinet Systems 3 2 3 2 1 Powering On the Syste...

Page 5: ...nterpreting Status LED Patterns 3 13 3 3 4 Powering Off the System 3 15 3 4 Failure of Network Communications 3 16 4 Using the Software 4 1 4 1 Operating System Software 4 1 4 2 Solstice SyMON Software 4 1 Index Index 1 ...

Page 6: ...vi Ultra Enterprise 6000 5000 4000 Systems Installation Guide November 1996 ...

Page 7: ...1 8 Figure 1 7 Cabinet Server Access Areas Top View 1 10 Figure 1 8 Standalone Server Access Areas Top View 1 11 Figure 1 9 Moving the Server Safely Down the Ramps 1 12 Figure 1 10 Rear Screen Levelling Wrench Kick Panel and Levelling Pad 1 13 Figure 1 11 Stabilizer Bar 1 14 Figure 2 1 Keyswitch Standby Position 2 2 Figure 2 2 AC Power Sequencer Power Switch and Rear Screen 2 3 Figure 2 3 Routing ...

Page 8: ...re 2 11 Fiber Cable and Fibre Card Connectors and Ports on the I O Board 2 12 Figure 2 12 Onboard Single ended SCSI Connector on the I O Board 2 14 Figure 3 1 Key Switch Positions 3 3 Figure 3 2 The AC Power Sequencer Power Switch 3 4 Figure 3 3 Local Remote Switch 3 5 Figure 3 4 CPU Reset Switch on the Clock Board 3 7 Figure 3 5 System Status LEDs Cabinet Server 3 8 Figure 3 6 Key Switch Position...

Page 9: ... Table 2 1 Ethernet Cabling Limitations for N type Coaxial Cable 2 9 Table 2 2 Internal SCSI Lengths Approximate 2 13 Table 3 1 Front Panel LED Status Indicators 3 8 Table 3 2 Front Panel LED System Status 3 14 ...

Page 10: ...x Ultra Enterprise 6000 5000 4000 Systems Installation Guide November 1996 ...

Page 11: ...ftware tasks and refer you to operating system documentation or the handbook that was shipped with your new hardware The types of tasks that you might need to use references for includes Shutting down the system Booting the system Configuring devices Other basic software procedures The references you can use include Solaris 2 x Handbook for SMCC Peripherals contains Solaris 2 x software commands O...

Page 12: ...ies on screen computer output Edit your login file Use ls a to list all files machine_name You have mail AaBbCc123 What you type contrasted with on screen computer output machine_name su Password AaBbCc123 Command line placeholder replace with a real name or value To delete a file type rm filename AaBbCc123 Book titles new words or terms or words to be emphasized Read Chapter 6 in the User s Guide...

Page 13: ...ardware Platform Guide 802 5341 Solstice SyMON User s Guide 802 5355 Options Expansion Cabinet Installation and Service Manual 802 6084 Enterprise Systems Boards Installation Guide 802 5030 UltraSPARC Module Installation Guide 802 5031 Enterprise Systems Memory Modules Installation Guide 802 5032 Enterprise Systems Peripheral Power Supply Installation Guide 802 5033 Enterprise Systems Power Coolin...

Page 14: ...voltage Accidental contact with centerplane card cage and drive areas can result in serious injury or death Caution Improper handling by unqualified personnel can cause serious damage to this equipment Unqualified personnel who tamper with this equipment may be held liable for any resultant damage to the equipment Individuals who remove any outer panels or open covers to access this equipment must...

Page 15: ...st be performed by qualified service trained maintenance providers Note Before you begin carefully read each of the procedures in this manual If you have not performed similar operations on comparable equipment do not attempt to perform these procedures ...

Page 16: ...xvi Ultra Enterprise 6000 5000 4000 Systems Installation Guide November 1996 ...

Page 17: ...ge 1 2 for diagrams of the cabinet and standalone servers The tasks for installing the systems are 1 Unpacking the cabinet server Chapter 1 2 Preparing the site Chapter 1 3 Preparing the servers Chapter 1 4 Cabling Chapter 2 5 Powering on Chapter 3 6 Using the software Chapter 4 Note For information about physical specifications electrical specifications and environmental requirements refer to App...

Page 18: ...4000 Systems Installation Guide November 1996 1 Figure 1 1 Ultra Enterprise 6000 5000 4000 Systems Enterprise 6000 5000 systems 16 slot and 8 slot servers in data center system cabinets Enterprise 4000 system 8 slot standalone server ...

Page 19: ...ils it is not necessary to lower the levelling pads 1 Cut the plastic or metal straps that are around the shipping container and lift off the corrugated top Store the shipping materials for future shipments 2 Remove the sides of the container The container is held together by six plastic clips To unlock a clip press the two inner tabs together and pull out the entire clip 3 Remove inner packing ma...

Page 20: ...cabinet Figure 1 2 Attaching the Ramps to the Shipping Pallet 1 2 Shipping and Storing the System Save the original shipping containers and packing materials in case you need to store or ship your system If you cannot store the shipping materials recycle or dispose of the materials properly Consult your local recycling authority for information Wheel guide Adhesive strip ...

Page 21: ...ice in the building installation thus it requires a 30A circuit breaker Caution Do not attach other electrical equipment to the server AC circuit server reliability may be affected Two AC connector plug types are available The AC input power cable for 200 240V North American operation has a NEMA L6 30P connector that plugs into the AC source on one end Figure 1 3 The other end with metal housing p...

Page 22: ...hat is identical in size insulation material and thickness to the earthed and unearthed branch circuit supply conductors except that it is green with or without one or more yellow stripes is to be installed as part of the branch circuit that supplies the unit or system The earthing conductor described is to be connected to earth at the service equipment or if supplied by a separately derived syste...

Page 23: ...tion The room should have sufficient air conditioning capacity to support the cooling needs of the entire system The air conditioning system should have controls that prevent excessive temperature changes 1 5 Preparing the Ethernet Network The Enterprise 6000 5000 4000 systems follow the IEEE standard for 10 100BASE T Ethernet twisted pair or MII Media Independent Interface Twisted pair cables use...

Page 24: ...e the performance of any components that are not purchased from Sun Figure 1 5 Types of Network Cables Used Figure 1 6 Example of 10 100BASE T Twisted Pair Ethernet Transceiver Vampire tap or N type connectors Ethernet cable Transceiver drop cable coaxial or optical fiber Hardware interface 10 100BASE T twisted pair cable Server Network cable Tap Coaxial cable or optical fiber Server Twisted pair ...

Page 25: ...b verify that your hub also has the link test function enabled See Section 3 4 Failure of Network Communications and refer to the manual provided with your hub 1 6 Preparing the Area 1 6 1 Floorspace for the Enterprise 6000 5000 Cabinet Systems The server cabinets require approximately four feet 122 cm of space in front and three feet 92 cm in back for access by service personnel See Figure 1 7 Al...

Page 26: ...r server The server unit requires approximately 1 5 feet 47 cm of space in the front and back for access by service personnel See Figure 1 8 A minimum space of 6 inches 16 cm is required on both sides of the server to afford adequate air flow A minimum space of 3 feet 92 cm is recommended to avoid exhaust air recirculation if systems are placed next to each other Warning To avoid exhaust air recir...

Page 27: ...ollowing tools 1 Phillips screwdriver Levelling wrench packed inside the system cabinet Front panel key packed in a bag in the accessory box 1 7 1 Moving the Server The server may weigh 1 2 ton 500 kilograms or more and can be unstable when rolling down ramps Caution Three or more people are needed to move the server cabinet safely Two people must push at the front of the cabinet to control the mo...

Page 28: ...s After moving the cabinet to its operating location adjust the levelling pads 1 Take off the rear screen by removing the two screws shown in Figure 1 10 Note If your system cabinet has a hinged rear door use the sliding door latch to open the door 2 Remove the levelling wrench from inside the server cabinet Press the plastic tab to unlock the plastic strap around the wrench then slide part of the...

Page 29: ...net if it should begin to tilt Figure 1 10 Rear Screen Levelling Wrench Kick Panel and Levelling Pad 5 Slide the stabilizer bar into the cabinet Warning Always extend the stabilizer bar before pulling the disk drive trays out for servicing 6 Adjust the four levelling pads on the cabinet frame The four pads should press against the floor so that the cabinet does not move To adjust levelling pads on...

Page 30: ...lose the cabinet 1 Secure the levelling wrench inside the cabinet 2 Replace the kick panel if the panel was removed 3 Attach the rear screen Figure 1 11 Stabilizer Bar 1 8 Preparing the Enterprise 4000 System Warning The server weighs more than 150 lbs 68 kg To prevent personal injury two people are needed to lift the server safely You need the following tools 1 Phillips screwdriver Stabilizer bar...

Page 31: ...Enterprise 4000 system refer to Section 13 4 1 Top Bezel 2 Snap out the narrow transparent window From the rear side of the bezel gently squeeze the top and bottom edges together as you simultaneously push the transparent window out through the front of the bezel 3 Choose the information that will appear on the label Common items include the name of the server IP address name and contact informati...

Page 32: ...1 16 Ultra Enterprise 6000 5000 4000 Systems Installation Guide November 1996 1 ...

Page 33: ...n guidelines and specifications covered in Chapter 1 2 2 Removing and Replacing the Enterprise 6000 5000 Cabinet Rear Screen and Kick Panel Removing the Rear Screen and Kick Panel 1 Locate the plastic key that is in the accessory box 2 Open the door on the left side of the top bezel to access the key switch The door opens when you press on the recessed area 3 Turn the system key switch to the Stan...

Page 34: ...oor use the sliding door latch to open the door and proceed to Step 6 and Step 7 a Remove two screws near the top of the screen See Figure 2 2 b Tilt the screen out and lift it free of the chassis Set the screen aside 6 Remove the AC power cord that is coiled inside the server cabinet Set the power cord aside 7 Remove the kick panel by loosening the two screws See Figure 2 3 Set the panel aside St...

Page 35: ...ed under the floor the cables should be between the bottom panel and the kick panel See Figure 2 3 2 Place the bottom of the rear screen on the flanges near the cabinet bottom 3 Tilt the rear screen against the frame and install two screws to secure the screen in place See Figure 2 2 4 After all the cables are connected and the screen and panel have been replaced power on the system Rear screen AC...

Page 36: ...0 Cabinet Rear Screen and Kick Panel 2 Route the AC power cord and external interface cables along the bottom panel of the cabinet and over the edge of the bottom panel See Figure 2 3 The cables should be between the bottom panel and the kick panel when you replace the kick panel 3 Uncoil the AC power cord and plug it into a grounded wall outlet The outlet must be a 200 240 VAC 30A circuit dedicat...

Page 37: ...h your system into the front panel key switch Turn it to the Standby position fully counterclockwise See Figure 2 4 Figure 2 4 Key Switch Positions 2 Turn the AC power switch to Off This switch is in the upper left corner of the system rear See Figure 2 5 3 Connect the female end of the power cord into the AC connector This connector is to the left of the AC power switch on the system rear See Fig...

Page 38: ... with Section 2 4 through Section 2 7 for further cabling instructions 6 After all the cables are connected power on the system 2 4 Connecting the Network Cable to the System The locations specified in the following instructions assume the use of twisted pair 10BASE T or 100BASE T Ethernet 1 Locate the network cable Figure 2 6 shows the twisted pair Ethernet network cable Figure 2 6 Network Cable ...

Page 39: ...only route the cable down along the right mounting rail of the chassis Use tie wraps to secure the cable to the rail 2 5 Connecting the System to the Network 1 Connect the network cable to a twisted pair to transceiver interface box 2 Connect the interface box with an appropriate cable to a network transceiver Figure 2 8 shows a typical arrangement for connecting the system to an Ethernet network ...

Page 40: ...ne of the transceiver connectors b Screw the other Ethernet coaxial cable into the other round screw on type connector on the transceiver 4 Determine if a terminator should be installed Table 2 1 lists the cabling limitations for Ethernet 5 If termination is required install a 50 ohm terminator in the unused transceiver N connector or at the end of the coaxial cable Use a female double N type conn...

Page 41: ...chieve next highest value Distance between transceivers multiples of 2 52 2 Transceivers are placed at intervals of 2 5 meters or multiples of 2 5 meters along the Ethernet cable Example transceivers are connected 2 5 meters apart not 2 0 meters Example transceivers are connected 15 meters apart 6 multiples of 2 5 meters not 14 0 meters Minimum length of Ethernet coaxial cable segments 23 4 Maximu...

Page 42: ...e Section 3 4 Failure of Network Communications and refer to the manual provided with your hub for more information about the Link Integrity Test function 2 6 Connecting an ASCII Terminal An ASCII terminal or workstation must be attached to the server to display diagnostic messages produced by the firmware power on self test POST or OpenBoot PROM OBP program A terminal is not required for normal s...

Page 43: ...ters can be changed in the NVRAM Refer to the set defaults and printenv commands in the OpenBoot Command Reference manual part number 802 3242 2 7 Connecting the Fiber Cable to the I O Board 1 Remove the two plastic caps that cover the cable connector on the FC OM module 2 Remove the plastic cap covering the ends of the fiber cable 3 Connect one end of the fiber cable into the FC OM module install...

Page 44: ... on the I O board in slot 1 controls internal SCSI tray devices Therefore the external SCSI connector on the I O board in slot 1 must always have a terminator installed Note The maximum combined length for a string of SCSI cables is six meters for non differential cables For differential SCSI cables the maximum is 25 meters When calculating the total length of a SCSI string include external cables...

Page 45: ...rd in slot 1 this is an SBus card installed in an appropriate SBus slot For I O boards in slots 2 through 15 use the onboard SCSI 2 port or an SBus card installed in an appropriate SBus slot Figure 2 12 shows the location of the onboard single ended SCSI connector on the I O board Location Internal Length Comments Enterprise 6000 slot 1 3 7 meters Includes I O board traces and cables to SCSI tray ...

Page 46: ...to secure the cable to the left mounting rail 3 Connect the other end of the SCSI cable to the external SCSI 2 device 4 Enterprise 6000 5000 systems only return to Section 2 2 Removing and Replacing the Enterprise 6000 5000 Cabinet Rear Screen and Kick Panel to replace the screen and panel Then power on and test the server This concludes the hardware installation for the standalone server You can ...

Page 47: ...k trays JumpStart software is not installed on SPARCstorage Array disks JumpStart will run only when the system is powered on for the first time Caution JumpStart may incorrectly install the system as a standalone workstation You should prevent JumpStart automatic installation from proceeding if the appropriate server specific configuration information is not in place Information about the JumpSta...

Page 48: ...gs and connections Observe the yellow middle LED on the front panel It should go off when boot completes If it remains lit observe the terminal screen for boot messages produced by the firmware diagnostic program during power on To power on the cabinet system 1 Begin with a safety inspection of the system a Turn the system key switch to the Standby position See Figure 3 1 Note The standby position...

Page 49: ...ork on or in the server cabinet This connection provides a ground path that prevents damage from electrostatic discharge Warning Never move the system or expansion cabinets when system power is on Excessive movement can cause catastrophic disk drive failure Always power the system OFF before moving it 2 Turn on power to any expansion cabinets Read the documentation supplied with each type of expan...

Page 50: ...ncer Power Switch 3 Turn on power to the terminal if applicable 4 Set the system cabinet Local Remote switch to Local See Figure 3 3 5 Turn the AC power sequencer power switch to On See Figure 3 2 Listen for the sound of AC powered devices such as disk drives and fans in the disk drive tray s AC power switch ...

Page 51: ...tch to the On position The system will run firmware diagnostics for about one minute and then boot You should see and hear several things happen The fans in the power supplies begin turning The left LED green on the front of the cabinet turns on immediately to indicate the DC power supply is functioning The middle LED yellow begins flashing Local remote switch ...

Page 52: ...iled diagnostics If there are no faults or if firmware completes a successful reconfiguration in response to detected faults the system boots If the system is unable to communicate with the network see Section 3 4 Failure of Network Communications Note POST does not test drives or internal parts of SBus cards To test these devices run OpenBoot PROM OBP diagnostics manually after the system has boo...

Page 53: ... your screen The message lists hardware detected in the system Note This screen display is an example only The actual message displayed on the screen will vary with the software running on the system If firmware indicates a hardware problem at this time refer to the Ultra Enterprise 6000 5000 4000 Systems Manual Part 3 Troubleshooting for further instructions 16 slot Ultra Enterprise 6000 Keyboard...

Page 54: ...ailable on the front panel LEDs as shown in Figure 3 5 Figure 3 5 System Status LEDs Cabinet Server Table 3 1 summarizes LED status indications Table 3 1 Front Panel LED Status Indicators LED Position Condition Left LED green On DC power supply is receiving AC current Off There is no DC power Middle LED yellow On Flashing first 60 seconds Self tests are running Off after self tests end No hardware...

Page 55: ...ystem To shut down the system 1 Notify users that the system is going down 2 Back up the system files and data to tape if necessary 3 Halt the system using the appropriate commands Refer to the Solaris Handbook for SMCC Peripherals that corresponds to your operating system 4 Wait for the system halted message and the boot monitor prompt 5 Turn the key switch on the front panel of the server to the...

Page 56: ... a Turn the system key switch to the Standby position See Figure 3 6 b Turn the AC power sequencer power switch to Off The AC power sequencer is at the rear of the enclosure See Figure 3 6 c Verify that the AC power cord is plugged into a wall socket Caution Do not disconnect the power cord from the wall socket when working on the server This connection provides a ground path that prevents damage ...

Page 57: ...ed after 60 seconds a test has failed The bottom front panel LED green flashes to show that booting is successful and the operating system is running If this LED fails to turn on and the middle LED is on a severe hardware fault exists Warning Never move the system when the power is on Failure to heed this warning may result in catastrophic disk drive failure Always power the system off before movi...

Page 58: ...e no faults or if firmware completes a successful reconfiguration in response to detected faults the system boots Note If faulty parts are detected and configured out of the working system you and the system manager must decide whether to operate the system until replacement parts arrive or to halt operation Also if a faulty component cannot be replaced in the field the entire subassembly like the...

Page 59: ...unning on your system If firmware indicates a hardware problem at this time refer to the Ultra Enterprise 6000 5000 4000 Systems Manual Part 3 Troubleshooting for further instructions Boot the system using the procedure that is appropriate for your operating system See the Preface UNIX Commands for a reference to documentation that describes this procedure 3 3 3 Interpreting Status LED Patterns If...

Page 60: ... The worst condition is if the top and middle LEDs are on system cannot boot or if no LED is on Table 3 2 Front Panel LED System Status LED Position Condition Top LED green On The power supply is delivering DC power Middle LED yellow Flashing first 60 seconds of AC power Self tests are running Off after self tests end No hardware failures detected On after self tests end Hardware failure was detec...

Page 61: ...he system To shut down the system 1 Notify users that the system is going down 2 Back up the system files and data to tape if necessary 3 Halt the system using the appropriate commands Refer to the Solaris Handbook for SMCC Peripherals that corresponds to your operating system 4 Wait for the system halted message and the boot monitor prompt 5 Turn the key switch on the front panel of the server to...

Page 62: ...n be enabled or disabled with a hardware jumper which you must set manually For the TPE and MII onboard ports on the I O board the link test is enabled or disabled through software as shown below Remember also that the TPE and MII ports are not independent circuits and as a result both ports cannot be used at the same time Note Some hub designs do not use a software command to enable disable the t...

Page 63: ...lution 2 Use this alternate method when the system is already in OpenBoot 1 At the monitor OpenBoot prompt type 2 Reboot to make the changes effective ok show devs eeprom nvramrc probe all install console banner apply disable link pulse device name Repeat for any additional device names eeprom use nvramrc true ok nvedit 0 probe all install console banner 1 apply disable link pulse device name Repe...

Page 64: ...3 18 Ultra Enterprise 6000 5000 4000 Systems Installation Guide November 1996 3 ...

Page 65: ...ice SyMON Software Solstice SyMON features a graphical user interface GUI display that shows various graphs reflecting system status Solstice SyMON intended to complement network wide and enterprise wide system management tools is accessible through an SNMP interface from network tools such as Solstice SunNet Manager Refer to the online Solstice SyMON User s Guide part number 802 5355 for starting...

Page 66: ...4 2 Ultra Enterprise 6000 5000 4000 Systems Installation Guide November 1996 4 ...

Page 67: ...gth 2 9 fiber 2 11 network 2 6 power 2 4 preparing for 2 1 SCSI 2 12 twisted pair 1 7 cautions notes warnings xiv SCSI bus SBus 2 13 clearance system 1 10 connecting power cord 2 5 cord power 1 15 D disk drive tray use stabilizer bar 1 13 drive disk caution improper shutdown 3 9 moving with power on 3 3 test 3 6 tray safety 1 13 duplicate addresses caution 2 13 E error messages POST 3 2 3 10 termi...

Page 68: ...essages boot 3 7 3 13 error 3 2 3 10 MII connector 1 7 N network cabling 2 6 to 2 7 site preparation 1 7 transceiver 1 9 notes cautions warnings xiv P panel replace kick 2 1 rear screen 2 1 POST error messages 3 2 3 10 LED interpretation 3 6 program 2 10 reconfiguration of system 3 6 3 12 restart 3 6 SBus card 3 6 power cabling 2 4 cord location 1 15 off the system 3 9 3 15 on the system 3 2 to 3 ...

Page 69: ...oorspace 1 9 network 1 7 software using 4 1 stabilizer bar 1 13 status LEDs 3 6 3 14 switch AC 2 6 3 2 3 10 key 3 3 local remote 3 4 reset 3 6 system clearance 1 10 T test drives 3 6 link test 2 10 SBus cards 3 6 tools list 1 11 1 14 transceiver network 1 9 tray stabilizer bar 1 13 TTY terminal See ASCII terminal twisted pair cable 1 7 U unpacking 1 3 W warnings notes cautions xiv wrench leveling ...

Page 70: ...Index 4 Ultra Enterprise 6000 5000 4000 Systems Installation Guide November 1996 ...

Page 71: ...o Please explain 3 Were the illustrations clear Yes No Please explain 4 Was the information complete and easy to find Yes No Please explain 5 Do you have additional comments about the Ultra Enterprise 6000 5000 4000 Systems Installation Guide You can send detailed comments via email to smcc docs sun com or send a fax to SMCC Doc Feedback at 415 786 6443 Your Name Title Company Name Address City St...

Page 72: ......

Reviews: