background image


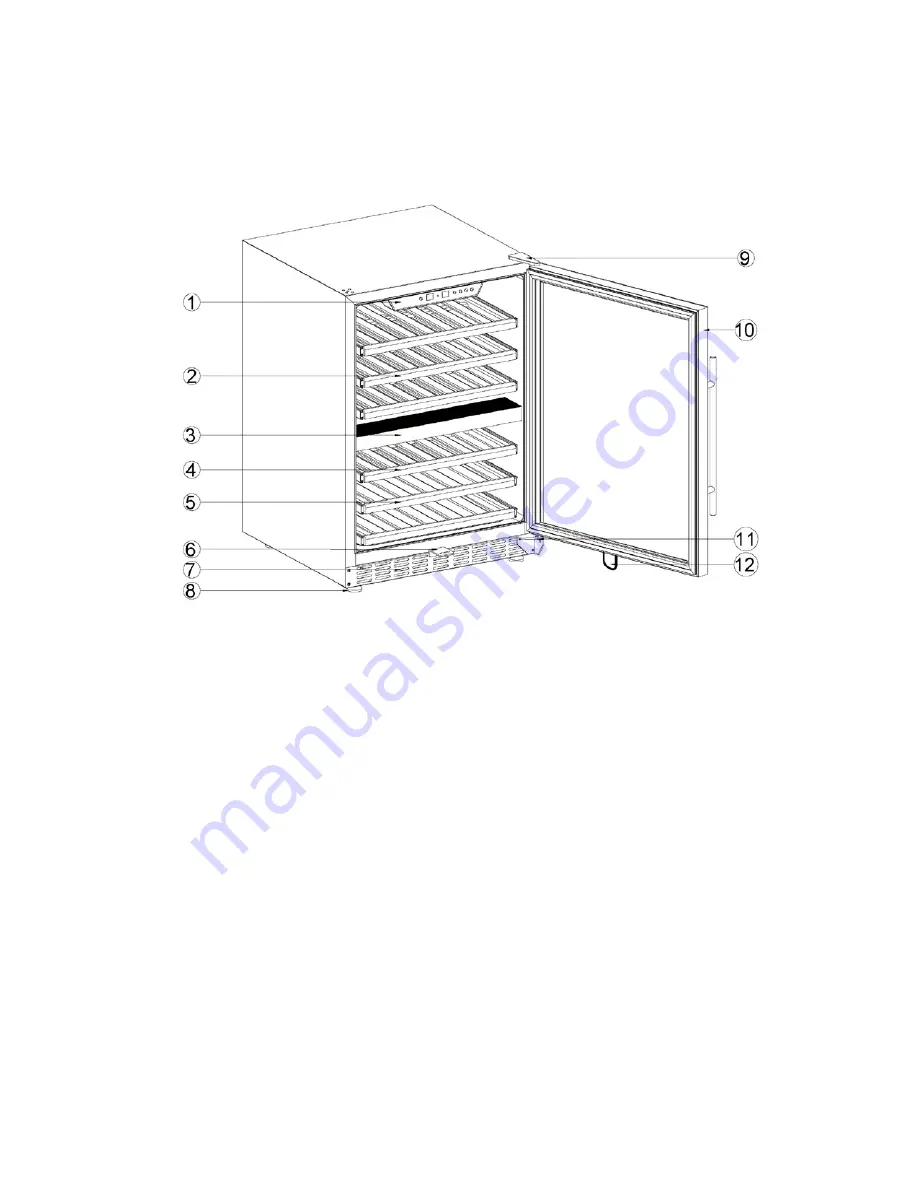
LOCATION OF PARTS 


1.  Control panel   
2.  Large shelf in upper zone   
3.  Air-duct board   
4.  Large shelf in lower zone   
5.  Small shelf in lower zone   
6.  Lock hook   


7.  Front vent   
8.  Adjustable feet   
9.  Upper hinge   
10. Door (with handle and gasket) 
11. Lower hinge 
12. Lock 

Summary of Contents for SWC532LBIST

Page 1: ..._____ BUILT IN TWO ZONE WINE COOLER Model SWC532LBIST Owner s Manual BEFORE USE PLEASE READ AND FOLLOW ALL SAFETY RULES AND OPERATING INSTRUCTIONS Felix Storch Inc Summit Appliance Division 770 Garris...

Page 2: ...s for Chilling Wine 8 Control Panel 8 ON OFF Power 8 RUN Light 8 Setting the Temperature Control 8 9 Interior Light 9 Door Lock 9 Defrosting 9 Storage of Wine Bottles 10 Care and Maintenance 10 12 Cle...

Page 3: ...quids in the vicinity of this or any other appliance The fumes can create a fire hazard or explosion Use two or more people to move and install the wine cooler Failure to do so can result in back or o...

Page 4: ...ses building up For every ounce of coolant at least 325 cubic feet of room space is required The amount of coolant in the appliance is stated on the data plate on the back of the appliance It is hazar...

Page 5: ...ntrol panel 2 Large shelf in upper zone 3 Air duct board 4 Large shelf in lower zone 5 Small shelf in lower zone 6 Lock hook 7 Front vent 8 Adjustable feet 9 Upper hinge 10 Door with handle and gasket...

Page 6: ...ng the unit should have at least 4 of clearance at both sides at the top and at the back to allow for adequate ventilation If the appliance is to be built in leave at least 3 16 at both sides 1 16 at...

Page 7: ...e the third ground prong from the power cord Any questions concerning power and or grounding should be directed toward a certified or authorized products service center Reversing the Door Swing This a...

Page 8: ...opposite side Fig 4 4 Remove the screw of the door handle then remove the bottom screw on the left side of the door and remove the lower support of the door Fig 5 Install the lower support of the doo...

Page 9: ...middle or lower section Control Panel ON OFF Power Connect the power cord to a properly grounded outlet To turn the appliance on or off press the ON OFF button NOTE This wine cooler has a protective...

Page 10: ...restart before this time delay the wine cooler will not start When you use the wine cooler for the first time or restart the wine cooler after it has been shut off for a long time there could be a few...

Page 11: ...than one layer of bottles on a sliding shelf Never try to pull out more than one sliding shelf at a time CARE AND MAINTENANCE Cleaning Your Wine Cooler 1 Turn off the power unplug the appliance and r...

Page 12: ...on the LED panel and replace the light with one having the same specifications Power Failure Most power failures are corrected within a few hours and should not affect the temperature of your applian...

Page 13: ...d be located in the coolest area of the room away from heat producing appliances and out of direct sunlight TECHNICAL INFORMATION Model Number SWC532LBIST Volume 5 43 cu ft 154 liters Bottle Capacity...

Page 14: ...dded to the wine cooler The door is opened too often The door is not closed completely The temperature controls are not set correctly The door gasket does not seal properly The light does not work Not...

Page 15: ...14 NOTES...

Page 16: ...States 5 Repairs to parts or systems resulting from unauthorized modifications made to the appliance 6 Expenses for travel and transportation for product service in remote locations 7 The removal and...

Reviews: