background image

18

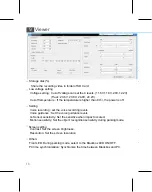
저장공간(%)

SD Card내 폴더에 영상이 저장되는 공간을 할당합니다.

저전압 설정

전압설정 : 차단 기준전압 설정은 11.6V, 11.8V, 12.0V, 12.2V로 각 4단계로 선택이 가능합니다.

(화물차 : 23.6V, 23.8V, 24.0V, 24.2V)

온도차단 설정 : 고온 87˚C 이상이 되면 블랙박스의 전원을 OFF 합니다.(선택사용)

설정

음성녹음 설정 : 음성 녹음되는 소리의 크기를 설정합니다.
음성안내 설정 : Black Box 사용간 발생하는 안내 음성의 크기를 설정합니다.
G-센서 감도 설정 : 충격이 일어 났을 때 이벤트를 기록하기 위한 민감도를 설정합니다.
모션감도 설정 : 주차모드 시 물체의 인식 감도를 설정합니다.

화면설정

명암 : 화면의 밝기를 설정합니다.

선명도 : 화면의 선명도를 설정합니다.

기타설정

전방LED : 주차모드 시 블랙박스 전방 시큐리티(LED) ON/OFF로 선택이 가능합니다.
PC 시간 동기화 : BlackBox의 시간을 PC의 시간정보와 동일하게 설정합니다.

10


5.

시작버튼을 클릭하면 아래와 같이
경고 창이 열

경고 창이 열리면 [확인] 버튼을
클릭한다

1

[ 내 컴퓨터 ]를 클릭한다

2

[ 이동식저장소가 있는 장치]에서
해당 [이동식디스크]를 오른쪽

마우스로 클릭한다.

3. 메뉴 바에 있는

[포맷

]

을 클릭한다.

4. 좌측 그림과 같이 포맷 창이 열리면

파일시스템을 [FAT32]로 지정해주고
시작버튼을 클릭한다.

5.

시작버튼을 클릭하면 아래와 같이
경고 창이 열

경고 창이 열리면 [확인] 버튼을
클릭한다

1

[ 내 컴퓨터 ]를 클릭한다

2

[ 이동식저장소가 있는 장치]에서
해당 [이동식디스크]를 오른쪽
마우스로 클릭한다.

3. 메뉴 바에 있는

[포맷

]

을 클릭한다.

4. 좌측 그림과 같이 포맷 창이 열리면

파일시스템을 [FAT32]로 지정해주고
시작버튼을 클릭한다.

5.

시작버튼을 클릭하면 아래와 같이
경고 창이 열

경고 창이 열리면 [확인] 버튼을
클릭한다

1

[ 내 컴퓨터 ]를 클릭한다

2

[ 이동식저장소가 있는 장치]에서
해당 [이동식디스크]를 오른쪽

클릭한다.

3. 메뉴 바에 있는

[포맷

]

을 클릭한다.

4. 좌측 그림과 같이 포맷 창이 열리면

파일시스템을 [FAT32]로 지정해주고
시작버튼을 클릭한다.

5.

시작버튼을 클릭하면 아래와 같이
경고 창이 열

경고 창이 열리면 [확인] 버튼을
클릭한다

1

[ 내 컴퓨터 ]를 클릭한다

2

[ 이동식저장소가 있는 장치]에서
해당 [이동식디스크]를 오른쪽
마우스로 클릭한다.

3. 메뉴 바에 있는

[포맷

]

을 클릭한다.

4. 좌측 그림과 같이 포맷 창이 열리면

파일시스템을 [FAT32]로 지정해주고
시작버튼을 클릭한다.

5.

시작버튼을 클릭하면 아래와 같이
경고 창이 열

경고 창이 열리면 [확인] 버튼을
클릭한다

1

[ 내 컴퓨터 ]를 클릭한다

2

[ 이동식저장소가 있는 장치]에서
해당 [이동식디스크]를 오른쪽
마우스로 클릭한다.

3. 메뉴 바에 있는

[포맷

]

을 클릭한다.

4. 좌측 그림과 같이 포맷 창이 열리면

파일시스템을 [FAT32]로 지정해주고
시작버튼을 클릭한다.

10

방법

1

3

4

5

19

SD card Format

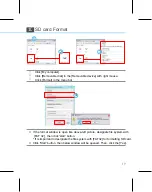
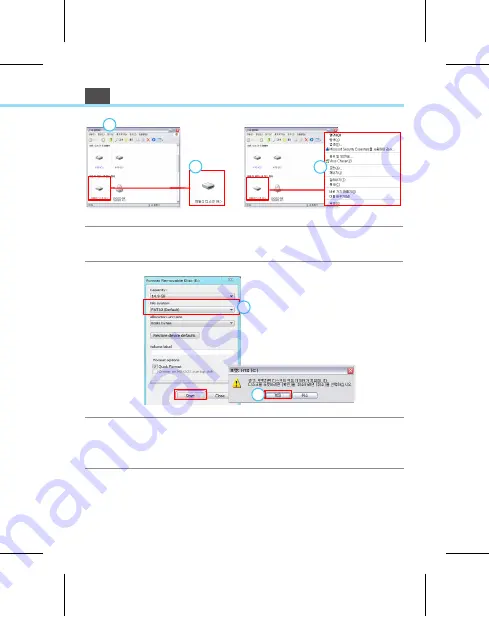
Click [My computer].

Click [Format] in the menu bar.

Click [Removable disk] in the [Removable device] with right mouse.

If the format window is open like above-left picture, designate file system with 
 [FAT 32] , then click 'start' button.

 * If is important to designate the file system with [FAT32] for formatting SD card.

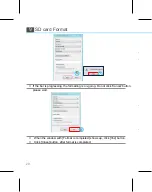
 Click 'Start' button, then below window will be opened. Then, click the [Yes].

Summary of Contents for SMVB-6100

Page 1: ...User manual...

Page 2: ...ontinuous product enhancement endeavors In such cases the information will be duly communicated on our website or via other appropriate communications channels This device has been tested and found to...

Page 3: ...Contents 3 6 11 14 17 19 1 Product responsibility Warning 10 SD card Format 11 Warranty 21 2 2 Liability 8 Installation 9 Viewer 7 Specifications 3 Components 6 Operation 4 Names of each parts 7 9 5...

Page 4: ...s not liable for any data loss caused by physical damage to the product or its accessories The manufacture and distributor have no liability for any injury or damage to property associated with the us...

Page 5: ...ct connection to vehicle battery Remove all substance from the lens including the tinting film that may affect the quality of the recorded image Any obstruction may degrade the recorded image quality...

Page 6: ...r turning towards direct sunlight on a very bright day the video quality may be compromised Check the product frequently to ensure that the camera angle is properly adjusted After violent force is app...

Page 7: ...at since format will delete all data 1 Warranty will be voided if above are not kept by user Back up micro SD card memory to HDD or CD DVD if any data is needed to be preserved Data might get lost due...

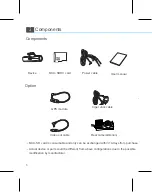
Page 8: ...Components Option GPS module Ciger Jack cable Video out cable Actual device or parts could be different from above configurations due to the possible modification by manufacturer Micro SD card is cons...

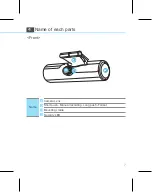
Page 9: ...4 4 3 1 4 2 1 2 3 4 7 Front Name Camera Lens Mounting cradle Security LED Short push Manual recording Long push Format Name of each parts...

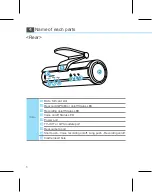
Page 10: ...3 8 Rear Name of each parts Rear cam GPS Error on off Status LED Micro SD card slot Recording on off Status LED Voice on off Status LED TV OUT or GPS module port Power port Short push Voice recording...

Page 11: ...of force it will trigger event recording mode and save them under Parking folder Auto format function by pushing a button PC Viewer Recording image can be played with exclusive viewer to confirm the d...

Page 12: ...nts to keep old recordings user must backup the recordings prior to the deleting of files or formatting After formatting SD card and turning the power on each folder and setting quota will be automati...

Page 13: ...ice LED functions No recording Normal recording Event or Motion recording No recording Creating file from motion detection Parking mode not recording Normal or event recording Button functions LED LED...

Page 14: ...re check Blackbox protected Blackbox recording by the sensor by the temperature when ACC power ON Constant Cigar jack End Disconnect from B Device ended 4 Voice Guidance Description Message Descriptio...

Page 15: ...rom ACC power on off High sensitive internal MIC MUTE possible Voice recording Infinite Event Manual Parking Recording mode Self formatting system SD Card format 12 24V Power Current sinking 290mAh ba...

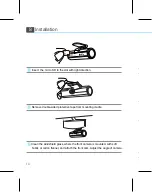
Page 16: ...t with right direction 2 Remove double sided protective tape from mounting cradle 3 Clean the windshield glass where the front camera is mounted with soft fabric or cotton flannel and attach the front...

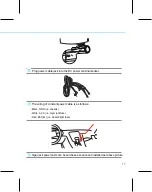
Page 17: ...wer terminal socket 5 The wiring of constant power cable is as follows Black GND i e chassis White ACC i e Ciger jack fuse Red BAT B i e hazard light fuse 6 Cigar jack power cable can be purchase as o...

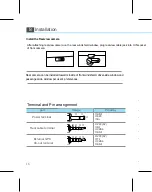
Page 18: ...ow per user s preferences Terminal and Pin arrangement G N D A C C B V C C 5V N C C V B S G N D V C C 5V T X C V B S G N D 16 After attaching rearview camera on the rear windshield window plug rearvie...

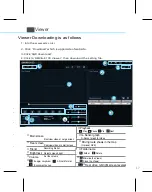
Page 19: ...ss Driving route shows in the map Optional GPS Adjust screen bright Volume Folder name Set the volume Minimize the Viewer Close the VIewer Rear video left right screen reversal 17 Delete 8 Enviroment...

Page 20: ...is off Setting Screen setting Others Voice recording set the voice recording levels Voice guidance Set the voice guidance levels G Sensor sensitivity Set the sensitive when impact occured Motion sensi...

Page 21: ...mat in the menu bar Click Removable disk in the Removable device with right mouse If the format window is open like above left picture designate file system with FAT 32 then click start button If is i...

Page 22: ...8 20 SD card Format Click Close button after format is completed When the window with Format is completed shows up click Yes button If the bar is progressing the formatting is on going Do not click C...

Page 23: ...ustomer fault For performance functional problems under normal use conditions The warranty is only valid in the country where you purchased the product Accessories such as Battery or Micro SD card war...

Page 24: ...co kr US CANADA Distributor GSI SYSTEMS INC 1201 S State college Blvd Fullerton CA 92831 Tel 1 714 349 8131 Homepage www gsisystemsus com Manufacture ATM CO LTD 681 300 92 Hamwol 20 gil Seongan dong J...

Reviews: