background image

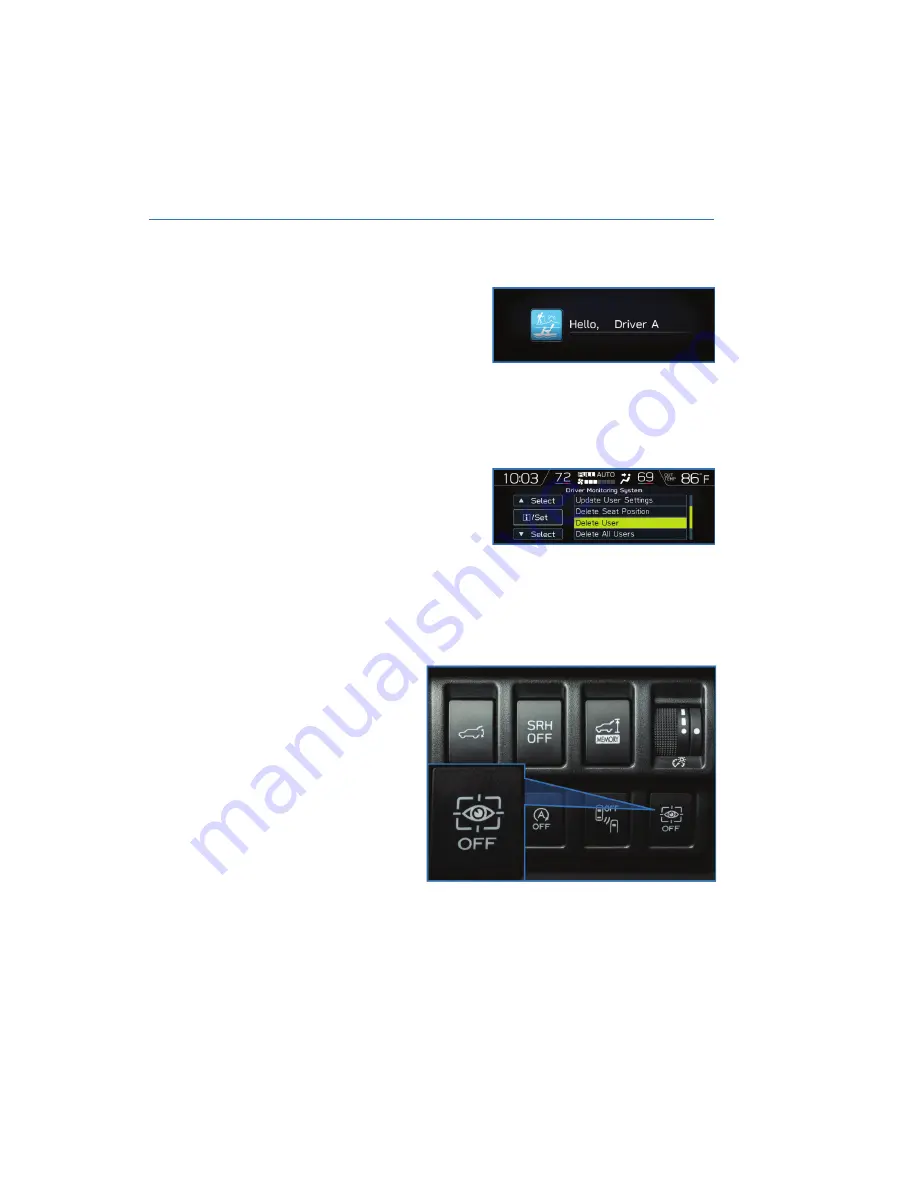
Recognizing a Driver

DriverFocus

®

will scan and recognize you as

soon as you enter the vehicle. The MFD will

display a welcome screen with your user

name and personal icon. The vehicle will also

recall your user settings, such as driver seat

and side mirror positions.

If the system does not automatically recognize you, use the Multi-Function Display to

navigate to the “Driver Monitoring System” menu, then select “Repeat Facial Scan.”

Deleting a Driver

1. With the ignition on, use the INFO button

on the steering wheel to navigate to the

“Settings” menu in the MFD.

2. Press and hold the INFO button to enter

the settings menu.

3. Use the i/SET switches to navigate to the “Driver Monitoring System” menu.

4. Select “Delete User”.

5. Select the driver you want to delete and select “Yes”.

DRIVER MONITORING SYSTEM OFF

Press the switch on the lower left

instrument panel to turn the

DriverFocus

®

system off. Press

the switch again to turn the

system back on.

NOTE: The user recognition

function and the automatically

retract seat on entry function

remain active even if the

DriverFocus

®

system is turned off.

DRIVERFOCUS DISTRACTION MITIGATION SYSTEM

111

Summary of Contents for Forester 2022

Page 1: ...2022 Getting Started Guide Forester Subaru of America Inc One Subaru Drive Camden NJ 08103 9800 MSA5B2202A Issued August 2021 Printed in USA 08 21 Love It s what makes Subaru Subaru...

Page 2: ...k of HARMAN International Industries Incorporated Harman Kardon is a registered trademark of Harman International Industries Incorporated Quantum logic is a trademark of Harman International Industrie...

Page 3: ...ATION METER 16 WARNING AND INDICATOR LIGHTS 17 CONTROLS INSTRUMENT PANEL SWITCHES LOWER LEFT 18 AUDIO CONTROLS 18 ADVANCED ADAPTIVE CRUISE CONTROL 19 i SET SWITCH 19 INFO SWITCH 20 LIGHT CONTROLS 20 T...

Page 4: ...Y 57 TIRE PRESSURE MONITORING SYSTEM TPMS 58 STARLINK OVERVIEW OVERVIEW OF YOUR MULTIMEDIA SYSTEM 60 BUTTONS 60 TOUCHSCREEN 62 STEERING WHEEL CONTROLS 63 VOICE RECOGNITION 64 STARLINK HOME HOME SCREEN...

Page 5: ...AB 104 DRIVERFOCUS DISTRACTION MITIGATION SYSTEM DRIVERFOCUS OVERVIEW 106 DRIVERFOCUS COMPONENTS 106 DROWSY INATTENTIVE WARNINGS 109 DRIVER PROFILE CONVENIENCE SETTINGS 109 DRIVER MONITORING SYSTEM OF...

Page 6: ...formation on the basic operation and key features of your Subaru as well as the STARLINK and EyeSight systems in your vehicle IMPORTANT SAFETY INFORMATION The Getting Started Guide is not intended as...

Page 7: ...rvice is available anytime during the 3 year 36 000 mile Subaru Limited Warranty whichever comes first See your retailer for details and refer to the Roadside Assistance guide in the owner s informati...

Page 8: ...power to all four wheels improper towing may damage your AWD system The best way to tow your Forester is with a flatbed truck by your Subaru retailer or a commercial towing service For more informati...

Page 9: ...ress the unlock disarm button once to unlock the driver s door and fuel door Two chirps sound and the hazard warning lights flash twice To unlock all the doors and the rear gate briefly press the butt...

Page 10: ...play use the i Set Switch to navigate to Vehicle Setting or through the STARLINK Touchscreen select Settings then Vehicle The available settings are listed in the table below AVAILABLE SETTINGS AUTO D...

Page 11: ...RLINK Touchscreen by selecting Settings then Vehicle Unlocking Using Door Handles Grip the driver s door handle to unlock the driver s door or all doors depending on the setting Grip the front passeng...

Page 12: ...nding on the setting Two chirps sound and the hazard warning lights flash twice Locking Using the Rear Gate Close all the doors and the rear gate and press the rear lock button All doors and the rear...

Page 13: ...arning lights flash twice Stopping the Power Rear Gate If you briefly press the Power Rear Gate Button while the rear gate is opening it will stop Press and briefly hold the button again to close the...

Page 14: ...u briefly press the Power Rear Gate Close Button on the inside edge of the rear gate while the gate is opening it will stop Press the button again to close the rear gate Closing the Power Rear Gate To...

Page 15: ...fuel lid will lock The Power Rear Gate also comes equipped with a memory height function allowing you to set the where the Power Rear Gate stops when it opens For step by step instructions on setting...

Page 16: ...1 Power Windows p 30 2 Power Exterior Mirrors p 28 3 Instrument Panel Switches p 18 4 i Set Switch p 19 5 Audio Controls p 18 6 Light Controls p 20 7 Combination Meter p 16 INSTRUMENT PANEL 14...

Page 17: ...ed Adaptive Cruise Control p 19 9 Multi Function Display MFD p 20 10 Windshield Wipers p 22 11 STARLINK Multimedia Touchscreen p 60 12 Climate Control System p 31 13 CVT Select Lever p 40 INSTRUMENT P...

Page 18: ...COMBINATION METER 1 Speedometer 2 Trip meter and odometer 3 Fuel gauge 4 Tachometer GAUGES AND WARNING LIGHTS 16...

Page 19: ...ng Door open Brake system Yellow lights indicate caution Some examples are Low fuel Engine low oil level warning light Tire pressure warning light Green and blue lights are for information Some exampl...

Page 20: ...quipped p 116 4 Illumination Brightness p 21 5 Vehicle Dynamics Control OFF if equipped 6 Auto Start Stop OFF p 42 7 Blind Spot Detection Rear Cross Traffic Alert OFF if equipped p 103 8 Driver Monito...

Page 21: ...etting Started Guide or Advanced Adaptive Cruise Control in your EyeSight Owner s Manual i SET SWITCH The i Set switch allows you to cycle through useful driving information in the Combination Meter D...

Page 22: ...headlights can be adjusted through the STARLINK multimedia display 2 Parking Lights Rotate the end of the lever to turn on the instrument panel illumination parking lights side marker lights tail ligh...

Page 23: ...ontrol dial For more information please refer to Instruments and Controls in your Owner s Manual Daytime Running Lights The daytime running lights automatically turn on when the engine is running the...

Page 24: ...s for continuous operation When the lever in is the intermittent position the wiper operates at intervals corresponding with vehicle speed When you move the select lever to the R position the wiper wi...

Page 25: ...n in your SUBARU STARLINK Safety and Security Owner s Manual 3 Automatic Illumination When the switch is in the DOOR position the map lights illuminate when any door is opened the doors are unlocked u...

Page 26: ...t and if equipped Automatic Emergency Steering and Pre Collision Throttle Management Press and hold the switch again for two seconds to turn the systems back on For more information please refer to pa...

Page 27: ...ower Driver s Seat if equipped 1 Seat Position Moving the switch forward or backward will adjust the seat in that direction Pulling up or pushing down on the back of the switch will adjust the seat he...

Page 28: ...top of the seatback while raising the head restraint To lower the head restraint push it down while pressing the release button Each head restraint should be adjusted so that the center of the head r...

Page 29: ...et the position Release the tab and make sure the adjuster is locked in place TILT AND TELESCOPIC STEERING COLUMN You can adjust both the height and lengthwise position of the steering wheel Pull the...

Page 30: ...e center position when finished Auto Tilt down Mirror if equipped The passenger side mirror will automatically tilt down when you move the select lever to the R position giving better visibility when...

Page 31: ...function is on HomeLink 5 Accessory Mirror if equipped The HomeLink 5 accessory mirror provides three buttons to replace devices such as garage door openers gate openers entry door locks security syst...

Page 32: ...ed The moonroof operates with the ignition in the ON position 1 Opening Press briefly hold and release the switch to automatically open the moonroof This also automatically opens the sunshade if it is...

Page 33: ...perature The temperature will appear on the Multi Function Display MFD When using automatic mode the fan speed airflow distribution air inlet control and air conditioning compressor are controlled aut...

Page 34: ...s Ventilation 2 Instrument panel outlets and less foot outlets than bi level Bi Level Instrument panel outlets and foot outlets Feet Foot outlets both side outlets of the instrument panel and some thr...

Page 35: ...ng compressor operates to defrost the windshield more quickly However the indicator on the air conditioner button may not illuminate 9 Rear Window Defogger Button Press this button to turn on the rear...

Page 36: ...ill appear on the screen You can adjust separate temperature settings for the driver s side and passenger s side If equipped with DriverFocus the temperature setting can also be changed with the gestu...

Page 37: ...entilation ventilation 2 bi level feet feet defrost or defrost is shown on the display ICON MODE FUNCTION Ventilation Instrument panel outlets Ventilation 2 Instrument panel outlets and less foot outl...

Page 38: ...turn on the rear window defogger If equipped the outside mirror defogger and windshield wiper deicer will also activate It will automatically turn off after about 15 minutes If the window clears befor...

Page 39: ...e are separate heated seat switches for each side on the rear center console Press the switch to activate the heated seat The heating mode changes to High Low and Off each time you press the switch an...

Page 40: ...your favorite music through your multimedia system or connect to Apple CarPlay or Android Auto All ports provide charging 5V 2 1A to devices The ports on the rear center console are for charging only...

Page 41: ...to the audio system and accessory power outlets Orange indicator illuminates ON All electrical systems are available Orange indicator illuminates OFF Power off and indicator off STARTING THE VEHICLE...

Page 42: ...m the D Drive position causes the transmission to change into Low Mode The shift position indicator shows L as the selected gear Manual Mode if equipped In manual mode you select the desired gear posi...

Page 43: ...t Sharp S Each mode is designed for different types of driving Intelligent The Intelligent I mode provides well balanced performance with greater fuel efficiency and smooth driveability without stress...

Page 44: ...e Auto Start Stop system from the how to video linked in the QR code and from the sections below Auto Start Stop System ON OFF If the Auto Start Stop OFF switch is pressed operation of the Auto Start...

Page 45: ...ight will turn off when the system restarts the engine There are several operating conditions for this system to operate as intended For more information please refer to Starting and Operating in your...

Page 46: ...luminate The light turns off once the brake pedal is released Solid Yellow This light indicates that the system has been turned off The light will turn off once the system is turned back on Flashing Y...

Page 47: ...n the P position NOTE For this system to work your seatbelt must be fastened Make sure to turn off this function before entering an automatic car wash X MODE if equipped X MODE is the integrated contr...

Page 48: ...X MODE press the X MODE switch again In certain situations such as navigating a vehicle stuck in mud or snow it may be helpful to allow more wheel spin by turning off the Vehicle Dynamics Control VDC...

Page 49: ...ch SNOW DIRT is suitable for driving on slippery road surfaces such as snow or gravel where the points of contact between the tires and road surface are visible D SNOW MUD provides maximum torque from...

Page 50: ...OFF NOTE The driver s window and if equipped the front passenger s window will remain active for about 40 seconds and the SUBARU STARLINK Multimedia System will remain on for about three minutes or u...

Page 51: ...place the fuel filler cap on the cap holder inside the lid After refueling put the cap back on and turn it clockwise until you hear a clicking noise Be certain not to catch the tether under the cap w...

Page 52: ...will no longer be able to see the red marker at the bottom of the knob when the seat is locked If equipped release latches are located on either side of the cargo area Pull the release latch on the se...

Page 53: ...rer as well as the installation instructions in your Owner s Manual to properly install the LATCH compatible restraint system Use the appropriate seatbelts or anchorages provided in your Subaru Childr...

Page 54: ...audible beeps and with a Reminder Look in Rear Seat message in the Combination Meter Display CMD You can turn the Rear Seat Reminder off in the Combination Meter Display CMD Passenger Occupant Detecti...

Page 55: ...e rear of your Subaru and insert both ends of the cover into the catches Store the cover under the floor of the cargo area when not in use Instructions for operation are included on the cargo cover ho...

Page 56: ...HOOD PROP The hood prop is located in the left front of the engine compartment Unfold it and insert the end into the slot marked with an arrow ENGINE COMPARTMENT 54...

Page 57: ...r maintenance needs may vary depending on your driving conditions Please consult with your retailer and refer to the Warranty and Maintenance Booklet for complete information and recommended replaceme...

Page 58: ...d braking except in an emergency ENGINE OIL Use 0W 20 synthetic with one of the following specifications API classification SN with the words RESOURCE CONSERVING SN PLUS with the words RESOURCE CONSER...

Page 59: ...support systems when towing a trailer it may be necessary to press the BSD RCTA OFF switch to deactivate the system The system may not operate as expected due to obstruction of the radar waves For det...

Page 60: ...s TPMS The TPMS screen shows individual tire pressure in the Combination Meter Display Use the i Set switch to display the TPMS screen Units for the TPMS can be customized to Psi or KPa in the Combina...

Page 61: ...Touring Tire Inflation Pressure Front Wheel Rear Wheel Temporary Spare Tire 35 psi 33 psi 60 psi NOTE The temporary spare tire if equipped must be used only on a rear wheel If a front wheel tire gets...

Page 62: ...dia Plus 8 0 inch Multimedia Plus 8 0 inch Multimedia Navigation BUTTONS Radio Functions 1 Power Volume Control Press the power volume control knob to mute or un mute the audio and pause playback of c...

Page 63: ...es available on the screen 10 Apps Displays the installed apps that are available on your vehicle Controlling the Volume Adjusting the Volume Turn the volume knob to adjust the volume The volume stays...

Page 64: ...h two fingers Reducing the scale of the map screen Drag Touch and drag your finger on the screen to move the screen to the desired position Scrolling lists Scrolling the map screen Swipe Quickly move...

Page 65: ...3 Source Press the source button to change the audio sources between radio modes and media modes 4 INFO Press to operate the Multi Function Display 5 Call Voice Recognition Press to receive end a call...

Page 66: ...with voice recognition press the Help button on the screen or press the voice recognition button and say Help Tips The system may not recognize the voice command due to various types of interference S...

Page 67: ...M Preset Number Switches to the preset channel Preset 3 Satellite Channel Name Channel Number Switches to satellite channel number Satellite Channel Prime Country 58 Set Fan Speed to 1 7 2 Sets the fa...

Page 68: ...avel Link Android Auto SUBARU STARLINK aha and Apple CarPlay Media Allows you to play CDs USB iPod music or Bluetooth audio by connecting to the device Radio Allows you to select a station to listen t...

Page 69: ...d on You can turn on the Home Screen Shortcuts function by selecting Settings then the General tab To add shortcut icons to the Home Screen press the Home button 1 Select Add Shortcut 2 Select the des...

Page 70: ...ess if equipped with navigation phone favorites screen icons and placement and the background wallpaper To create a driver profile 1 On the Home screen select Settings Then in the General menu select...

Page 71: ...elect Finish Retrieving a Driver Profile The system automatically retrieves the profile once you are in your Subaru with the STARLINK multimedia system on and your phone s Bluetooth active You can als...

Page 72: ...rystal clear audio with no static or distortion Visit www hdradio com for more information and a guide to available radio stations and programming Satellite Radio A SiriusXM Satellite Radio is a tuner...

Page 73: ...a Bluetooth device to the audio system please see page 119 for Android devices or page 123 for Apple devices A QR code and link to more information can also be found on page 72 CD The CD player holds...

Page 74: ...creen see page 119 for Android devices or page 123 for Apple devices MAKING A CALL Once your phone is paired you can make a call through voice recognition by pressing the Voice Recognition Switch on t...

Page 75: ...CALL To receive a call press the Call Switch on the steering wheel or the Call Button on the Touchscreen To reject a call press the End Switch on the steering wheel or the End Button on the Touchscre...

Page 76: ...aging Service MMS is received the incoming message screen pops up with sound and is ready to be retrieved using the Touchscreen Select Play to listen to the message If there is more than one unread me...

Page 77: ...nternet radio personalized music audiobooks Facebook Twitter restaurant and hotel searches weather and more To use the aha application connect your iPhone or Android device via Bluetooth When connecti...

Page 78: ...o the system You can also run supported applications To use the Apple CarPlay application connect your iPhone to the USB port For more information on connecting your iPhone please refer to page 130 in...

Page 79: ...oad or planning adventures the MySubaru app makes loving every part of owning your Subaru easy Although the mobile app is great when you are on the go you can also visit www MySubaru com from your com...

Page 80: ...or service is easy no matter where you are If you are away from your preferred Subaru retailer for service you can always use Service Appointment Scheduler to locate any of our certified Subaru retail...

Page 81: ...favorites You can also customize route options and settings and find the nearest gas station along your route with the touch of a button For more information and step by step directions on using your...

Page 82: ...ARU STARLINK experience includes in vehicle call center support maintenance and diagnostic alerts as well as remote services that keep you connected to your Subaru vehicle Located in the overhead cons...

Page 83: ...learn more ENROLLMENT To enroll in SUBARU STARLINK and access remote services a MySubaru account is required MySubaru is the Subaru owner website that allows you to access vehicle remote services use...

Page 84: ...etails SUBARU STARLINK WI FI HOTSPOT SUBARU STARLINK in vehicle Wi Fi Hotspot keeps you and your family connected using AT T s 4G LTE nationwide cellular network Whether watching movies playing games...

Page 85: ...ARLINK Owner s Manual Performing Software Updates Software updates provide enhancements to the system such as new features added security and upgraded functions You can ask your preferred Subaru retai...

Page 86: ...to adjust the ringtone volume Speech VR Volume Select to set the voice recognition prompts volume Alert Sounds Select to turn the Alert Sound on off for traffic weather or SXM game information updates...

Page 87: ...m Allows you to turn on off Rest Stop Guidance Function Allows you to turn on off Low Fuel Warning Allows you to turn on off Checking for Map Updates You can update the maps to the latest information...

Page 88: ...ich will allow the entire map program to be updated at one time This is a great option if you are going to take a cross country trip and your maps have not been updated in a while To update the map us...

Page 89: ...es with navigation system The following sections contain step by step instructions for setting the clock and you can scan the QR codes for a helpful how to video Choose the appropriate QR code based o...

Page 90: ...and white Multi Function Display MFD use the and buttons next to the clock Automatically To set the clock automatically the Auto mode must be selected in the clock adjustment setting To set the clock...

Page 91: ...GPS signal is available Systems without Navigation Automatically adjusts the clock when a phone is paired and connected via Bluetooth Phonebook Download must be enabled in the Phone Settings For step...

Page 92: ...your passengers take Working together these systems provide enhanced awareness safety and convenience in front to the sides and behind your Subaru Subaru Driver Assist Technologies include EyeSight Dr...

Page 93: ...hat the cameras windshield and area in front of the cameras are treated with special care Please refer to Care and Limitations on page 112 in this Getting Started Guide for more details FUNCTIONS The...

Page 94: ...dditional pressure to the braking system to decrease stopping distance This system can be turned on or off by using the Pre Collision Braking System OFF switch see page 100 Automatic Emergency Steerin...

Page 95: ...accelerates but then suddenly slows down or stops as you begin to accelerate This system can be turned on or off by using the Pre Collision Braking System OFF switch see page 100 Lane Departure Warnin...

Page 96: ...of travel when driving on expressways freeways and interstate highways at approximately 37 mph or greater Lane Departure Prevention uses the EyeSight camera to identify lane markings and assists steer...

Page 97: ...ehicle in front The vehicle is capable of being controlled at a speed between 0 mph and approximately 90 mph You can turn the Advanced Adaptive Cruise Control on or off using the Adaptive Cruise Contr...

Page 98: ...Conventional Cruise Control Conventional Cruise Control maintains a constant traveling speed you set but it does not adapt to the other vehicles in front of you To activate Conventional Cruise Control...

Page 99: ...in the Combination Meter Display CMD with audible beeps Lead Vehicle Start Alert is helpful in situations where you may become temporarily distracted at a traffic light and the vehicle ahead begins t...

Page 100: ...SET Decrease Speed Press the switch down to set an initial target speed Once set press up or down to adjust the target speed Adjust by 1 mph Briefly press the switch up to increase the target speed by...

Page 101: ...NG AND PRE COLLISION BRAKING SYSTEM OFF SWITCHES Lane Departure Warning OFF Press and hold this switch on the overhead console for approximately two seconds to turn off the Lane Departure Warning and...

Page 102: ...rgency Steering and Pre Collision Throttle Management function Press and hold the switch again for approximately two seconds to turn these functions on When these functions are off a yellow Pre Collis...

Page 103: ...and dynamic guidelines that move as the steering wheel is turned Rear vision Camera Washer To help keep your vision clear your Subaru comes equipped with a Rear vision Camera Washer The Rear vision Ca...

Page 104: ...atically BLIND SPOT DETECTION BSD REAR CROSS TRAFFIC ALERT RCTA if equipped This system uses radar sensors mounted behind the rear bumper on the left and right sides that warn you if another vehicle i...

Page 105: ...en moving backward If RCTA detects a vehicle approaching from either side while moving backward the system provides visual and audible warnings The BSD RCTA approach indicator light s on the side mirr...

Page 106: ...ches to low beams STEERING RESPONSIVE HEADLIGHTS SRH The Steering Responsive Headlights SRH system aims the headlight beams in the direction you are steering improving visibility at corners and inters...

Page 107: ...the touchscreen when the select lever is in the R position Select and hold the RAB ON button in the lower part of the touchscreen until it changes to RAB OFF to disable the automatic braking functions...

Page 108: ...rowsy For added convenience DriverFocus can also recognize up to five drivers and remember their preferences such as seat position climate settings and outside mirror positions For more information pl...

Page 109: ...O and i SET switches on the steering wheel INFO SWITCH Press the INFO switch to cycle through useful information in the Multi Function Display MFD Navigate to the Settings Menu then Driver Monitoring...

Page 110: ...h to confirm a selection Combination Meter Display CMD The CMD provides audible signals visual alerts and reminders in the event you become drowsy or distracted DriverFocus status is also displayed in...

Page 111: ...SETTINGS You can take advantage of convenience settings by becoming a registered driver Preferences such as seat and side mirror memory settings as well as some features in the MFD and climate control...

Page 112: ...e following actions to adjust the temperature with gesture control Raise the temperature by 4 gesture toward the DriverFocus camera with an open palm fingers extended up Lower the temperature by 4 ges...

Page 113: ...ion on use the INFO button on the steering wheel to navigate to the Settings menu in the MFD 2 Press and hold the INFO button to enter the settings menu 3 Use the i SET switches to navigate to the Dri...

Page 114: ...s hot the cooling fans may operate Do not block or insert anything into the ventilation holes Do not touch the camera cover because it may be hot due to head generated by the camera system Electronic...

Page 115: ...FORESTER Do not place stickers or objects in the prohibited area in gray FRONT VIEW 113...

Page 116: ...when the lane markings are visible and system effectiveness depends on many factors Blind Spot Detection Lane Change Assist and Rear Cross Traffic Alert are systems designed to assist the driver by m...

Page 117: ...your Forester If you need some help with these features or want to learn more we are here to assist you Your Subaru Owner s Manuals Located in the glovebox Online Subaru Owner s Resources www subaru...

Page 118: ...Power Rear Gate Memory Height from the how to video linked in the QR code and the steps below 1 Make sure the Memory Height Switch is the OFF position the switch is raised and you can see a white lin...

Page 119: ...lose Button on the inside edge of the rear gate A chirp will sound and the hazard warning lights will flash to confirm the height is set When the memory switch is in the ON status the rear gate will s...

Page 120: ...old either button 1 or 2 A chirp sounds when the position is registered While holding the SET button press and hold either button 1 or 2 A chirp sounds when the position is registered To retrieve the...

Page 121: ...to your preferred positions BLUETOOTH PAIRING Pairing an Android Device 1 Start by selecting Settings on the Home screen 2 Select the Phone menu then select Add Device 3 This screen will be displayed...

Page 122: ...ound under apps Then select Connected Devices or Connections 5 Now select Bluetooth This will show a screen to Pair New Device or it will be showing the nearby devices to add Select Subaru BT if shown...

Page 123: ...hes the phone 7 Make sure to allow access to your contacts and call history and select Download to download the phonebook contacts 8 If your phonebook or messages are not appearing press the Phone ico...

Page 124: ...ok Download is enabled 10 If you still cannot access your phonebook or messages go back to your phone s Bluetooth settings and select the gear icon next to your vehicle s device name and ensure all se...

Page 125: ...Add Device 3 This screen will be displayed when pairing mode is in progress The device name will most likely be Subaru BT but be sure to make note of what name it is so you can find it on your phone 4...

Page 126: ...5 Select Bluetooth 6 Now select the device name usually Subaru BT on the Touchscreen HOW TO APPENDIX 124...

Page 127: ...device PIN is correct and select Pair on your phone and Confirm on the Touchscreen 8 Select Allow on the Allow Contacts and Favorites Sync screen then select Download to download the phonebook contac...

Page 128: ...nabled 10 Your iOS Apple device is now paired It is recommended that you restart your Subaru to complete the process and ensure everything is fully synced 11 If your phonebook or messages are not appe...

Page 129: ...properly if one of them is outdated or having an issue The apps can be downloaded from the Play Store For more information visit www android com auto Connecting an Android Phone 1 To set up Android A...

Page 130: ...f the Android Auto app 4 If Android Auto won t launch open the Android Auto app on the phone then select the top left menu button Select Settings then Connected Cars and finally select the top right m...

Page 131: ...Compatible Models Android Auto is available on Android phones To see if your phone is compatible please refer to the Android Auto website https www android com phones HOW TO APPENDIX 129...

Page 132: ...To set up Apple CarPlay you will need to plug the iOS Apple phone into the USB port of the vehicle Make sure to use an MFi certified cable 2 Select Allow on the iOS Apple phone when prompted 3 Select...

Page 133: ...tible with Apple CarPlay visit www apple com ios carplay WI FI Connecting to a Wi Fi Network 1 Display the General Settings screen by pressing the Home button then select Settings Make sure Wi Fi is o...

Page 134: ...of the screen 4 Select Connect to connect to the network If you are connecting to a secure network enter the password and select Join 5 Check that a confirmation message appears when the connection is...

Page 135: ...ot Settings to view or update the following settings Wi Fi Network Name SSID SSID Broadcast Network ON OFF Security Type WPA WPA2 Password Connected Devices Maximum of 8 devices Broadcast Frequency Ho...

Page 136: ...e address or a keyword e g pizza and select Search As you type the address or name of the destination suggestions will display The route calculation screen is displayed if a suggested is selected 3 Se...

Page 137: ...egories are listed alphabetically Use the scroll bar on the right if needed to display more categories then make your selection 3 Select the desired item from the list then select GO for the route cal...

Page 138: ...rtest Fastest Economic You can set the route preferences to search for the shortest fastest or most economic route To do this 1 Select Settings on the home screen 2 Select Navigation 3 Select Route Se...

Page 139: ...t the T junction Keep left at the fork in the road Turn right at the T junction Keep right at the fork in the road Go left at the roundabout Turn left sharp curve You are half way to your destination...

Page 140: ...different color on the map and a small icon representing the type of traffic condition is displayed above the road A subscription to the SiriusXM Satellite Radio Service is necessary to receive the d...

Page 141: ...nce Displays the distance to the destination the estimated travel time to the destination or the estimated arrival time at the destination Select the information box in the lower right corner to chang...

Page 142: ...a Wi Fi follow this process 1 Connect to a Wi Fi network If you need help with this see page 131 2 On the Home screen select Settings then Navigation Next select Map Update on the navigation setting s...

Page 143: ...heck the confirmation message then select Yes 8 This screen is displayed simultaneously with the start of the download and installation Select the X in the upper right corner if you need to stop the d...

Page 144: ...ings and then select General 3 Select Check for Updates If Automatically Check for Updates is turned on at the general settings screen an update check will be performed automatically before proceeding...

Page 145: ...AND COVER 53 CHILD SAFETY LOCKS 50 CLIMATE CONTROL 31 Automatic Climate Control 31 Dual Zone Automatic Climate Control 34 Heated Seats if equipped 37 Heated Steering Wheel 37 Rear Heated Seats 37 Rem...

Page 146: ...king 92 Pre Collision Throttle Management 93 H HIGH BEAM ASSIST HBA 104 HOME SCREEN ICONS 66 HOOD PROP 54 HOW TO OVERVIEW 115 I IGNITION SWITCH 39 IMPORTANT SAFETY INFORMATION 4 IN CASE OF EMERGENCY 5...

Page 147: ...N 82 N NEW VEHICLE BREAK IN 56 O OPERATION 91 OVERHEAD CONSOLE 23 OVERVIEW OF YOUR MULTIMEDIA SYSTEM 60 Various Systems 60 OWNER S RESOURCES 4 P PAIRING A PHONE 72 PHONE 84 POWER EXTERIOR MIRRORS 28 A...

Page 148: ...a by HARMAN 75 Android Auto 76 Apple CarPlay 76 Pandora 75 SiriusXM Travel Link 76 SUBARU STARLINK MOBILE APP 77 SUBARU STARLINK WI FI HOTSPOT 82 T TEXT MESSAGES 74 TILT AND TELESCOPIC STEERING COLUMN...

Page 149: ...NOTES 147...

Page 150: ...NOTES 148...

Page 151: ...NOTES 149...

Page 152: ...NOTES 150...

Page 153: ...NOTES 151...

Page 154: ...NOTES 152...

Page 155: ......

Page 156: ...2022 Getting Started Guide Forester Subaru of America Inc One Subaru Drive Camden NJ 08103 9800 MSA5B2202A Issued September 2021 Printed in USA 10 21 Love It s what makes Subaru Subaru...

Reviews: