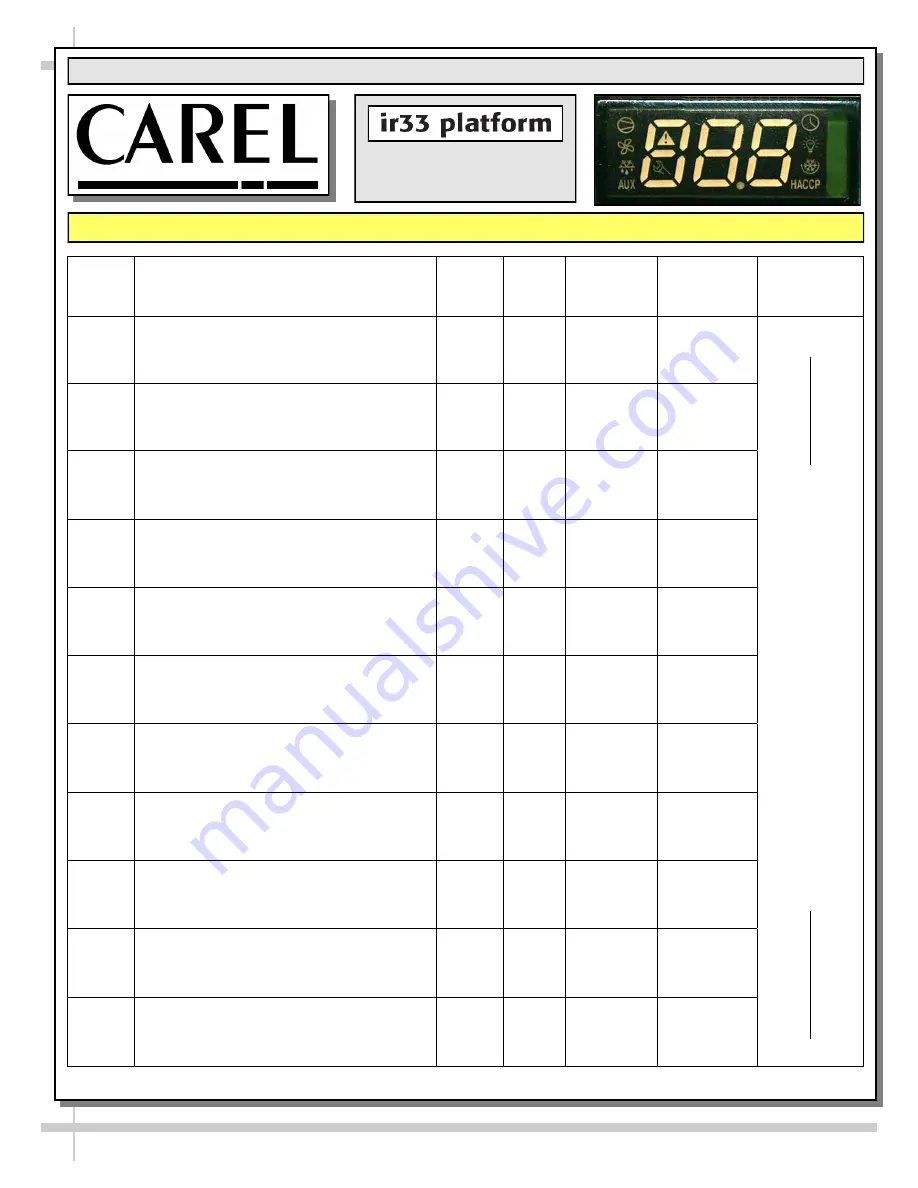
background image

CODE 

PARAMETER 

UOM*  TYPE  MINIMUM  MAXIMUM 

DEFAULT 


/5 

Select Celsius (°C) or Fahrenheit (°F) 

flag 

/c1 

Calibration of probe 1 

°C/°F 

-20 

20 

/c2 

Calibration of probe 2 

°C/°F 

-20 

20 

St 

Temperature set point 

°C/°F 

r2 

r1 

rd 

Control delta 

°C/°F 

20 

0.1 

dl 

Interval between defrosts 

hours 

250 

dt1 

End defrost temperature, evaporator 

°C/°F 

-50 

200 

dP1 

Maximum defrost duration, evaporator 

min 

250 

d6 

Display on hold during defrost 

dd 

Dripping time after defrost 

min 

15 

d/1 

Display of defrost probe 1 

°C/°F 

21 

For Case  

Specific  

Defaults  

See Serial 

Label 

Located  

Near 

Electrical 

Access 

On Your 

Case. 


For 

Additional 

Technical 

Information 

Call 

Structural 

Concepts 

Technical 

Service 

Dept. at 

1(800) 

433.9489 

* Unit Of Measure 

Read And Save These Instructions - Page 3 of 3 

Integrated Electronic 

 Microprocessor Controller 

Summary Table of Operating Parameters 

Summary of Contents for Oasis MOT4048RSS.5197

Page 1: ... E S Rev C Date 10 1 2017 MULTI PURPOSE SELF SERVICE REFRIGERATED ISLAND MERCHANDISER Operating Manuals Oasis MOT4048RSS 5197_MOT6048RSS 5197_20 09455 pub 888 E Porter Road Muskegon MI 49441 Phone 231 798 8888 Fax 231 798 4960 www structuralconcepts com Model MOT4048RSS 5197 Model MOT6048RSS 5197 ...

Page 2: ...UNDAMENTALS CONTINUED REFRIGERATION UNIT ACCESS ILLUSTRATED PARTS BREAKDOWN SERIAL LABEL INFORMATION LOCATION PREVENTIVE MAINTENANCE HONEYCOMB AIR DIFFUSERS SERVICE TECHNICIANS ONLY TROUBLESHOOTING TO BE PERFORMED BY TRAINED SERVICE PROVIDERS ONLY TROUBLESHOOTING CONDENSING SYSTEM BY TRAINED SERVICE PROVIDERS ONLY TROUBLESHOOTING EVAPORATOR SYSTEM BY TRAINED SERVICE PROVIDERS ONLY GENERAL CLEANING...

Page 3: ...D TECH INFO SERVICE section in this manual for sample serial labels COMPLIANCE Performance issues when in violation of applicable NEC federal state and local electrical and plumbing codes are not covered by warranty See below compliance guideline WARNINGS This page contains important warnings to prevent injury or death Please read carefully PRECAUTIONS and WIRING DIAGRAMS See next page for PRECAUT...

Page 4: ...ONDITIONS SPACING ISSUES Performance issues caused by adverse conditions are NOT warranted Keep end panels tightly joined or at least 6 away from structures to prevent condensation Keep rear panel at least 6 from wall structure Unit must be kept at least 15 feet from exterior doors overhead HVAC vents or any air curtain disruption to maintain proper temperatures Unit must not be exposed to direct ...

Page 5: ...s below Note Shipping Brackets will vary in size shape material and location depending upon case type and model 2 Remove Case With Casters From Skid A Place ramp up against pallet to allow case to smoothly slide off pallet at location shown below B Maintain support of case at all times C Unlock casters Slide unit to edge of pallet Slide down ramp and off from pallet Ramp To Be Placed On This Or Op...

Page 6: ...e case is in a start up mode or has been idle for a long period of time the unit will require approximately 30 minutes runtime in order to pull down temperature 2 Temperature Controller Access Assembly or disassembly and servicing to be accomplished by licensed electrical refrigeration contractor Temperature control module is located on the electrical box Electrical box is at center rear of case a...

Page 7: ...otor From either end of case front or rear raise deck pans and check to see that the coil fans are functioning properly Illustration below shows entirely removed deck pan After case has been energized fans should be functional Caution Rotating fans can cause serious injury Refrigeration Lines Routed To Refrigeration Package Refrigeration Lines Drain TXV Valve Evaporator Coils Evaporator Fan Evapor...

Page 8: ...ont See illustration below for specifics Caution To prevent airflow from blocking venting slots place product at least 1 from rear plenum 3 Load Lines The load lines represents the maximum height that product can be place and or stacked in case Keep product at or under load line to assure that refrigerated airflow is properly cycled from rear plenum through return air grille Proper product placeme...

Page 9: ...frigerated compartment are for monitoring Front View Rear Grille Shown Removed From Case No Screw Removal Required Reverse View Slots To Lift Up and Off Hooks No Screw Removal Required warmest air temperature See illustration below for location See OVERVIEW NSF TYPE COMPLIANCE section in this manual for temperature specifics 3 Honeycomb Air Diffuser See PREVENTIVE MAINTENANCE HONEYCOMB AIR DIFFUSE...

Page 10: ...r Compressor Electrical Box Compressor Electrical Box Overflow Pan Hot Gas Loop Condensate Coils and Pan Sight Glass Overflow Pan Electrical Coil Condenser Coils Fan Shroud Plastic glides are mounted to the unit base to assist in sliding condenser out for access Note condenser unit does not slide out front 5 Refrigeration Package Hot Gas Loop System Enlarged View For Illustrative Purposes Only Fro...

Page 11: ...rature refrigeration information as well as regulatory standards to which the case conforms For additional technical information and service see the TECHNICAL SERVICE page in this manual for instructions on contacting Structural Concepts Technical Service Department See images below for samples of both refrigerated and non refrigerated serial labels Sample Serial Label For Refrigerated Case Sample...

Page 12: ...pse the honeycomb to allow it to be pulled out of honeycomb retainer C Carefully pry downward and away from the honeycomb retainer C D F Clean honeycomb with warm water and soap solution Submerse if necessary Use brush to dislodge stubborn or sticky residue Dry by using vacuum s blow mode vs suction mode 2 Honeycomb Air Diffuser Installation D Squeeze honeycomb to allow it to fit into the honeycom...

Page 13: ...rator system If so water will overflow pan and seep onto flooring causing damage Until evaporator pan is functioning or is replaced follow these procedures Use wet dry vacuum or mop bucket to remove standing water Use catch pans for water to drain into Swap out regularly until case has completely drained Caution Disruption of power can cause water to overflow pan and seep onto flooring causing dam...

Page 14: ...heck that the MAIN power switch is on Check that fans are plugged in at the fan shroud Check for foreign material obstructing fan performance Check that fan blades freely rotate within fan shrouds Check that power is going to fans Check that fan wiring is connected on terminal blocks Digital Control Display Is Blank Check that the MAIN power switch is on Check the circuit breaker box for tripped c...

Page 15: ...fluctuation can hinder unit s ability to maintain temperature See OVERVIEW AND WARNINGS section in manual for adverse conditions spacing issue parameters Check that condenser coil air filter attached to rear grille has been cleaned See GENERAL CLEANING TO BE PERFORMED BY STORE PERSONNEL section in operating manual for instructions Check that condenser coil has been cleaned Check air return grilles...

Page 16: ... system Check that liquid line filter dryer is not plugged Check that close offs are intact around condensing coil and that air is not recirculating Check that store ambient temperature isn t above maximum allowed See OVERVIEW TYPE COMPLIANCE WARNINGS PRECAUTIONS WIRING PLUGS section in this manual Head Pressure Too Low Check if sight glass is flashing or showing low charge Check that suction pres...

Page 17: ... coil is not iced up High Suction Pressure Check for refrigerant overcharge Check that compressor reed valves aren t bad Look for high suction low head pressure Perform pump down Check that the cooling load isn t high Product must be pre chilled before placing in refrigerated section of case Check that case is at least 15 feet from exterior doors overhead HVAC vents or any air curtain disruption C...

Page 18: ...ean with a warm soap and water solution and soft cloth Steps can be entirely removed from case and submersed in warm soapy water Use soft bristled brush to remove food particles dust grease or grime Rinse thoroughly Dry Return to case Monthly Condenser Coil Vacuum or brush grille condenser coil at case front Use metal or fiber brush to remove dust and dirt that can collect on condenser coils Be ca...

Page 19: ...s timeout occur normal operational settings prior to modifications being made will resume 3 If the instrument is switched off before pressing the Prg key all modifications to parameters will be lost Set Set aux Prg mute def Prg mute Set Set def Set aux aux def Set Prg mute Oper Manuals PUB Templates Carel Controller Carel Controller IR33 pub This data derived from Carel Material ir33 030220441 rel...

Page 20: ...eset reset HACCP alarms reset temp monitoring Summary Table of Alarm and Signals Display Buzzer and Relay Integrated Electronic Microprocessor Controller Read And Save These Instructions Page 2 of 3 User Interface Display 20 ...

Page 21: ...F F 50 200 dP1 Maximum defrost duration evaporator min F 1 250 d6 Display on hold during defrost C 0 2 dd Dripping time after defrost min F 0 15 d 1 Display of defrost probe 1 C F F 21 For Case Specific Defaults See Serial Label Located Near Electrical Access On Your Case For Additional Technical Information Call Structural Concepts Technical Service Dept at 1 800 433 9489 Unit Of Measure Read And...

Page 22: ...torney fees and costs Remedies of SCC SCC s rights and remedies shall be cumulative and may be exercised from time to time In a proceeding or action relating to the breach of this Agreement by Purchaser Purchaser shall reimburse SCC for reasonable costs and attorney s fees incurred by SCC No waiver by SCC of any breach of Purchaser shall be effective unless in writing nor operate as a waiver of an...

Reviews: