Strong SRT 6020 User Manual Download Page 22

PART 1 • English

18

6.7 Subtitles function

From normal view mode press 

SUB

 button. If channel has subtitle information the subtitles 

language selection menu will appear. Use 

LEFT/RIGHT

 buttons to select between DVB and Teletext 

subtitles. Use 

UP/DOWN

 to select subtitles language. Press 

OK

 to confirm your selection. 
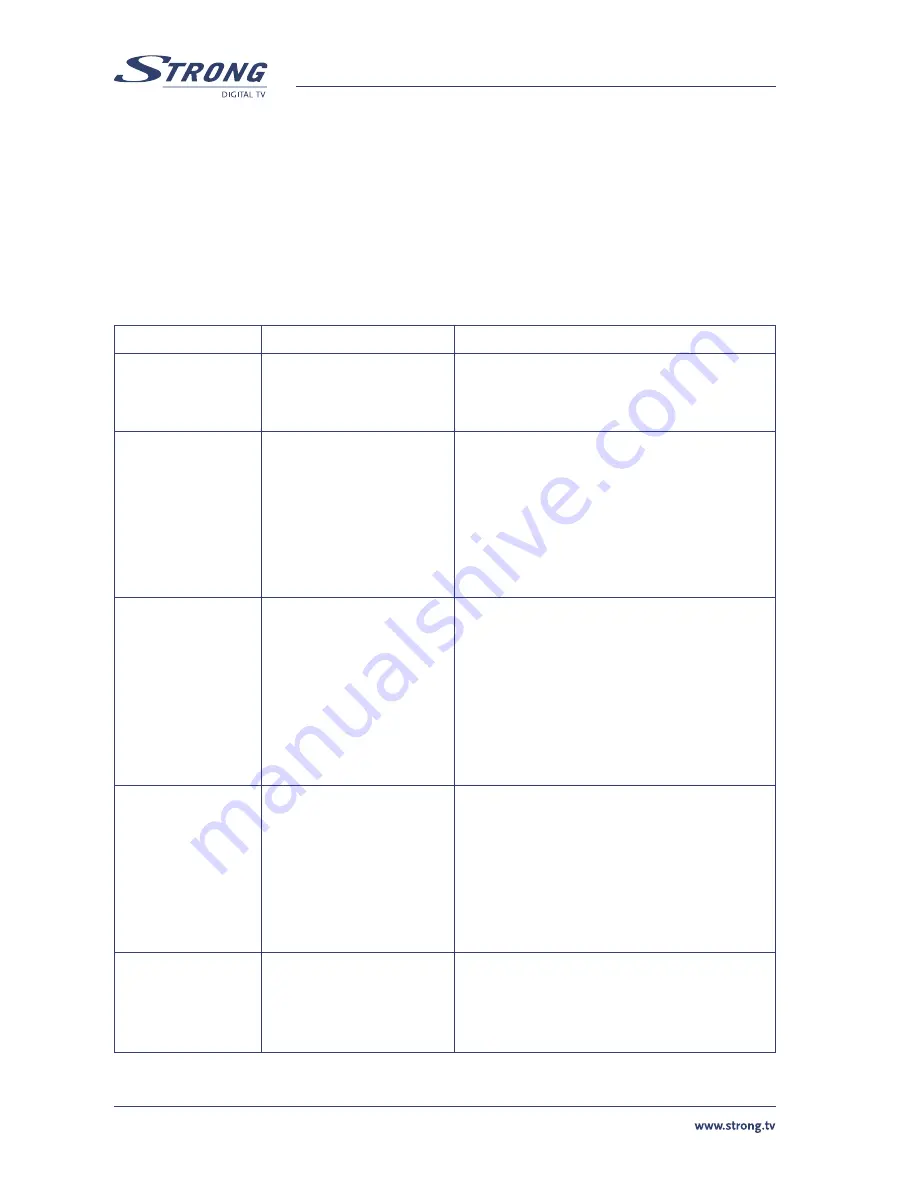
A.1 TROUBLESHOOTING

There may be various reasons for the abnormal operation of the receiver. Check the receiver 
according to the procedures shown below. If the receiver does not work properly after checking it, 
please contact the dealer. Don’t open the receiver cover. This may cause a dangerous situation.

Symptom

Cause

Remedy

The  display  on 
front  panel  does 
not light up.

The  power  cord  is  not 
plugged in.

Check  that  the  power  cord  is  plugged  in  to 
the wall outlet.

No  picture  or 
sound

Wrong  connection  of  the 
Audio/Video  output  of  the 
receiver to TV.

Audio muting.

TV power off.

Connect  the  Audio/  Video  output  of  the 
receiver to TV correctly.

Press the Mute button

Turn TV on.

No picture

The receiver can’t receive 
the signal 

Incorrect values of some
tuner parameters

Wrong 

direction 

of  

the dish

Check the antenna cable, replace the cable, or 
connect the cable to the receiver tightly.

Set  the  values  of  the  tuner  parameters 
correctly in the installation menu.

Check  the  signal  strength  with  a  spectrum 
analyzer and adjust your dish correctly.

Message “Antenna 
Power  Overload” 
displayed on TV

Receiver  detected  short 
cut in your cable system

Disconnect receiver from main power

Check your cable system. Remove short cut.

Replace LNB.

Restart receiver.

The remote control 
does not work

The  batteries  of  the 
remote controller are not 
inserted or exhausted

Check  whether  the  batteries  are  inserted 
correctly  in  your  remote  control.  Check 
the  batteries,  and  if  exhausted  replace  the 
batteries in the remote control.

Summary of Contents for SRT 6020

Page 1: ...User Manual Digital Free To Air Satellite Receiver SRT 6020 Picture similar...

Page 2: ...S 232 S VIDEO COAXIAL S PDIF Figure 6 AC 90 240 V 50 60 Hz Max 20 W TO TV SAT OUT ON OFF ANT IN SAT IN TV SCART VCR SCART RS 232 S VIDEO COAXIAL S PDIF Fixed Satellite Dish Figure 7 AC 90 240 V 50 60...

Page 3: ...and then reinsert it If the plug still fails to t contact an electrician and have the receptacle replaced n Protecting the Power Cord The power supply cord should be placed so it will not bewalked on...

Page 4: ...Safety Instructions...

Page 5: ...7 4 1 Language Selection 7 4 2 Select Satellite 7 4 3 Antenna mode 7 5 0 MAIN MENU 8 5 1 Channel Organiser 8 5 3 System setting 10 5 4 Timer 13 5 5 SD Card 14 5 6 Game 15 5 7 Calendar 16 6 0 WATCHING...

Page 6: ...use re or an electric shock n Do not place any objects on top of the receiver because this might prevent proper cooling of the components inside Safety Precautions n Do not open the receiver cover as...

Page 7: ...Display showing channel name or time n Automatic clock change summer winter time n Timeshift with 15 seconds play back n Digital sound through coaxial output S PDIF n Separate power switch n Set up su...

Page 8: ...AWAKE mode 4 VFD display In STAND BY mode this indicates current time In AWAKE mode this indicates current channel name 5 SD card slot Insert your SD card to this slot to watch your photos play MP3 l...

Page 9: ...NU Shows the main menu and exits from any level of menu to view mode INFO Shows information of the current channel EPG Shows the EPG Electronic Program Guide only when menu is off EXIT Exits from the...

Page 10: ...5 3 3 Connecting to Satellite Dish Connecting a xed satellite dish to your receiver Fig 6 First choose a satellite you want to receive your signals from and have your dealer aim your dish at the reque...

Page 11: ...hoose your language press OK to con rm The Select Satellite menu will appear 4 2 Select Satellite Future installation steps are depending from satellite where your dish is aimed 1 Your dish is aimed t...

Page 12: ...t to the normal play state 5 0 MAIN MENU All the important settings and features of your receiver can be operated in Main Menu The Main Menu consists of ve sub menus which are Channel Organizer Instal...

Page 13: ...selected channel to the Favorite group To remove the channel from the favorite group repeat same operation 5 2 Installation The installation menu contains three sub menus Antenna Installation Auto Sc...

Page 14: ...art the scan n Add Transponder In this menu you can add a new transponder to the system Press the GREEN button the Add Transponder sub menu will appear on screen Frequency input the frequency of the n...

Page 15: ...yed To set the time value manually move the cursor to the time item and use the numeric buttons on the remote control 5 3 1 4 Set Factory Default Please be careful when using this function because it...

Page 16: ...lect System Update STB to STB 3 When the status displays detecting slave STB power on slave STB after the master STB detects the slave the master starts transmission and burns 4 While transmitting and...

Page 17: ...item Select the le with the new software UPD you want to download and choose the protocol 1K Xmodem Finally press OK and a download menu will appear in the computer screen Power on the receiver then...

Page 18: ...t Use UP DOWN buttons to select folder Use OK to open folder Use GREEN button to go to Upper folder Use LEFT RIGHT button to select folder list or le list left or right panel n Navigation in the pictu...

Page 19: ...e play list Use UP DOWN buttons to select le Use OK or RED to play le USE GREEN button to go to upper folder User YELLOW button to setup play list parameters Use BLUE button to delete le current le Yo...

Page 20: ...rmation In normal operation status no menu operation press the INFO button The program information banner will be displayed at the bottom of screen From program information banner you can read channel...

Page 21: ...se TV R button from normal operation mode or from channel list mode To change channel list to favourite mode press FAV button from normal operational mode Use LEFT RIGHT buttons to select favourite gr...

Page 22: ...ection of the Audio Video output of the receiver to TV Audio muting TV power off Connect the Audio Video output of the receiver to TV correctly Press the Mute button Turn TV on No picture The receiver...

Page 23: ...32 44 1 48 kHz Audio modes Stereo Joint stereo Dual mono Mono Tuner Front End DVB S Input Frequency Range 950 2150 MHz RF Input Level 25 65 dBm LNB Power 13 18 V DC 5 Max 500 mA Overload protected Di...

Page 24: ...y the ISO MPEG is a standard method for digital transmission of video and audio Network A network which is also known as a bouquet is a set of channels that is offered by a single broadcaster PAL Refe...

Page 25: ...rea User of this service will be free to you Within the scope of the European legislation on Waste Electrical and Electronic Equipment Directive 2002 96 EC valid as of August 2005 STRONG provides a re...

Page 26: ...Environmental Issues...

Reviews: