Strong SRT 4910 HD DVR User Manual Download Page 7

13

English

12

6.1 Getting Started

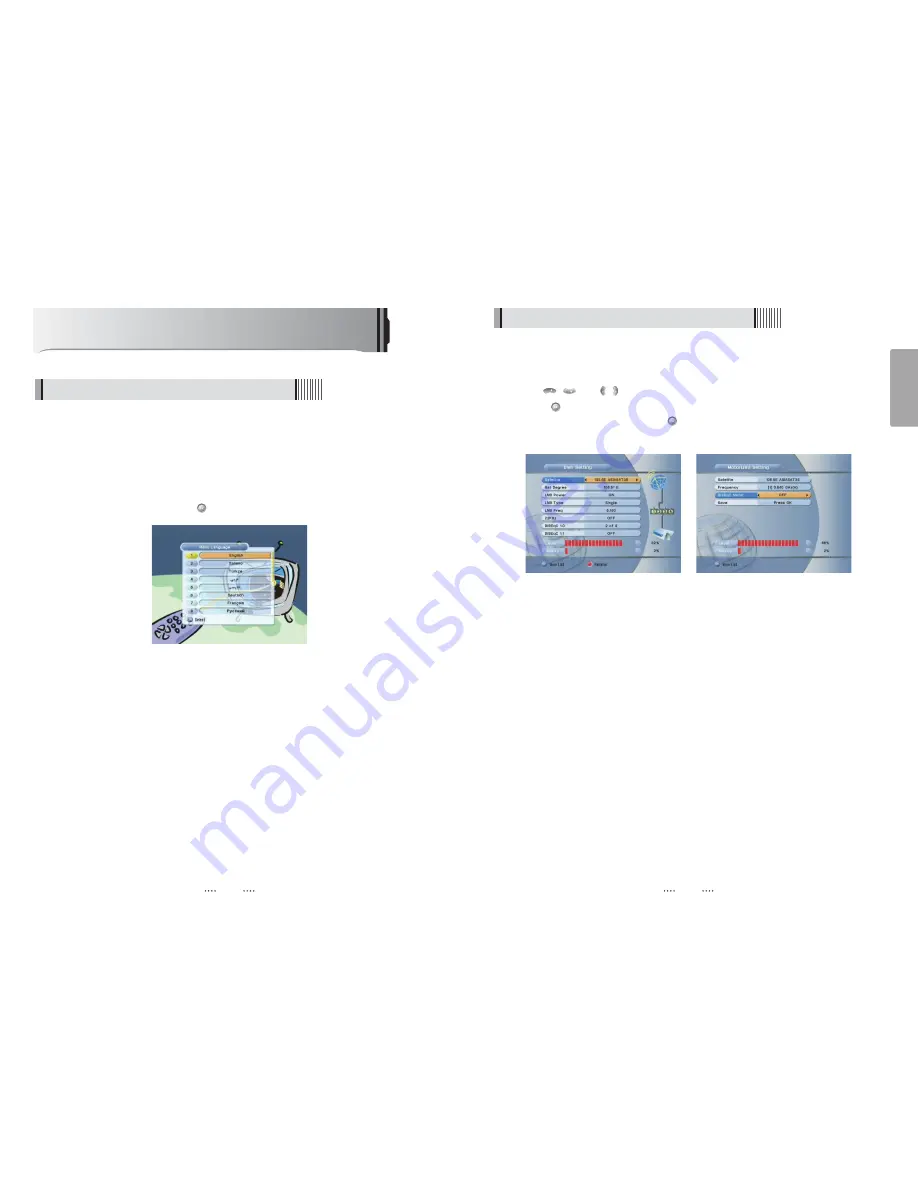
Select the item that you want to edit, and set its parameters as desired. <Dish Setting>  

- LNB Power : 

Select among ON/OFF/13V/18V.

- LNB Type : 

Select among Single/Universal/OCS.

- LNB Freq : 

Set the frequency of the LNB oscillator.

- 22KHz : 

When not AUTO, set the signal path from LNB or switch by selecting a control
signal among 0/22KHz.

- DiSEqC switch :

Select DiSEqC protocol among OFF/1.0/1.1 as appropriate for your
configuration.

- Committed/Uncommitted : 

Select the DiSEqC port. 

Select the item that you want to edit and set its parameters as desired. <Motorized
Setting>  

- Frequency : 

If the default TP frequency is not appropriate, you can select another TP
frequency at which to check for signal.

- DiSEqC Motor : 

Select DiSEqC protocol among OFF/1.2/USALS as appropriate for
your Motor.

<Figure 6.1.2>

<Figure 6.1.3>

2) Antenna Setup

Press the 

MENU

button to display the main menu. 

Use 

/

and  /

to move in the menu. 

Press  

on ‘Dish Setting’. The following window will appear. <Figure 6.1.2>

If you have a motorized dish, press 

on ‘Motorized Setting’. < Figure 6.1.3> 

ҫ

Note : Enter a 4-Digit password if need arise. The default password is ‘0000’.

VOL

VOL

CH

CH

Operation

6.1 Getting Started

After your receiver is powered on, proceed with installation as follows :

1) Menu Language Setting

Turn on your TV and receiver.

The pop-up menu for language selection will appear.<Figure 6.1.1>

Select one language and press 

to proceed. 

<Figure 6.1.1>

Summary of Contents for SRT 4910 HD DVR

Page 1: ...trols Functions 6 4 1 Front Panel 4 2 Rear Panel 4 3 Remote controller 4 4 Front Display 5 How to Connect 11 6 Operation 12 6 1 Getting Started 6 2 System Setting 6 3 Channels 6 4 Electronic Program G...

Page 2: ...e Channel Groups OSD in 12 Languages Multi Picture Display and Zoom 16 9 Full Screen 4 3 Letterbox Full Screen DiSEqC 1 2 and USALS Compatible Data Transfer Between Units Electronic Program Guide Tele...

Page 3: ...om a cold one will cause condensation Do not operate the unit for one or two hours or until it has dried completely User s manual 1 User s manual Remote control 1 Batteries AAA type 2 Component Y Pb P...

Page 4: ...onnector Function 1 ANT IN IEC 169 2 FEMALE Input from terrestrial antenna 2 ANT OUT IEC 169 2 MALE Loop through output from digital tuner and Output to TV 3 LNB INPUT IEC 169 24 FEMALE IF input from...

Page 5: ...to the previous menu Vol Up Down To change the volume level in non menu mode 19 18 17 16 15 14 13 12 11 10 9 8 7 6 5 4 3 2 1 Double arrow Up Down To move to the next or previous page when many pages...

Page 6: ...hts when loop mode is setting in Mp3 player 16 Lights when the current channel is Radio mode 17 Lights when the current channel is TV mode 18 Lights when the signal comes in via TV Antenna 19 Indicate...

Page 7: ...ault TP frequency is not appropriate you can select another TP frequency at which to check for signal DiSEqC Motor Select DiSEqC protocol among OFF 1 2 USALS as appropriate for your Motor Figure 6 1 2...

Page 8: ...isplays the current TP value of the selected satellite Move Move the dish position to west east by pressing buttons Move Fine Move the dish position 1 step at a time to west east by pressing buttons M...

Page 9: ...its PID data Video Audio and PCR CH CH Note If you cannot access programs after correctly completing a scan procedure please contact your seller or your installer Figure 6 1 10 Figure 6 1 11 6 1 Gett...

Page 10: ...AS system Press when the selection bar is positioned on the desired channel VOL VOL CH CH 6 1 Getting Started 4 Terrestrial Scan Through this function the receiver searches for all the available chann...

Page 11: ...INFO button to display the information banner for a few seconds If you then press the INFO button again a detailed banner will be displayed TV RADIO switching You can press this key to change from a T...

Page 12: ...up time using the NUMERIC buttons Wake Up Channel Press to set the wake up channel Sleep Mode Select the Sleep frequency Off Once Daily Mon Fri Sleep Time Set the sleep time using the NUMERIC buttons...

Page 13: ...ying Figure 6 2 4 Blue Light Trun the blue light ON OFF Text Moving Turn the text moving ON OFF Channel Number Turn the channel number ON OFF Figure 6 2 4 6 2 System Setting 2 A V Output Settings This...

Page 14: ...stall Lock Set ON to require entering a PIN code to access the installation menu Channel Lock Set ON to require entering a PIN code to access the channels menu Lock Channel Confirm Set ON to require e...

Page 15: ...ress Mac Address display Firmware update Support download from a LAN BLUE button appear input target IP address button to connect after input a target IP Choose a update software and button for downlo...

Page 16: ...s The list of groups will be displayed Figure 6 3 1 Press and to choose a group The following menu will be displayed Figure 6 3 2 If you want to change the name of a favorite group press the RED butto...

Page 17: ...d Press the EXIT button to return to the previous menu CH CH 6 3 Channels Figure 6 3 6 4 Lock Channels This submenu allows you to lock channels to control access to them Once a channel is locked you w...

Page 18: ...RED button while in the guide menu Figure 6 4 2 Press to select a timer s parameter Press to change the parameter Timer No Select the timer that you want to modify 1 8 State Select the timer frequency...

Page 19: ...lock You can see the next block in the top right small window Press the EXIT button to quit the game CH VOL VOL CH CH Figure 6 5 1 Figure 6 5 2 6 5 Games Figure 6 4 3 Figure 6 4 4 If you want to recor...

Page 20: ...ave to be careful not to push them into a corner where you can t get them out from You can only push one ball at a time Press on Sokoban The following menu will be displayed Figure 6 5 3 You can choos...

Page 21: ...receiver before software downloading is completed CH CH CH CH Figure 6 6 3 Figure 6 6 4 This submenu allows you to play various MP3 files view JPG files or download a new software by connecting your...

Page 22: ...ices Warning All data will be lost to the disk Testing USB Speed Press to test usb speed for PVR Timeshift Rec Time Set the Timeshift Recording Time 10Min 30Min 60Min Figure 6 6 5 6 6 Storage 5 File M...

Page 23: ...oved wanted timer number Press to select a timer s parameter Press to change the parameter State Select the timer frequency off once daily weekly Date Press to display a Calendar pop up Select a date...

Page 24: ...m the service provider program distributor If you are subscribing to services from more than one service provider you will need a Smart Card from each one and may even need different CAMs depending on...

Page 25: ...ing time bar will appear Figure 6 10 2 CH CH Figure 6 10 1 Figure 6 10 2 6 9 Conditional Access System 2 The Status of the Smart Card You can access detailed information about the Smart Card using the...

Page 26: ...ying speed Figure 6 10 5 The speed will change to x2 x4 x8 and x32 2 Trick Mode Figure 6 10 4 Figure 6 10 5 Edit Menu You will be asked to enter a password whenever you try to enter it Press The pop u...

Page 27: ...and playback starts from this point Note The maximum number of the bookmark is 20 in a file Figure 6 10 8 6 10 PVR RWD Rewind When playing the file you can press to adjusting the playing speed Figure...

Page 28: ...p to live channel please press Figure 6 10 11 Figure 6 10 12 6 10 PVR Note 1 Do not remove the USB device while recording a program 2 You can t change to another channel while recording a program 3 In...

Page 29: ...System resource Video decoder Teletext MPEG Audio Serial data interface Problem The LED light on the front panel does not light No Picture or sound Black and white screen or V Hold The remote control...

Page 30: ...X 58 5 X 247 mm 3 Kg Size W X H X D Weight Net Physical Specification Disposal of Old Electrical Electronic Equipment Applicable in the European Union and other European Countries with separate colle...

Reviews: