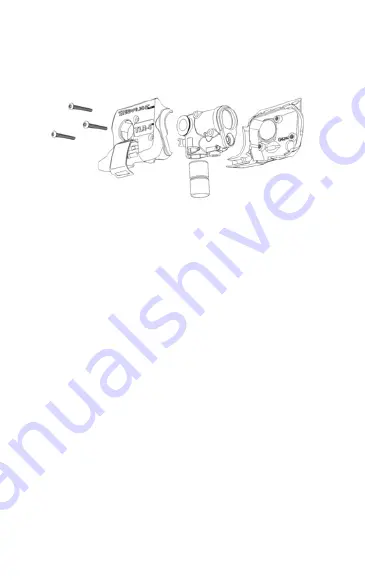
Mounting Screws
Battery Door
1/3N Batteries Only
(Non-Wrapped)
LED/Laser Module
TLR-6
®
Mounting/Removal
MAKE SURE THAT THE FIREARM IS UNLOADED AND THE BREECH IS OPEN.
IT IS IMPERATIVE THAT SAFETY MEASURES BE EMPLOYED AT ALL TIMES
WHILE HANDLING THE FIREARM.
The TLR-6
®
is designed to be attached to the trigger guard of the firearm.
1. Open battery door and remove any batteries (do not close door).
2. Use the hex wrench (included) to loosen and remove the 3 mounting/assembly screws.
3. Separate the two halves of the housing and retain the laser/LED module.
4. Place the side of the housing (that has no battery door attached) on a flat work surface.
5. Place the laser/LED module into the molded surface and direct the LED
and laser compartments to their respective openings.
6. Align the (unloaded firearm) trigger guard with the matching groove in the
TLR-6
®
housing and place both onto the flat work surface.
7. Place the mating side of the TLR-6
®
over the trigger guard and onto the other
half of the TLR-6
®
(maintain alignment while joining the two halves together).
8. Securely fasten the two TLR-6
®
halves together with the 3 mounting screws.
Note: Do not over tighten screws.
9. Reinstall batteries (maintain proper polarity/orientation) and secure the battery door.
Battery Installation/Removal
MAKE SURE THAT THE FIREARM IS UNLOADED AND THE BREECH IS OPEN.
IT IS IMPERATIVE THAT SAFETY MEASURES BE EMPLOYED AT ALL TIMES
WHILE HANDLING THE FIREARM.
At the end of battery life, the switch may appear intermittent or non-functional.
Replacing the batteries will restore normal operation.
• Unclip and swing battery door open.
• Remove both depleted batteries from the flashlight body.
• Insert fresh 1/3N batteries into the body of the TLR-6
®
.
Note: Batteries cannot have plastic wrapping.
• Swing battery door shut and snap to lock.


