12
Outside Air –
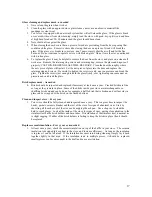
Outside air is required in all manufactured home installations.
2.
Kuma stoves does not particularly require that outside air be directly connected to this
stove,
However, some state or local building codes may mandate outside air. If your state or local
building code requires an outside air supply use part# KA OA 1. If you are unable to supply a
direct connection to the stove, we suggest the following:
d.
Provide a passive air supply to the home. The air vent should be a minimum of 4” in
diameter.
e.
The air supply must be provided to the same room that the stove is installed in.
f.
The air supply should utilize a barometric damper so that air is only supplied to the room
if the house pressure becomes negative.
Visit
www.woodheat.org
for more information on the use of outside air.
3.
When building a hearth pad on site, be sure to leave an area open for the installation of the
outside air vent.
Once the hearth is positioned according to the minimum clearances, locate and
mark out for the 4” outside are vent. On a pedestal model stove, this hole may be anywhere under
the stove base. On a leg model stove, try and locate the hole to line up with the hole in the bottom
of the stove. On a pre-manufactured hearth, use a hole saw or circular saw to cut through just the
backing board then use a hammer and firmly hit the tile or stone on the top side. If the backing
board was cut to the correct depth, the tile or stone will break out very clean. Also using a hole
saw or circular saw cut the hole through the home floor into the crawl space. Be sure to line this
hole up with the one in the hearth.
4.
If you are installing your outside air vent through the wall, use a 4” hole saw or reciprocating saw
to cut the hole through the wall. BE SURE TO CHECK FOR OBSTRUCTIONS IN THE WALL.
When using outside air through the wall and a blower, a special adapter is required for pedestal
models, please consult your dealer for this adapter.
STEP 4: Assembling the stove and connecting to the chimney
6.
Attach the legs or pedestal using the instructions provided in the leg or pedestal box. Set the
stove gently on the hearth using cardboard for protection.
7.
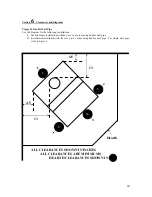
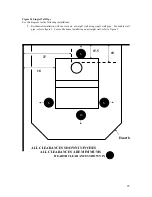
Position the stove on the hearth according to the clearances shown on the diagrams in section 6.
Be sure that the stove is at least minimum clearance from all combustible walls and materials. If
possible it is advisable to set the stove 1-2 inches further away from the combustibles than
required.
8.
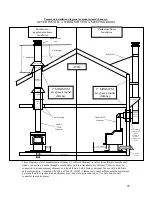
USING DOUBLE WALL PIPE ONLY, (single wall is not approved for a mobile home) connect
the stove to the chimney. If necessary, use elbows to offset the pipe so that the stove can remain at
the correct clearance and still connect to the chimney. Secure each pipe joint with three screws,
using the screws provided with the pipe.
9.
Drill a small hole through the hearth and route the 8 gauge copper wire into the crawl space. Use
a grounding “connector” or “lug” to attach the ground wire to the stove and to the frame of the
mobile home.
10.
When required by local code, you will need to fasten the stove to the floor of the mobile home. To
fasten a leg model, simply mark the location of the hole in the bottom of the legs, drill holes and
bolt into the bottom of the leg from the crawl space. To fasten a pedestal model, holes will need
to be drilled in the pedestal base. Once the holes are drilled in the base, mark the location on the
floor and use bolts and nuts or lag screws to fasten.
If your stove installation required a permit and requires inspection by the local building dept. please do not
forget to call for inspection. It is important that your permit and inspection be finalized, as some insurance
companies will require the stove to be inspected. It is also a great idea to give your insurance a call and let
them know that you have installed a wood stove.
PLEASE REFER TO SECTION 4-
Wood Burning Operation Instructions
before lighting your first fire.


