background image

                                                                  StoryDisk Ultimate                                                Page 7/20 

NO. 

BUTTON 


FUNCTION 

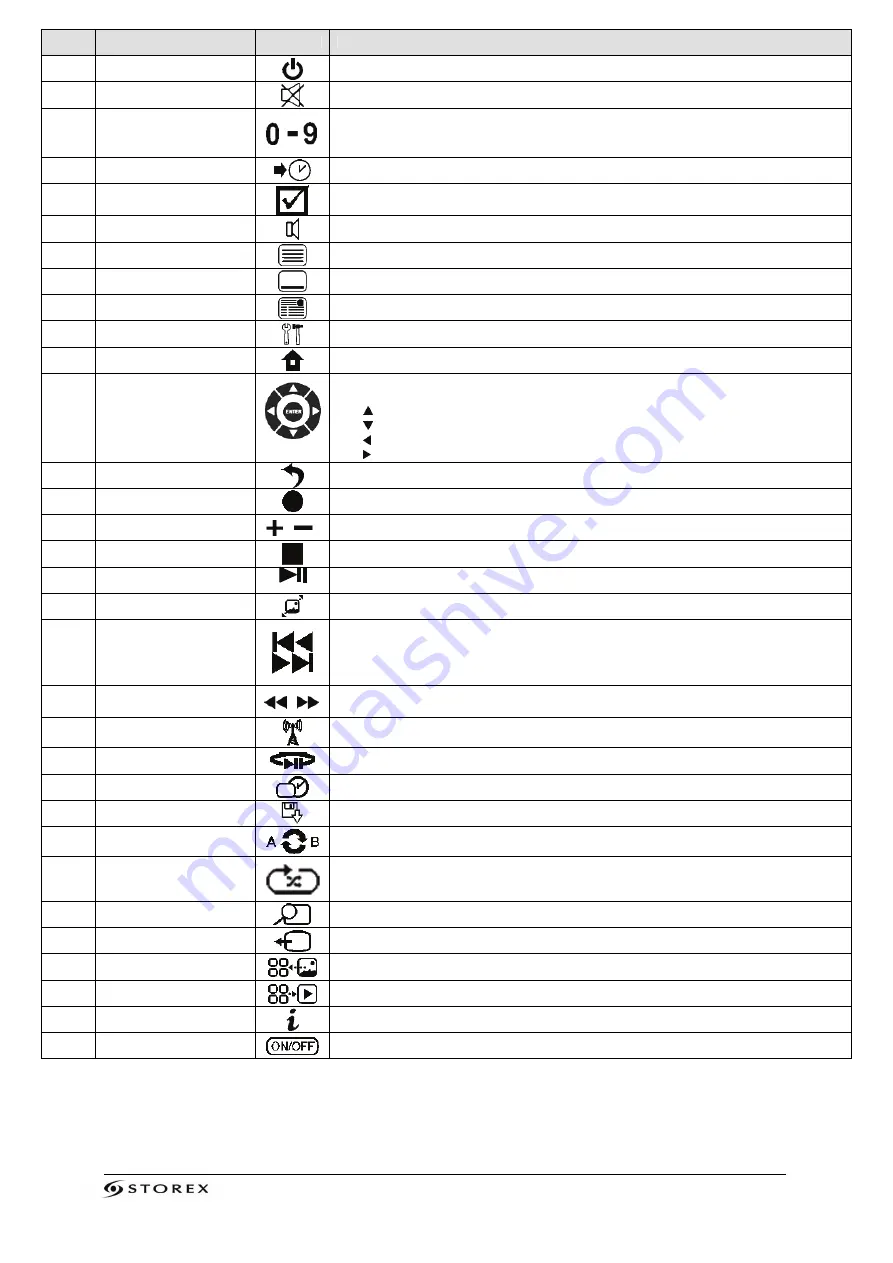
STANDBY 


Turn On/Off (Standby) the StoryDisk Ultimate 

MUTE 


Enable/Disable the sound (Mute) 

NUMBERED BUTTONS 


0-9 
The 0 button allows adding a TNT channel to the Favorites list, or adding selected audio 
tracks to the BGM list


GOTO 


Goes to a specific point (Time) 

SELECT/BGM 


Displays the edit page (Copy, Rename, Delete, etc.)  
Enable/Disable background music while viewing a slideshow 


AUDIO 


Allows selection of an audio track 

TTX 


Enable/Disable Teletext 

SUBTITLE 


Enable/Disable the display of subtitles 

EPG 


Displays the EPG screen (Electronic Program Guide) 

10 

SETUP 


Allows direct access to the configuration page 

11 

HOME 


Allows direct access to the home page 

12 

ARROW BUTTONS 
 
CONFIRM 


Allows you to navigate between different files and folders 
Allows you to validate your selection 
The   button changes the channel (CH+)  
The   button changes the channel (CH-)  
The   button jumps to the top of the list of media files


(PAG-) 

The   button jumps to the next page in the list of media files (PAG+) 

13 

BACK 


Exit/return to the previous page 

14 

REC 


Enable/Disable the "record" function 

15 

VOL+/VOL- 

  Increase/Decrease the volume 

16 

STOP 


Stop the media file playback 

17 

PLAY/PAUSE


Playback or pause of a file 

18 

FULL SCREEN 


Switches the selected file into full screen playback mode 

19/21 

NEXT/PREV 


1. Skips to the next page when you are in the explorer 
2. Skips to the next file during playback of media files 
1. Return to the previous page when you are in the explorer 
2. Return to the previous file during playback of media files


20 

FR/FF 


Fast rewind of the media file with a playing speed of 2x, 4x, 8x, etc.  
Fast-forward of the media file with a playing speed of 2x, 4x, 8x, etc. 

22 

DTV/RADIO 


Allows direct access to TNT and HD TNT channels 
Allows direct access to radio channels 

23 

T-SHIFT 


Enable the "TIMESHIFT" function 

24 

TIMER 


Allows direct access to the programming page 

25 

COPY 


Allows direct access to the "COPY" page 

26 

A - B/ROTATE 


Used to rotate the image when viewing a photo  
Defines a point “A” and point "B" to enable the repetition of the sequence 

27 

REPEAT 


Music and Video: Repeats the current file or repeats all files in the directory or cancels 
the repeat function 
Enable/Disable random mode for audio tracks  

28 

ZOOM 


Zoom on a video or photo 

29 

VIDEO OUT 


Allows you to switch between different video display modes  

30 

DIGEST 


Displays mosaic (photo mode) 

31 

SLIDE SHOW 


Turns on slideshow mode (photo mode) 

32 

INFO 


Displays information from the selected file 

33 

BACKLIGHT 


Enable/Disable the backlight of the LCD screen 


Summary of Contents for StoryDisk Ultimate

Page 1: ...StoryDisk Ultimate Page 1 20 QUICK INSTALLATION GUIDE ...

Page 2: ...StoryDisk Ultimate Page 2 20 ...

Page 3: ...T MENU CONFIGURATION 12 VIEWING AND RECORDING TNT CHANNELS 13 VIEWING 13 SELECTING RECORDING DEVICE 13 LIVE RECORDING 14 SCHEDULED RECORDING 14 STORYDISK ULTIMATE PARAMETERS 15 STOREX WEB SITE 16 TECHNICAL SUPPORT 16 WARRANTY REGISTRATION 16 WARRANTY TERMS AND CONDITIONS 17 SAFETY INFORMATION 18 GENERAL INFORMATION 18 SAFETY PRECAUTIONS 18 ELECTRICAL POWER SUPPLY TO THE PRODUCT 18 PROPER PLACEMENT...

Page 4: ... videos on High Definition TV or to listen to music OPERATION Once connected to the TV you can view media files in High Definition from your hard drive or a USB device on your StoryDisk Ultimate KEY FEATURES USB Host Connection Video connection Composite YUV and HDMI Power INPUT 100V 240V 50 60Hz 0 6A OUTPUT 5 0V 2000mA Supported formats Video AVI RMVB Ts Vob Mkv and Mov Audio MP3 WMA AAC WAV and ...

Page 5: ... LED Indicates the status of the product On Off Rear Panel 1 AC IN To connect the power cord to the wall outlet 2 ON OFF To turn On Off the product 3 HDMI To connect an HDMI cable to the StoryDisk Ultimate and your TV 4 COAXIAL To connect a coaxial audio cable 5 Y Pb Pr Video output YUV 6 CVBS AUDIO LR Video output Composite 7 USB 2 0 To connect the StoryDisk Ultimate to the PC 8 ANT IN To connect...

Page 6: ...StoryDisk Ultimate Page 6 20 REMOTE CONTROL BUTTONS Remote control 1 Refers to the actual remote Remote control 2 Refers to the numbering of the buttons on the remote 1 2 ...

Page 7: ...media file playback 17 PLAY PAUSE Playback or pause of a file 18 FULL SCREEN Switches the selected file into full screen playback mode 19 21 NEXT PREV 1 Skips to the next page when you are in the explorer 2 Skips to the next file during playback of media files 1 Return to the previous page when you are in the explorer 2 Return to the previous file during playback of media files 20 FR FF Fast rewin...

Page 8: ...Disk Ultimate to the TV with a YUV cable depending upon your configuration 3 Connect the StoryDisk Ultimate to the TV with an AV cable depending upon your configuration 4 Connect the StoryDisk Ultimate to the TV with a HDMI cable depending upon your configuration 5 Connect the supplied power cord to your wall outlet Antenna cable AV cable HDMI cable Rear TV panel Wall antenna socket YUV cable ...

Page 9: ...ons on the remote control and press ENTER To use the remote control please refer to details on the remote control Home page 3 Select the folders and files with the arrow buttons and confirm the selection by pressing ENTER 4 Select the playback device Select DEVICE from the StoryDisk Ultimate homepage to display the device selection page ...

Page 10: ...CK EXPLANATION Video To watch your favorite movies Music To listen to your favorite music Photo To view your favorite photos File To browse all files stored on your hard drive You may use the shortcut buttons film music photo file on the home page to select the desired function ...

Page 11: ...e TV menu by pressing on the ENTER button FIRST USAGE OF THE TNT FUNCTION 1 Select the menu language 2 Select your location country 3 To start the automatic channel scan select Scan for channels and press ENTER on your remote control This progress bar should appear ...

Page 12: ...TNT configuration menu The tabs allow you to configure all of the functions of the TNT mode Config Edit the list of TNT channels EPG configuration to sort channels CH scanning Channel scanning Hour Set the time and time zone of your device Options Display subtitles System Setting the password and Parental Control ...

Page 13: ...CHANNELS VIEWING Select the TV menu by pressing the ENTER button SELECTING RECORDING DEVICE Once in the TV menu press HOME then select REC MODE and confirm by pressing ENTER Select REC MODE in order to see the StoryDisk Ultimate disc or USB device connected ...

Page 14: ...StoryDisk Ultimate Note Recordings are stored directly at the root of the connected device USB key external hard drive in the PVR RECORD file SCHEDULED RECORDING To schedule a recording press on the BLUE button of the remote control 1 To add a new scheduled program press on the RED button of the remote control 2 Enter your timer recording settings and press the ENTER button on your remote control ...

Page 15: ...he SETUP button of the remote control to enter the SETUP menu 2 Use the arrow buttons to select the setting and press ENTER On this page you can change the language On this page you can change the display resolution of StoryDisk Ultimate Note The display resolution 576i 576p may not appear on the configuration page It all depends upon the equipment being used ...

Page 16: ...ECHNICAL SUPPORT All requests should be sent by e mail to the following address support fr storex eu Or telephone the following offices France 09 72 11 39 20 Price of a local call to Paris Belgium 02 888 99 12 support be storex eu Spain 911 871 608 soporte es storex eu Germany 0 30 896778 04885 support de storex eu Switzerland 0 22 533 01 53 support ch storex eu Worldwide 339 72 11 39 29 support w...

Page 17: ...tors such as without limitation exposure to heat or excessive moisture a power failure or incorrect installation uninstallation of the StoryDisk Ultimate The only contractual obligation of STOREX involves the repair or replacement of a defective product In no case may STOREX be held liable for any loss of data or its consequences resulting from a malfunction or failure of the product In any event ...

Page 18: ...ile operating the housing unit gives off heat therefore place the product on a flat and rigid surface and avoid covering or placing any item on top of it ELECTRICAL POWER SUPPLY TO THE PRODUCT In the event of prolonged disuse of the product or during a lightning storm unplug the unit from the wall outlet by grasping the plug itself without pulling on the cable The power adapter provided is specifi...

Page 19: ...ction televisions also are vulnerable to damage SAFETY ENVIRONMENT Your STOREX product has been laboratory tested and is in compliance with European directives related to EC marking in force at the time of its sale Traceability of the components of your STOREX product was performed which demonstrated that the product complies with the environmental directive RoHS in force at the time of its sale A...

Page 20: ...StoryDisk Ultimate Page 20 20 STORYDISK ULTIMATE is a product line of www storex eu STOREX 2010 All trademarks cited are trademarks of their respective owners ...

Reviews: