


139
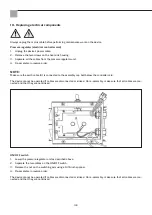
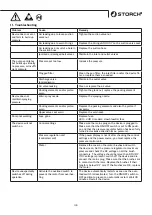
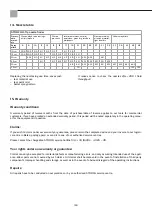
11. Troubleshooting
Problem
Cause
Remedy
Device does not vent
and fails to build up
pressure
Air leaking due to loose suction
valve nut
Tighten the suction valve nut
Air leaking due to worn O rings
Replace the O-rings 69 03 97 on the suction valve seat
Air leaking as a result of a hole in
the suction hose
Replace the suction hose
Jammed or damaged ball valves
Maintain the inlet and outlet valves
The pump ventilates
but builds up virtually
no pressure, or insuffi-
cient pressure
Pressure set too low
Increase the pressure
Clogged filter
Clean the gun filter, the inlet filter and/or the device fil-
ter, or replace them as needed.
Discharge valve
Jammed/worn
Maintain the outlet valve
Air valve leaking
Clean or replace the air valve
Packing elements and/or piston
worn
Tighten the gland nut; replace the packing element
Device does not
maintain spraying
pressure
Worn spray nozzle
Replace the spraying nozzle.
Packing elements and/or piston
worn
Replace the packing elements and also the piston if
necessary
Upper valve seat worn
Replace the worn seat.
Pump not working
Fuse gone
Replace fuse:
220 – 240 V models: slow blow 8A fuse
The device will not
switch on
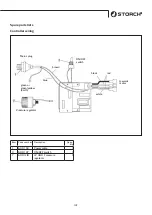
Control settings
Make sure the mains plug on the device is plugged in.
Make sure that the ON/OFF switch is set to ON positi-
on and that the pressure regulator button has been fully
turned in clockwise direction (max. pressure).
Pressure regulation unit
(controller card)
If the power display is not lit after checking the control
settings and the power source, you must replace the
pressure control unit.
Motor
Remove the cover on the motor brushes and switch
the device on. Set the pressure regulator to maximum
pressure and check the DC voltage on all the brush
connectors. The voltage should be more than 80 V DC.
If DC voltage is present, switch off the device and dis-
connect the mains plug. Make sure that the brushes are
in contact with the rotor. Replace the brushes if their
length is below 12.7 mm. If the brushes are OK, replace
the motor.
Device unexpectedly
switches off during
operation
Activate the overload switch to
prevent the motor from overhea-
ting
The device automatically restarts as soon as the over-
load switch is deactivated. Turn the ON/OFF switch to
OFF position to prevent an automatic restart. Wait 30
minutes. Restart the device.
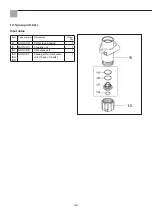
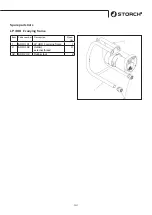
Summary of Contents for LP 400 F
Page 1: ...Airless LP 400 F DE NL FR IT GB CZ ...
Page 22: ...22 Ersatzteillisten Motor Antrieb ...
Page 52: ...52 Motor aandrijving ...
Page 82: ...82 Nomenclatures de pièces de rechange Moteur entraînement ...
Page 112: ...112 Elenchi dei pezzi di ricambio Motore Azionamento ...
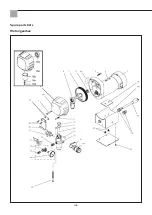
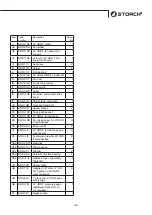
Page 142: ...142 Spare parts lists Motor gearbox ...
Page 172: ...172 Seznamy náhradních dílů Motor pohon ...
Page 182: ...182 ...
Page 183: ...183 ...


