background image

47

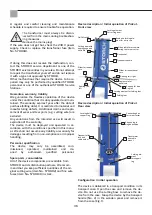
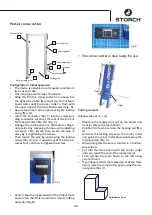
Rohová řezačka ProCut

Ruční vedení

Stavěcí a 

aretační šroub

Upínání drátu

Přestavění drátu

Kotouč k vedení drátu

Řezací drít

Zástrčka

Montáž / Zprovoznění

Zařízení  se  dodává  v  přepravním  kufru  vhodně 

• 

připravené k dopravě:

Kufr otevřete a zařízení vyjměte.

• 

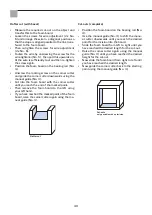
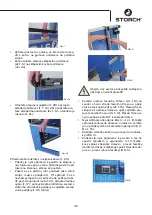
Rohovou řezačku ProCut zasuňte shora do pravé-

• 

ho bočního profilu (č. 14) řezačky izolačních de-

sek ProCut, až se rohová řezačka slícuje s horní 

hranou řezačky izolačních desek (Obr. 6).

Rohovou  řezačku  upevněte  pomocí  stavěcího 

• 

aretačního šroubu (č. 4).

Konektor (č. 7) zapojte do určené připojovací zá-

• 

suvky  na  zadní  straně  řezačky  izolačních  desek 

ProCut (č. 16 ) (obr. 7).

Řezací  drát  vyrovnejte  vodorovně  nebo  šikmo: 

• 

povolte oba šrouby k nastavení polohy drátu (2x 

č. 6 ) a po vyrovnájí je opět utáhněte.

Poté  drát  opět  napněte  povolením  stavěcích  a 

• 

aretačních šroubů (č. 4 ), šrouby vytáhněte nah-

oru, až se drát napne, a poté je opět zajistěte.

Kolébkový  přepínač  řezačky  izolačních  desek 

• 

ProCut (č. 11) přepněte do polohy 2 (provoz roho-

vé řezačky (obr. 8).

Obr.7

Obr.6

Obr.8

Rohová řezačka je nyní připravena k 

• 

provozu

Varianty řezu

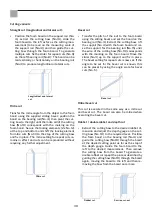
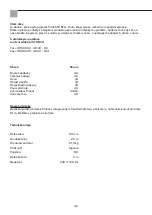
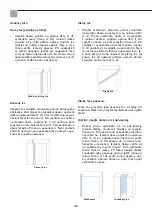
Výřez okna (řez L)

Na objektu změřte potřebný výřez a přeneste ho 

• 

na izolační desku.

Izolační desku položte na opěrnou lištu (č. 4).

• 

Rohovou  řezačku  povolte  pomocí  stavěcího 

• 

aretačního šroubu a rohovou řezačku veďte ručně 

(č. 3) směrem dolů.

Drát se nachází vodorovně.

• 

Rohovou řezačkou řezejte izolační desku, až se 

• 

dostanete na konec vyznačeného bodu.

Nyní levou rukou odtáhněte izolační desku dole-

• 

va.

Jakmile  se  dostanete  k  vyznačenému  bodu 

• 

izolační desky, veďte rohovou řezačku ručně  

(č. 3 ) opět nahoru.

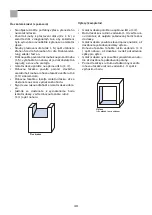
Výřez okna 

3

7

5

6

2

2

1

4

6

Summary of Contents for 57 00 00

Page 1: ...il de d coupe sur pied pour pan neaux isolants et d coupeuse d angles Taglierina fissa per pannelli isolanti e macchina per tagliare angoli Free standing foam board cutting tool and corner cutter Stoj...

Page 2: ...20 244 kostenlose Service Hotline 08 00 7 86 72 47 kostenlose Bestell Hotline 08 00 7 86 72 44 kostenloses Bestell Fax 08 00 7 86 72 43 nur innerhalb Deutschlands Inhaltsverzeichnis Seite Lieferumfan...

Page 3: ...rnzukontrollierenundggf nachzuziehen Draht f hrungsrollen und Ausz ge sind zu reinigen und auf Leichtg ngigkeit zu pr fen Bei starker Verschmut zung Verkrustung ist der Schneidedraht zu ersetzen Siche...

Page 4: ...h den die durch Nichtbeachtung oder durch un sachgem es Vorgehen entstehen lehnen wir jede Verantwortung und Garantieleistung ab Personalqualifikation Das Ger t darf nur von sachkundigem Per sonal mon...

Page 5: ...s langen St tze ausklappen und der Ar retierung f r Freistellst tze Nr 19 arretieren Abb 4 Achten Sie darauf dass die Arretierung si cher einrastet damit das Ger t nicht um fallen kann L sen Sie die A...

Page 6: ...Ausf hrung des Schr gschnittes zus tzlich noch auf Gehrung geschnitten werden Falz Doppelfalz und Tiefenzuschnitt Schneideb gel bis zum gew nschten Falzmass ausziehen Tiefenbegrenzer am Schneidb gel...

Page 7: ...ziehen bis der Draht spannt und anschlie end wieder arretieren Best tigen Sie den Wippschalter des ProCut D mmplattenschneiders Nr 11 in Position 2 Be trieb Eckschneider Abb 8 Der Eckschneider ist nu...

Page 8: ...e des eingezeichne ten Punktes angekommen sind Ziehen Sie dann mit der linken Hand die D mm platte nach links weg Sind Sie am angezeichneten Punkt der D mm platte angekommen ziehen Sie den Eckscheider...

Page 9: ...ndschneideger t ProCut auf welches sich in dieser Erkl rung bezo gen wird mit den folgenden Normen und normativen Dokumenten bereinstimmt Richtlinie 2006 95 EG Norm EN ISO 12100 EN 1050 EN 60742 STORC...

Page 10: ...CH serviceafdeling Tel 32 0 475 75 07 99 Fax 32 0 9 229 31 99 Inhoudsopgave Pagina Levering 10 Technische gegevens 10 Voorwoord 11 Toepassingsgebied 11 Veiligheidsrichtlijnen 11 Apparaatbeschrijving 1...

Page 11: ...apparaat te worden uit geschakeld Onderhoud en reiniging Voor iedere ingebruikname dienen alle schroeven en moeren te worden gecontroleerd en eventueel te worden aangedraaid Reinig de draadgeleidingsr...

Page 12: ...p paraat garanderen we een storingsvrije werking De garantie eindigt na 1 jaar na de koopdatum datum op de rekening De garantie is beperkt tot materiaal en fabricagefouten Verdere claims of vervanging...

Page 13: ...ns maakt u de vergrendelingen voor de klapvoet 2 x Nr 6 los aan het klepscharnier van de standvoet Afb 2a Afb 1 Afb 2a Afb 2b Afb 3 Afb 4 Let erop dat de vergrendeling goed vast klikt zodat het appara...

Page 14: ...et deze op de opleghouder Nr 4 Trek de snijdbeugel uit en til de houder Nr 4 met de isoleerplaat omhoog schuif de steun voor opleghouder Nr 15 omhoog totdat de snijddraad van de snijdbeugel Nr 10 over...

Page 15: ...osdraait en na uitlijning weer vastzet Span vervolgens de draad door de vergrende lingsschroef Nr 4 los te maken en hem naar boven te trekken totdat de draad zich spant zet de schroef hierna weer vast...

Page 16: ...in de plaat totdat u aan het einde van het aangegeven punt bent geko men Trek met uw linkerhand de plaat naar links weg Als het aangeteken punt op de plaat hebt bereikt trek dan de hoeksnijder aan de...

Page 17: ...apparaat voor isolatieplaten ProCut waarop deze verklaring betrekking heeft in overeenstemming is met de volgende normen en normatieve documenten Richtlijn 2006 95 EG Norm EN ISO 12100 EN 1050 EN 6074...

Page 18: ...el 32 0 475 75 07 99 Fax 32 0 9 229 31 99 Sommaire Page Fourniture 18 Caract ristiques techniques 18 Pr face 19 Domaine d application 19 Consignes de s curit 19 Description de l appareil 20 Mise en se...

Page 19: ...rrez ventuellement tous les vis et crous avant chaque mise en service Les galets conducteurs de fil et les sorties sont nettoyer leur libre course tant contr ler Le fil de coupe est remplacer en cas d...

Page 20: ...n oeuvre et utilis dans les conditions nonc es dans cette notice Nous d cli nons toute responsabilit et toute garantie pour les dommages d coulant de l inobservation ou d une ma ni re d agir incorrect...

Page 21: ...e arr t de la partie int rieure de la longue b quille et bloquez la b quille n 19 illustr 4 Ill 1 Ill 2a Ill 2b Ill 3 Ill 4 Veillez ce que le dispositif d arr t soit bien enclench pour viter une chute...

Page 22: ...la coupe diagonale et la coupe en biais Lors de la r alisation de la cou pe diagonale le panneau peut tre coup en plus en biais Rainure double rainure et coupe en profondeur Sortir l arceau de coupe j...

Page 23: ...rant apr s le r glage Tendez ensuite le fil en desserrant les vis d arr t n 4 tirez les vers le haut jusqu ce que le fil soit tendu et resserrez ensuite les vis Ill 7 Positionnez l interrupteur bascul...

Page 24: ...marqu Enlevez ensuite avec la main gauche le panneau isolant vers la gauche Une fois atteint le point marqu sur le panneau isolant tirez la d coupeuse d angle vers le haut l aide du guide manuel n 3 D...

Page 25: ...coupe pour panneaux isolants ProCut sur lequel cette d claration se fonde r pond aux normes et documents de normalisation suivants Directive 2006 95 CE Norm EN ISO 12100 EN 1050 EN 60742 STORCH Malerw...

Page 26: ...e Pagina Materiale compreso nella consegna 26 Dati tecnici 26 Premessa 27 Campo di applicazione 27 Avvertenze di sicurezza 27 Descrizione dell apparecchio 28 Messa in funzione ProCut 28 29 Varianti di...

Page 27: ...llare la scorrevolezza dei guidafili In caso di sporco ostina to incrostazioni sostituire il filo metallico da taglio Avvertenze di sicurezza Proteggere il dispositivo da umidit E vi etato azionare il...

Page 28: ...la data d acquisto data della fattura Essa si limita ai difetti di produzi one e di materiale Sono escluse richieste che vanno oltre o la sostituzione di componenti di consumo e soggetti a usura ad es...

Page 29: ...arresto per bloccaggio dalla parte in terna e l arresto per montante libero nr 19 ill 4 Ill 2b Ill 3 Ill 4 Assicurarsi che l arresto s incastra per bene per evitare che il dispositivo possa cadere Svi...

Page 30: ...a sghembo e taglio obliquo Il pannello pu essere inoltre tagliato a sghembo durante il taglio obliquo Taglio di piegatura doppia piegatura e intaglio di profondit Estrarre l archetto per taglio fino...

Page 31: ...seguito nuovamente il filo allentando la vite di arresto nr 4 tirarla in alto affinch il filo testo e riarrestare nuovamente Azionare l interruttore a bilico della taglierina per pannelli isolanti Pro...

Page 32: ...siete arrivati alla fine del punto contrassegnato Tirare via con la mano il pannello isolante verso il lato sinistro Arrivati al punto contrassegnato del pannello isolante tirate la macchina per tagli...

Page 33: ...r pannelli isolanti ProCut al quale va fatto riferimento in questa dichiarazione concordi con le seguenti norme e documenti normativi Direttiva 2006 95 CE Norma EN ISO 12100 EN 1050 EN 60742 STORCH Ma...

Page 34: ...02 49 20 112 Fax 49 0 2 02 49 20 244 Table of contents Page Scope of delivery 34 Technical specifications 34 Preface 35 Area of application 35 Safety precautions 35 Device description 36 Initial oper...

Page 35: ...elements are to be cleaned and checked with regard to their ease of movement If heavily contaminated in crustation the cutting wire must be replaced Safety precautions Protect the device from moistur...

Page 36: ...year after the date of purchase billing date It is restricted to material and manufacturing defects Additional claims and repla cement of wear and tear parts e g cutting wire are excluded Any variati...

Page 37: ...m inside the long support leg and secure the locking element for the support leg No 19 in place Fig 4 Fig 2b Fig 3 Fig 4 When doing this make sure that the lo cking element securely engages in positi...

Page 38: ...as a mitre cut and bevel cut The board can also be mitred when executing the bevel cut Rabbet double rabbet and depth cut Extract the cutting bow to the desired rabbet di mension and adjust the depth...

Page 39: ...in place by re tightening the screws Then tauten the wire by unscrewing the locking screw No 4 pull it upwards until the wire be comes taut and then re tighten the screw Confirm that the rocker switc...

Page 40: ...oard with the corner cutter until you reach the end of the marked point Then remove the foam board to the left using your left hand If you have reached the marked point of the foam board raise the cor...

Page 41: ...foam board cutter which is referred to in this declaration con forms with the following standards and further normative documents Directive 2006 95 EC Standard EN ISO 12100 EN 1050 EN 60742 STORCH Ma...

Page 42: ...zdravy servisn odd len STORCH Tel 49 0 2 02 49 20 112 Fax 49 0 2 02 49 20 244 Obsah Strana Rozsah dod vky 42 Technick daje 42 vod 43 Oblast pou it 43 Bezpe nostn pokyny 43 Popis p stroje 44 Zprovozn n...

Page 43: ...den m do provozu zkontrolujte a p padn ut hn te v echny rouby a matice V le ky k veden dr tu a vytahovac za zen vy ist te a zkontrolujte jejich lehk chod P i siln m zne i t n vznik usazen ch vrstev ez...

Page 44: ...tu ve ker ch z ruk Za zen se mus pou vat za podm nek uveden ch v tomto n vodu Za kody vznikl nerespektov n m n vodu nebo neodborn m zach zen m odm t me ve kerou odpov dnost a v kony ze z ruky Kvalifik...

Page 45: ...21 sklopte dlouhou op ru 17 pot vyklopte protilehlou aretaci z vnit n ho d lu dlouh podp ry a zajist te aretaci voln podp ry 19 obr 4 Obr 3 Obr 4 Dbejte aby aretace bezpe n zaklapla a p stroj se nemo...

Page 46: ...en ez a ikm ez sou asn Desku lze p i vytv en ikm ho ezu je t zkosit Dr ka dvojit dr ka a ez do hloubky ezac t men vyt hn te a na po adovan rozm r dr ky omezova hloubky na ezac m t menu 10 nastavte na...

Page 47: ...lohy dr tu 2x 6 a po vyrovn j je op t ut hn te Pot dr t op t napn te povolen m stav c ch a areta n ch roub 4 rouby vyt hn te nah oru a se dr t napne a pot je op t zajist te Kol bkov p ep na eza ky izo...

Page 48: ...u n 3 sm rem dol Rohovou eza kou ezejte izola n desku a se dostanete na konec vyzna en ho bodu Nyn levou rukou odt hn te izola n desku dole va Jakmile se dostanete k vyzna en mu bodu izola n desky ve...

Page 49: ...a ka ProCut na izola n desky na kterou se vztahuje toto prohl en a kter odpov d n sleduj c m norm m a normativn m dokument m Sm rnice 2006 95 ES Norma EN ISO 12100 EN 1050 EN 60742 STORCH Malerwerkzeu...

Page 50: ...50...

Page 51: ...51...

Page 52: ...pareil de d coupe pour panneaux isolants et d coupeuse d angle ProCut en coffret bois 57 00 04 fusibles de rechange 2 pces 1 jeu 56 10 06 agrafes universelles 57 00 02 fil de rechange sur bobine 10m N...

Reviews: