background image

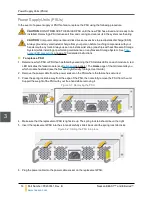
The two PSU status LEDs light up green to indicate that the unit is functioning properly and supplying
power to the unit.

7. In the graphical user interface (GUI), go to the

Home

page and verify that the status bar for the new

Power Supply Unit is green. See the

Nexsan High-Density Storage User Guide

for more information.

Expansion Controllers

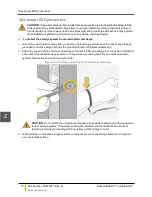
CAUTION

: Computer components and disk drives are sensitive to electrostatic discharge (ESD).

Always ground any electrostatic charge from your person before touching components with your
hands or with any tools. Always use an anti-static wrist strap (one ships with each Nexsan Storage
System) while installing or performing maintenance on any Nexsan Storage System. See

Take

proper ESD precautions

on page 12 for detailed instructions.

Note

If an Expansion Controller fails or is removed, the RAID Controller on the main unit that it is connected

to passes control of the expansion units to the other RAID Controller.

This is normal behavior.

After the

Expansion Controller is replaced, you can re-establish the proper control paths through the graphical user
interface (GUI).

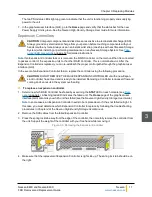
In the event of an Expansion Controller failure, replace the controller using the following procedure:

CAUTION

: DO NOT REMOVE THE FAILED EXPANSION CONTROLLER until the new Expan-

sion Controller has arrived and is ready to be installed. Removing a Controller reduces air flow and
cooling and can result in the system overheating.

To replace an expansion controller:

1. Determine which RAID Controller has failed by examining the

STAT

LED on each module (see

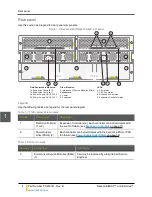
Rear

panel

on page 4). A flashing red LED indicates the failed unit. The

Home

page of the graphical user

interface (GUI) also tells you which unit has failed (see the

Nexsan High-Density Storage User Guide

).

Note

In some cases, an Expansion Controller needs to be replaced even if it has not failed outright. In

this case, you must determine which Expansion Controller to replace by following the troubleshooting
procedures in

Chapter 4

of the

Nexsan High-Density Storage User Manual

.

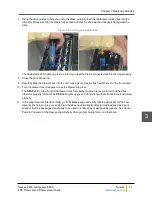
2. Remove the SAS cables from the failed Expansion Controller.

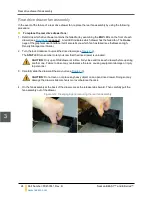
3. Press the spring lock tab away from the edge of the controller, then carefully remove the controller from

the unit. Support the weight of the controller with your free hand while removing it.

Figure 3-3: Removing the Expansion Controller

EXP 0

EXP 1

L1

STAT

L0

EXP 0

EXP 1

L1

L0

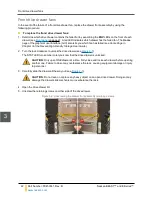
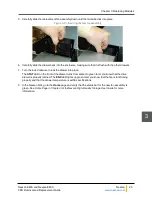
4. Make sure that the replacement Expansion Controller is right side up. The spring lock tab should be on

the right.

Chapter 3: Replacing Modules

Nexsan E48X and Nexsan E60X
FRU Removal and Replacement Guide

Nexsan

www.nexsan.com

17

3

Summary of Contents for Nexsan E48X

Page 1: ...exsan E48X and Nexsan E60X Storage Expansions FRU Removal and Replacement Guide Part Number P0450141 Rev B NEXSAN 1289 Anvilwood Avenue Sunnyvale CA 94089 USA Printed Sunday April 3 2022 www nexsan co...

Page 2: ...l may cause harmful interference to radio communications Operation of this equipment in a residential area is likely to cause harmful interference in which case the user will be required to correct th...

Page 3: ...d 6 Physical characteristics 8 Dimensions Nexsan E48X 8 Dimensions Nexsan E60X 8 Power 9 Cooling 9 Materials 9 Environment 9 Chapter 2 Adding Modules 11 Take proper ESD precautions 12 Adding disk driv...

Page 4: ...Glossary 27 Contents iv Part Number P0450141 Rev B www nexsan com Nexsan BEAST and E Series...

Page 5: ...and non interactive items in the GUI References to software user guides monospace Command line interface CLI text or text that refers to file or directory names monospace bold Text strings that must b...

Page 6: ...als contain related information Nexsan E48 and Nexsan E60 Storage Systems FRU Removal and Replacement Guide Nexsan E48 and Nexsan E60 Storage Systems Installation Guide Nexsan E48X and Nexsan E60X Sto...

Page 7: ...an E SeriesFRU Removal and Replacement Guide for the Nexsan E60X and Nexsan E48X Storage Systems P450135 Rev B March 2022 Updated for technical accuracy applied new Nexsan template and branding P04501...

Page 8: ...About this manual viii Part Number P0450141 Rev B www nexsan com Nexsan BEAST and E Series...

Page 9: ...eries base models use 3Gb s SAS for internal communication between the RAID Controllers and hard disks E Series P models use 6 Gb s SAS for internal communication This chapter contains the following s...

Page 10: ...embly can be field replaced in the event of a fan failure by removing a screw on each side of the drive drawer see Front drive drawer fans on page 22 Table 1 3 Other modules Number Component Descripti...

Page 11: ...er Guide 5 Environment LED ENV Indicates the temperature and fan status for the drawer Green indicates that the drawer temperature is within specifications and that all fans are operating properly Red...

Page 12: ...status 8 Expansion Port status 9 Expansion Controller status Legend Use the following tables as a legend for the rear panel diagram Table 1 7 Field replaceable modules Number Component Description 1 R...

Page 13: ...OUT 0 and 1 per Expansion Controller Mini SAS 26 pin I Pass 8088 6Gb s SAS connectors 6 One Management port MGMT per RAID Controller Dedicated management port RJ45 for Web based configuration 1Gb in E...

Page 14: ...rawer interior components diagram Table 1 13 Field replaceable modules Number Module Description 1 Disk Drives Up to 16 for Nexsan E48X Storage Systems or 20 for Nexsan E60X Storage Systems 3 5 disk d...

Page 15: ...ne for each disk drive slot Solid green indicates that the disk is operating within specifications and is not currently being accessed Flashing green indicates disk activity Red indicates that a disk...

Page 16: ...weight with drives 84 kg 185 2 lbs Rack mount kit length 660mm to 914mm 26 to 36 Rack mount kit weight approx 2 5 kg 5 5 lbs Dimensions Nexsan E60X Measurement Value Chassis height 4U 177mm 6 97 Chas...

Page 17: ...A for 600GB SAS drives and 579W 2 6A for 3TB SATA drives Peak current is up to 15A Cooling Front panel One 120mm 12V axial fan life 40 000 hrs per drive drawer for a total of three Internal Two double...

Page 18: ...Physical characteristics 1 10 Part Number P0450141 Rev B www nexsan com Nexsan BEAST and E Series...

Page 19: ...static charge from your person before touching components with your hands or with any tools Always use an anti static wrist strap one ships with each Nexsan Storage System while installing or performi...

Page 20: ...ic workstation 2 Attach the clip end of the anti static wrist strap to the rack s ESD grounding pin or to any bare metal part of the rack for a racked storage system or to any proper grounding point f...

Page 21: ...ewly inserted disks are automatically assigned as pool spares To check or set the spare mode go to Configure RAID Spare Mode in the graphical user interface GUI See the Nexsan High Density Storage Use...

Page 22: ...drives decreases cooling efficiency and may result in some disk drives overheating 5 Close the drive drawer lid 6 Carefully slide the drawer back into the enclosure making sure that it is flush with t...

Page 23: ...s ground any electrostatic charge from your person before touching components with your hands or with any tools Always use an anti static wrist strap one ships with each Nexsan Storage System while in...

Page 24: ...ne which PSU or PSU fan has failed by examining the PSU status LEDs on each module A red LED indicates the failed module see Rear panel on page 4 The Home page of the GUI also tells you which module h...

Page 25: ...edure CAUTION DO NOT REMOVE THE FAILED EXPANSION CONTROLLER until the new Expan sion Controller has arrived and is ready to be installed Removing a Controller reduces air flow and cooling and can resu...

Page 26: ...h the SAS cables to the EXP IN 0 and 1 connectors on the replaced Expansion Controller 7 In the graphical user interface GUI do the following a Go to System Admin Reboot b Scroll down to the Controlle...

Page 27: ...m while installing or performing maintenance on any Nexsan Storage System See Take proper ESD precautions on page 12 for detailed instructions To replace disk drives in the Nexsan Storage Expansion 1...

Page 28: ...ing disk drives carefully to avoid damage and data loss 5 Determine which drive has failed by examining the arrow shaped drive status LEDs next to each drive see Drawer interior on page 6 A red LED in...

Page 29: ...k the drawer into place The STAT LED on the front of the drawer turns from amber to green to let you know that the drive drawer is properly latched The DSK LED lights up green to let you know that all...

Page 30: ...nlock the drive drawer see Figure 3 5 The STAT LED turns amber to let you know that the drive drawer is unlocked CAUTION Only open ONE drawer at a time Fully close and lock each drawer before opening...

Page 31: ...10 Carefully slide the drawer back into the unit making sure that it is flush with the other drawers 11 Turn the lock clockwise to lock the drawer into place The STAT LED on the front of the drawer t...

Page 32: ...2 2 The STAT LED turns amber to let you know that the drive drawer is unlocked CAUTION Only open ONE drawer at a time Fully close and lock each drawer before opening another one Failure to do so may...

Page 33: ...rns from amber to green to let you know that the drive drawer is properly latched The ENV LED lights up green to let you know that the fan is functioning properly and that the drawer temperature is wi...

Page 34: ...Rear drive drawer fan assembly 3 26 Part Number P0450141 Rev B www nexsan com Nexsan BEAST and E Series...

Page 35: ...in cable management sys tem allows cables to extend and retract with the active drawer for easy servicing Anti Vibration Design Nexsan s proprietary disk installation scheme wherein drives are loaded...

Page 36: ...rawer E E Series The series of Nexsan Storage Systems that includes the Nexsan E18 E48 and E60 Stor age Systems and their V VT and P variants the Nexsan E32V the Nexsan E18X E48X and E60X expansions a...

Page 37: ...laced on site Consult Nexsan Support for details G Gb Gigabit Approximately one billion 1 000 000 000 bits GB Gigabyte Approximately one billion 1 000 000 000 bytes Used to describe the storage capaci...

Page 38: ...omputer System Interface A transport protocol that provides for the SCSI protocol to be carried over a TCP IP network ISM See Interconnect Service Module L LAN See local area network LED Light Emittin...

Page 39: ...gurations are usually referred to with a two digit number For example RAID 10 RAID 1 RAID 0 rail A type of rack mount that enables a device to be easily slid into and back out of a rack S SAN See stor...

Page 40: ...join network seg ments U U Unit The standard unit of measure for des ignating the vertical usable space or height of racks 1U is equal to 1 75 inches A device that is described as being 1U in height m...

Page 41: ...per nexsansupport com contact Copyright 2010 2022 Nexsan All rights reserved Nexsan and the Nexsan logo are trademarks or registered trademarks of Nexsan All other trademarks and registered trademarks...

Reviews: