background image


Page 13 

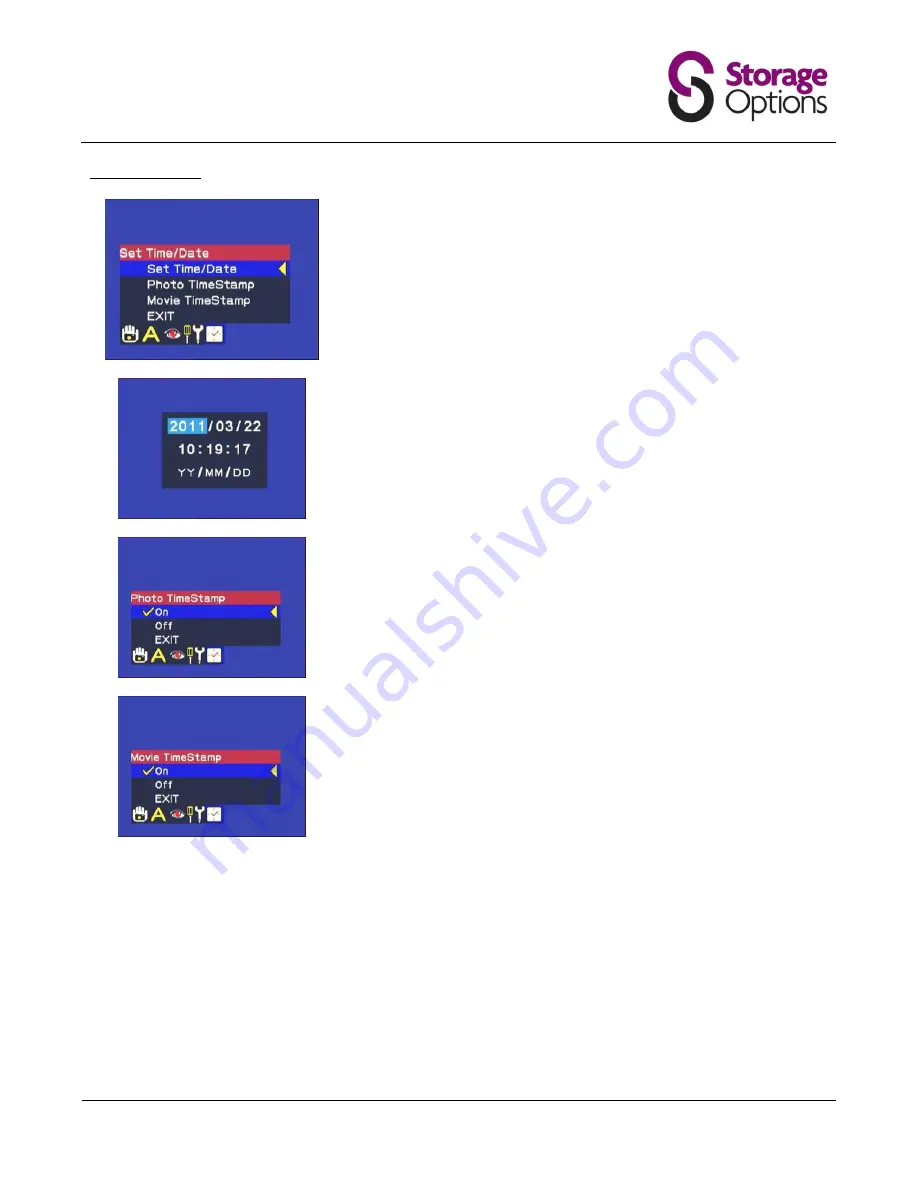
5.6 – Time / Date 


Use  the  ↑  /  ↓  and  “Menu/OK”  keys  to  highlight  and  select  one  of  the 
following options: 


Set Time / Date 


Photo TimeStamp 


Movie TimeStamp 


Set Time / Date 

 
Use  the  ←  and  →  buttons  to  highlight  the  field  you  wish  to  change,  then 
use ↑ and ↓ to change the value in the field. 
 
It  is  important  to  set  these  fields  accurately  as  the  time  and  date  will  be 
stamped onto recorded images (if enabled, see below). 


Photo TimeStamp 

 
Choose whether to apply the date and time onto a captured still frame. 


Movie TimeStamp 

 
Choose whether to apply the date and time onto a captured video. 


Summary of Contents for SD DVR

Page 1: ...SD DVR SECURITY SYSTEM INSTRUCTION MANUAL For the latest up to date manual please visit www storageoptions com...

Page 2: ...he content of this manual is subject to change without notice RECOMMENDATIONS AVOID DUSTY LOCATIONS Excessive build up of dust may cause the unit to fail INSTALL IN VENTILATED SPACE Ensure adequate ai...

Page 3: ...On the DVR 4 5 5 6 6 BASIC OPERATION 7 4 1 Using the Controls 4 2 Switching Between Record Playback Modes 4 3 Picture In Picture 4 4 On Screen Icons 7 7 7 8 RECORD MODE MENU FUNCTIONS 9 5 1 Navigatio...

Page 4: ...itter cable Video power extension cable Black CCTV camera INSTALLATION 3 1 Mounting the Camera The camera is supplied with a mounting kit for attaching to a wall Before you affix the camera in positio...

Page 5: ...onitor not applicable Red Power 2x power connections for camera s Connect the camera to VIDEO1 red RCA on the back of the DVR for viewing and recording If you also have a second camera you may connect...

Page 6: ...rite protect tab is in the up position The SD card slot is located on the left side of the DVR Insert an SD or SDHC card as indicated and make sure the write protect tab is not engaged If the card nee...

Page 7: ...Switching Between Record Playback Modes When first powered on the SD DVR will default to Recording mode This mode shows a live view from the camera To switch to Playback mode press the MODE button In...

Page 8: ...Indicates a Secure Digital SD card has been inserted Indicates manual capture mode Indicates the DVR will capture still frames Indicates the DVR is in motion detection mode Indicates the DVR is curre...

Page 9: ...ate Use the and navigation buttons to highlight the required menu then press Menu OK to select 5 2 Manual Capture The Manual Capture menu allows you to configure Master Capture settings Press Menu OK...

Page 10: ...ed to leave the Auto Capture mode on Master Capture Photo 1 Photo 3 Movie 5s Movie 10s Captures a single still frame Captures 3 still frames Video is recorded in a 5 sec clip Video is recorded in a 10...

Page 11: ...gger the alarm record function Same as 1 4 but a smaller box for motion detection Timeslot Set the length of time for motion to be detected before recording takes place e g if set to 5s when motion is...

Page 12: ...ill be clearer and more detailed but they will also occupy a larger amount of space on the SD memory card Movie Quality Choose a quality setting for captured video At QVGA 320x240 video recordings wil...

Page 13: ...to highlight the field you wish to change then use and to change the value in the field It is important to set these fields accurately as the time and date will be stamped onto recorded images if enab...

Page 14: ...Menu OK to execute Format Use this option to completely erase the inserted SD card Please note formatting will completely erase ALL data on the card You will not be able to recover the data so do not...

Page 15: ...age Quality High or low configurable Memory Media SD Card supports maximum 32GB Record Time 2GB can save 20 000 pictures 2 hours video QVGA 320x240 not designed for continuous recording Power DC 12V 1...

Page 16: ...Page 16 Storage Options Analogue CCTV DVR Made in Taiwan...

Reviews: