background image


20 

7.3 – FILE LIST 

 
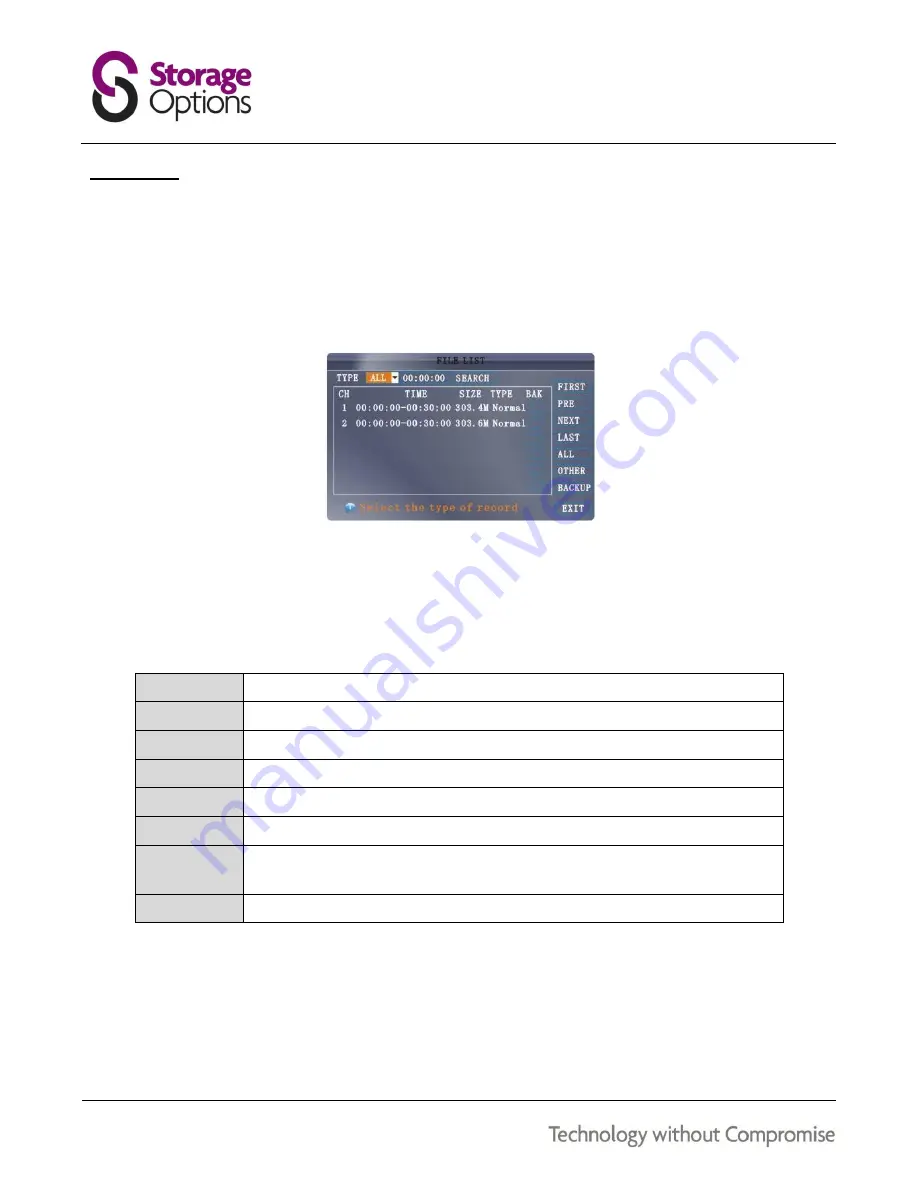
Use the File List sub menu to see a detailed list of all the recorded video on your system.  To open the file list: 
 

1.


From the Search menu, click SEARCH to find recorded video. 


2.


Select FILE LIST at the bottom of the menu.  The File List menu will open. 
 

3.


Highlight the required file and select it to begin playback. 


To use the File List: 
 

1.


Under TYPE, select NORMAL to view only normal recordings, ALARM to view triggered recordings (alarm and 
motion detection), or ALL to view all videos. 


2.


Use the buttons on the right side of the panel to navigate the file list: 


FIRST: 

Jump to the first page of the list. 

PRE: 

Return to the previous page. 

NEXT: 

Move forward to the next page. 

LAST: 

Jump to the last page of the list. 

ALL: 

Select all files. 

OTHER: 

Invert current file selection. 

BACKUP: 

After selecting a file(s), click BACKUP to begin copying the data to a USB flash drive 
(not included). 

EXIT: 

Exit the File List menu. 


Summary of Contents for 8 Channel DVR

Page 1: ......

Page 2: ...lated dangerous voltage within the product s enclosure that may be of sufficient magnitude to constitute a risk of electric shock The exclamation point within an equilateral triangle is intended to al...

Page 3: ...the DVR to prevent overheating DO NOT EXPOSE TO MOISTURE Exposing the unit to water poses high risk of electric shock DO NOT DROP Doing so could damage internal components DO NOT OPEN CHASSIS No user...

Page 4: ...6 3 Remote Control 6 4 Mouse Control 6 5 Using The Sub Menu 6 6 Power On Off 6 7 Pass Codes 6 8 Format The Hard Disk Drive 6 9 System Login 6 10 Playback 6 11 On screen Playback Controls 12 13 14 15 1...

Page 5: ...39 40 41 42 REMOTE SURVEILLANCE SOFTWARE 43 9 1 Using Remote Surveillance 9 2 Main Screen 9 3 Live View 9 4 Recording 9 5 Sub Menu 9 6 PTZ Control 9 7 Screen Captures 9 8 Playback 9 9 Search 9 10 Remo...

Page 6: ...n your monitor television to view the DVR system Refer to its manual for instructions on how to do this 3 Connect the DVR and camera to a mains supply Refer to section 1 3 Power Connection Diagram pag...

Page 7: ...can support the weight 2 Accurately mark on the wall the position of the holes to be drilled 3 Drill to the correct depth in the wall as indicated by the plugs 4 Insert plugs into the drilled holes 5...

Page 8: ...e are used for connecting power to each Storage Options camera CAUTION The 1 8 power splitter is designed for use ONLY with Storage Options cameras DO NOT attempt to connect other brands as this may p...

Page 9: ...se comply with all the electric product safety criteria 2 Power and ground Do not touch the DVR or mains adapter with a wet hand Do not drop liquid on the DVR or mains adapter Do not put any object on...

Page 10: ...warnings are highlighted in red Unless otherwise stated all functionality described in this manual is performed using the USB mouse PACKAGE CONTENTS Check the contents of your DVR package against thi...

Page 11: ...M CONNECTION 5 1 CONNECTIVITY DIAGRAM Refer to the following diagram for how to connect the DVR system Refer to section 1 3 Power Connection Diagram page 8 for more information on connecting to a main...

Page 12: ...dicate network traffic 4 CHANNEL NUMBERS PLAYBACK Press buttons 1 8 to view the selected channel in full screen During playback press the following BUTTON DESCRIPTION 6 Rewind Press multiple times for...

Page 13: ...8x I O alarm input Alarm output I O alarm output RS485 Connect to PTZ camera 6 Audio input Connect audio input phono 7 Audio output Connect audio output phono 8 Video input 8x numbered video inputs f...

Page 14: ...screen 3 NUMBERS In menus press 0 9 to enter values In live view press 1 8 to view channels in full screen display mode 4 Press to switch between quad and split screen display modes 5 MENU Opens the m...

Page 15: ...to open the Sub Menu Scroll Wheel Forward switch to VGA Backward switch to CVBS 6 5 USING THE SUB MENU When using the mouse open the Sub Menu to access system options including the Main Menu and PTZ c...

Page 16: ...t need to enter a pass code when accessing any menus For security purposes it is highly recommended to enable pass codes via the Password Menu 6 8 FORMAT THE HARD DISK DRIVE This DVR uses a Hard Disk...

Page 17: ...ormal recordings will appear as green 5 Click a date in the month grid to search for video files 6 Click a time block in the Hour Grid to view the video Playback will begin NOTE Only single channel fu...

Page 18: ...nfigure recording options quality resolution set record modes and enable disable audio recording 3 HDD Display HDD status and format the internal hard drive 4 BASIC Set the system language date time D...

Page 19: ...hannels or select ALL 2 Under DATE enter a desired date using the virtual keyboard then click SEARCH The system will search for any related recordings 3 Under RECORD STATE the system shows recorded ev...

Page 20: ...r TYPE select NORMAL to view only normal recordings ALARM to view triggered recordings alarm and motion detection or ALL to view all videos 2 Use the buttons on the right side of the panel to navigate...

Page 21: ...lect all files Click OTHER to invert the current file selection TIP The size of each file is shown in the File List menu Use this to help you choose a USB flash drive large enough to hold all the file...

Page 22: ...2 Under resolution select CIF HD1 or D1 CIF HD1 D1 PAL Resolution 352 x 288 704 x 288 704 x 576 Frame rate FPS 25 25 25 NTSC Resolution 352 x 240 704 x 240 704 x 480 Frame rate FPS 30 30 30 NOTE This...

Page 23: ...ODE select POWER UP or TIMER RECORD POWER UP The system will start continuous recording as soon as it is powered on TIMER RECORD The system will record according to the customisable recording schedule...

Page 24: ...n the Main Menu and click RECORD 2 Under REC MODE select TIMER RECORD 3 Click SCHEDULE The Schedule menu will open 4 Under CHANNEL select a specific channel s or select ALL 5 Below the grid click eith...

Page 25: ...rent recording settings e g resolution quality number of connected cameras OVERWRITE If enabled the system will record over the oldest video data once the HDD is full If disabled recording will stop o...

Page 26: ...ons The Basic Setup menu contains the following sub menus Language Date Time Password Display Video Audio Exit 7 9 LANGUAGE To change the system language 1 From the drop down menu select ENGLISH or CH...

Page 27: ...DIFY DATE AND TIME then click CLOSE in the confirmation window 3 Click APPLY to save the new date and time 7 11 DAYLIGHT SAVING TIME To set daylight saving time 1 Under DST select ON DST options will...

Page 28: ...tor has access to all system settings NORMAL Normal users have limited access to features 3 STATE Choose either ACTIVE INACTIVE to enable or disable the account 4 CONFIG Use this page to set a pass co...

Page 29: ...of permissions ALL Select all permissions CLEAN Unselect all permissions APPLY Save the current permissions settings EXIT Return to the previous menu To configure user permissions 1 Click the boxes to...

Page 30: ...ether the channel can be seen if the monitor is in public view See section 7 15 Preview page 31 for more details PREVIEW TIME Select ON OFF to show or hide the date and time during live view RECORD TI...

Page 31: ...ions 1 Under VGA RESOLUTION choose a setting which matches the attached monitor s native resolution 2 Under CAMERA SYSTEM select PAL or NTSC TIP Generally PAL is used in the UK France and Hong Kong wh...

Page 32: ...the Advanced Setup menu to configure alarm settings motion detection mobile surveillance PTZ settings and network settings The Advanced Setup menu contains the following sub menus Alarm Info Motion De...

Page 33: ...ng HDD LOSS The alarm will sound if the internal HDD is damaged HDD SPACE If the overwrite function is disabled the alarm will sound when the HDD is full VIDEO LOSS The alarm will sound when a camera...

Page 34: ...3 Under SMTP PORT enter the SMTP port of your e mail server 4 Under SMTP enter the SMTP address of your e mail server e g smtp mail com 5 Under SEND EMAIL enter your e mail address e g user mail com 6...

Page 35: ...able motion detection for that channel Click NEXT PAGE for channels 5 8 2 Under SENSITIVITY select 1 low 2 medium 3 high or 4 very high 3 Under MD AREA click SETUP The red motion grid appears over the...

Page 36: ...that the Mobile Port setting matches the port number on this page To configure notification settings 1 Under MOBILE NETWORK select 3G 2 75G or 2 5G 2 Under MOBILE PORT enter an appropriate mobile port...

Page 37: ...ate for auto reset from the drop down menu 4 Enter the time for auto reset using the virtual keyboard mouse only 5 Click APPLY to save changes then click CLOSE in the confirmation window To restore fa...

Page 38: ...top USB port on the front panel of the DVR labelled USB 2 0 3 Open the System Menu Main Menu Advance System 4 Click FIRMWARE UPDATE The system will scan the USB flash drive and begin updating the firm...

Page 39: ...tlet 2 Under PROTOCOL select PELCO D or PELCO P for the selected channel 3 Click NEXT PAGE to view and configure channels 5 8 4 Under BAUD RATE select 1200 2400 4800 or 9600 5 Under DATA BIT select 5...

Page 40: ...ommend you disable DHCP and manually set the IP address to static configuration This ensures that port forwarding will not change in the event of power failure or resetting of your network 2 If you se...

Page 41: ...of your router in the MANUAL DNS field 2 Click DDNS SETTINGS 3 Under DDNS select ON 4 Under SERVICE select 3322 DYNDNS or PERFECTEYES e g If you registered for a DynDNS account as instructed above ple...

Page 42: ...do this 2 On the DVR open the Main Menu and click ADVANCE 3 Click NETWORK 4 Under UPNP select OPEN 5 Click APPLY to save changes then click OK on the confirmation window 6 Using a remote computer i e...

Page 43: ...ar then press Enter to load the page On first use you will be prompted to install ActiveX controls Please follow on screen instructions and if you are given the option to block or allow any controls p...

Page 44: ...r the IP address of the DVR e g http 192 168 0 10 2 You must install the ActiveX control in order to access the DVR Click the attention bar at the top of the main page and select Install ActiveX Contr...

Page 45: ...to indicate channel number 5 PTZ Control Pan Tilt Zoom controls for compatible cameras 6 Functions Click icons to show hide channels take screen captures and record 7 Display Modes Click icons to vie...

Page 46: ...or more details see section 9 4 Recording below 5 Select a channel the current channel is outlined in red and then click the audio bars to increase decrease listen in volume Click the speaker icon to...

Page 47: ...and CLEAR to further control presets 9 7 SCREEN CAPTURES You can use the remote surveillance software to take a snapshot of the channels on the main display screen Screen captures can be useful for y...

Page 48: ...on mark icon 3 Double click a file from the File List to play back the file in the main screen The icon in the file list will change to You may control playback using the buttons at the bottom of the...

Page 49: ...main screen 9 10 REMOTE BACKUP You can backup recorded video files from your system to your PC using the Replay menu in the remote surveillance software To backup files remotely 1 Click PLAYBACK at t...

Page 50: ...ke changes to settings from a Web browser To open remote setup Click SETUP at the top of the main screen The Remote Setup menu features the following tabbed options RECORD ALARM PTZ NETWORK SETTING MA...

Page 51: ...ALARM to access the setup interface and check or change settings in a similar manner to using the DVR s GUI 9 14 PTZ Click PTZ to access the setup interface and check or change settings in a similar m...

Page 52: ...to access the setup interface and check or change settings in a similar manner to using the DVR s GUI 9 16 SETTING Click SETTING to access the setup interface and check or change settings in a similar...

Page 53: ...format it s HDD or upgrade the system s firmware 9 18 HOST INFO Click HOST INFO to access the system information interface The interface includes information on the HDD status remaining record time f...

Page 54: ...sx Windows Mobile Meyesetup Instructions for Mobile Phone Monitor Windows PC Playback Software Playback Setup v 2 3 4 2 Storage Options 8CH DVR Instruction Manual NOTE Playback software can be used to...

Page 55: ...ter a friendly device name optional Enter the user ID you wish to sign in with Enter the password related to the account default is blank for the admin account Once these fields have been completed pr...

Page 56: ...he cover in place then slide it off With the front panel facing you the HDD mounts to the left of the chassis There are 4 screw holes to mount the HDD 2 Align the HDD with the mount points circled in...

Page 57: ...system Firmly connect the mouse cable to the USB Mouse port on the front panel of the DVR Mouse is not connected to the system System needs to be reset Power off the system disconnect power cable Firm...

Page 58: ...25fps NTSC 30fps VGA Interface 1 channel D Sub VGA Resolution Support 800 x 600 1024 x 768 1280 x 1024 1366 x 768 1440 x 900 Alarm Input 8 channel Alarm Output 1 output Network Ethernet 10 100Mbps Mon...

Page 59: ...59 NOTES...

Page 60: ...60...

Reviews: