1
2
3
-7-
-6-
STOLZENBERG
Kehrmaschinen
20122006
·MATRIXMTX-900-V/-B/-VBTRS·
·MATRIXMTX-900-V/-B/-VBTRS·20122006
STOLZENBERG
Kehrmaschinen
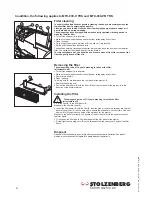
Readjusting the brush rollers
The height of the brush rollers can be adjusted to obtain the best possible cleaning results of
the area to be swept and to effectively exploit the efficiency of the brush rollers.
The brush rollers need to be lowered once the sweeping performance starts to wane due to
wear and tear of the brush rollers, or if the area to be swept is not level (bumpy).
If pushing the sweeper seems to become harder and you can hear the brush rollers
scratching the ground, you will have to raise the brush rollers to ensure you use the sweeper
ergonomically and to prevent the brush rollers from wearing prematurely.
On principle, the brush rollers should be set to ensure that they touches the ground at slight
pressure.
To raise the brush rollers
•
•
•
•
Undo wing nut
on the height adjustment bracket
.
Push down the rocker arm -3- in the direction of the dustbin.
Tighten wing nut
on the height adjustment bracket
.
Test the sweeper.
Readjust if necessary
-2-
-1-
The brush rollers are raised.
-2-
-1-
To lower the brush rollers
•
•
•
•
Undo wing nut
on the height adjustment bracket
.
Push down the rocker arm -3- in the direction of motion.
Tighten wing nut
on the height adjustment bracket
.
Test the sweeper.
Readjust if necessary
-2-
-1-
The brush rollers are lowered.
-2-
-1-
Setting the brush rollers
•
•
•
Park the sweeper on level ground that has been designated (assigned) for this purpose.
Make sure the sweeper has been secured from rolling away by accident.
Open the hood.
The rear trim panel of the frame reveals the height adjustment bracket to adjust the height of
the brushes.
Brush roller replacement
Removing the brush rollers
Installing the brush rollers
Every brush roller consists of two split shells with brushes.
Screws join the split shells.
Park the sweeper on level ground that has been designated (assigned) for this purpose.
Make sure the sweeper has been secured from rolling away by accident.
Remove the dustbin.
Turn the sweeper on its side.
Turn the top running wheel until you can see the screwed connections on the brush roller.
Undo the screwed connections.
Lift the split shells with the brush rollers off the shaft.
If needed clean the running gear box and the shaft.
The split shells have square recesses, which retain the brush roller shaft.
Position the first split shell under the square shaft of the brush roller.
.
Position the second split shell on top of the square shaft of the brush roller.
To tighten use three screws for each set of brushes. Tighten until you can no longer see a
gap between the split shells.
•
•
•
•
•
•
•
•
•
•
•
Make sure the running wheels can move freely.
Make sure the shaft fits flush into the recess of the split shell.
Side brush replacement
Removing the side brushes
Mounting the side brushes
•
•
•
•
•
•
•
•
•
•
Park the sweeper on level ground that has been designated (assigned) for this purpose.
Make sure the sweeper has been secured from rolling away by accident.
Lift the side brushes.
Reach under the side brushes.
With your fingers squeeze together the snap-in fixtures in the centre of the side brush
retainer.
With a downward motion, pull off the side brushes.
Replace the side brushes.
Position the side brushes under the side brush retainers.
Turn the side brushes until the bore holes of the side brush disk line up with the pins of the
side brush retainer.
Push the side brushes into the side brush retainers until you feel the side brushes lock
into place.
Changing the chain
De-tentioning or tentioning of the chain is proceeded by turning/ moving the DC-motor or the
sprocket-support.
Position the machine on a appropriate surface.
Make sure the machine is blocked against possible movement
Open the cover.
Loosen the screws of the DC-motor or the sprocket-support to move the support by rotating
it around the front/ first screw.
By lowering the DC-motor or the sprocket-support, the chain is de-tentioned e.g. for
changing the chain.
Moving up the DC-motor or the sprocket-support tentiones the chain.
Tighten the screws before operating the machine.
The tention of the chain is supported by the automatic chain-tentioner.
Cleaning the sweeper
Do not clean the sweeper with a pressure washer. Just use a dry broom to brush off the
sweeper. Remove dirt, strings, etc. from the brush rollers, side brushes, and shafts.
The Sweeping & Suction Machine is a machine with
electrical system components.
Humidity will damage the electronics and the mechanics of the machine.
Moisture may lead to leak current and short-circuits.
Do not use high-pressure cleaning devices.
The Sweeping & Suction Machine may only be dry-cleaned.
Please observe!
Summary of Contents for MATRIX MTX-900 TRS
Page 11: ......


