background image

4.  Clear Text Display Module & System Parameters

English

© STÖBER plc 1997

17

05.02.01

Parameter Function

Range

[Default]

Description / Notes

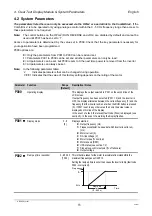
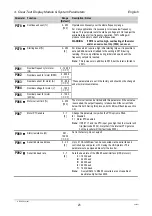
P007

Keypad control

0 - 1

[0]

0

 = The RUN, REVERSE and JOG buttons are disabled. Control is

via digital inputs 

(see parameters P051 - P053)

 and 

 may

still be used to control frequency provided that P124 = 1 and a
digital input has not been selected to perform this function.

1

 = OPm2 buttons are enabled (can be individually disabled

depending on the setting of parameters P121 - P124). The
digital inputs for RUN, JOG and 

 / 

 are disabled.

P009  

••••

Parameter protection setting

0 - 3

[0]

Determines which parameters can be adjusted:

0

 = Only parameters from P001 to P009 can be read/set.

1

 = Parameters from P001 to P009 can be set and all other

parameters can only be read.

2

 = All parameters can be read/set but P009 automatically

resets to 0 when power is removed.

3

 = All parameters can be read/set.

P011

Frequency setpoint  memory

0 - 1

[0]

0

 = Disabled

1

 = Enabled. The setpoint alterations made with the 

 / 

 buttons or

digital inputs are stored even when power has been removed
from the inverter.

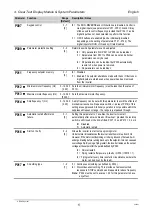
P012  

••••

Minimum motor frequency (Hz)

0 - 120.00

[0.00]

Sets the minimum motor frequency (must be less than the value of
P013).

P013  

••••

Maximum motor frequency (Hz)

0 - 120.00

[50.00]

Sets the maximum motor frequency.

P014  

••••

Skip frequency 1 (Hz)

0 - 120.00

[0.00]

A skip frequency can be set with this parameter to avoid the effects of
mechanical resonance. Frequencies /-(value of P019) of this
setting are suppressed. Stationary operation is not possible within the
suppressed frequency range - the range is just passed through.

P015  

••••

Automatic restart after mains
failure.

0 - 1

[0]

Setting this parameter to ‘1’ enables the inverter to restart
automatically after a mains break or ‘brownout’, provided the run/stop
switch is still closed or the link is fitted, P007 = 0 and P910 = 0, 2 or 4.

0

 = Disabled

1

 = Automatic restart

P016  

••••

Start on the fly

0 - 2

[0]

Allows the inverter to start onto a spinning motor.
Under normal circumstances the inverter runs the motor up from 0 Hz.
However, if the motor is still spinning or is being driven by the load, it will
undergo braking before running back up to the setpoint - this can cause an
overvoltage trip. By using a flying restart, the inverter ramps up the output
voltage at the setpoint for the period defined by P020.

0

 = Normal restart

1

 = Flying restart after power up, fault or OFF2 ( if P018 = 1).

2

 = Flying restart every time (useful in circumstances where the

motor can be driven by the load).

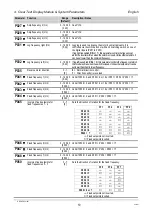
P017  

••••

Smoothing type

1 - 2

[1]

1

 = Continuous smoothing (as defined by P004).

2

 = Discontinuous smoothing. This provides a fast unsmoothed

response to STOP commands and requests to reduce frequency.

Note:

P004 must be set to a value > 0.0 for this parameter to have
any effect.

Summary of Contents for CombiDrive

Page 1: ...STÖBER CombiDrive SIEMENS Micromaster integrated Installation and Commissiong instructions It ist essential to read and comply with these instructions prior to installation and commissioning 01 2001 ...

Page 2: ...Safety precautions 1 1 OVERVIEW 2 2 INSTALLATION 3 3 OPERATING INFORMATION 10 4 CLEAR TEXT DISPLAY MODULE SYSTEM PARAMETERS 15 5 FAULT CODES 30 6 SPECIFICATIONS 31 7 SUPPLEMENTARY INFORMATION 34 8 ACCESSOIRES 37 ...

Page 3: ...he cover Only qualified personnel may connect start the system up and repair faults These personnel must be thoroughly acquainted with all the warnings and operating procedures contained in this manual Certain parameter settings may cause the motor to restart automatically after an input power failure This equipment must not be used as an emergency stop mechanism see EN 60204 9 2 5 4 CAUTION Child...

Page 4: ...to control up to 31 CombiDrive via the USS protocol Optional remote control capability via RS485 serial link using PROFIBUS DP Factory default parameter settings pre programmed for European and North American requirements Output frequency and hence motor speed can be controlled by one of four methods 1 Built in potentiometer 2 High resolution analogue setpoint voltage or current input 3 Fixed freq...

Page 5: ...the system 0V at the inverter as described below may prove effective 1 Ensure that all equipment is well earthed using short thick earthing cable connected to a common star point or busbar It is particularly important that any control equipment that is connected to the inverter such as a PLC is connected to the same earth or star point as the inverter via a short thick link Flat conductors e g met...

Page 6: ...hub length to length of shaft end 0 8 and they run at speeds of 1500 rpm In such cases rebalancing may be necessary e g by reducing the distance by which the featherkey protrudes from the transmission element and the shaft surface WARNING Take suitable precautions to prevent transmission elements from being touched If the CombiDrive is started up without a transmission element attached the feather...

Page 7: ...0 75 kW PM 75 1 122 193 259 5 Motor type Motor output rating Inverter type Width b Dimension w qx 71 L 0 37 kW PM 37 3 122 182 237 80 K 0 55 kW PM 55 3 122 193 259 5 80 L 0 75 kW PM 75 3 122 193 259 5 90 K 1 1 kW PM 110 3 171 201 296 90 L 1 5 kW PM 150 3 171 201 296 100 K 2 2 kW PM 220 3 171 234 328 5 100 L 3 0 kW PM 300 3 171 234 328 5 112 K 4 0 kW PM 400 3 171 248 5 353 132 K 5 5 kW PM 550 3 171...

Page 8: ...ouching the boards or components with your hands or metal objects Note Jumper in V position voltageinput default Jumper in I position current input Ensurethat thefollowingtighteningtorquesareused Electrical terminal screws 1 1Nm Accesscover retainingscrews 4 0Nm Glandholecovers 1 0Nm IMPORTANT V I JP303 JP302 JP303 Jumpers for PI Input Type Default V V I JP303 JP300 JP301 Jumpers for Analogue Inpu...

Page 9: ... They must not be fed through the same cable conduit trunking Use screened cable for the control lead Feed the control cable into the inverter via the appropriate gland hole see Figure 3 Unplug connector block PL800 from the PCB and connect the control wires in accordance with the information given in Figures 4a and 4b also see Figure 3 IMPORTANT A wire link must be fitted between control terminal...

Page 10: ...English 2 Installation STÖBER plc 1998 05 02 01 8 1 2 3 1 2 3 1 8mmmax OR Figure 4b Connecting Control Wires to PL800 Figure 2 Cable Connections with Drip Loop ...

Page 11: ...acitor 2 3 4 5 6 3 1 2 PE 3 AC 380 500 V L1 L2 L3 PE U V W 1 10V 10mAmax 0V PE 4 24V OR OR V 0 10V 2 10V I 0 20mA 4 20mA AIN AIN DIN1 DIN2 PE 5V 0V PL800 SK200 N P 11 12 8 9 Power supply for PI feedback transducer or other load 3 RL1B RL1C RS485 Relay Connections Connections for Serial Link or OPm2 7 DIN3 15V PI veInput PI veInput 10 V I JP302 JP303 JP300 JP301 PI Input Type AnalogueInput Type OR ...

Page 12: ...ving the appropriate gland hole cover see Figure 3 and plugging a suitably terminated interface cable into the telephone socket SK200 4 Analogue input type selection is determined by jumpers JP300 and JP301 JP300 closed selects current input JP301 closed default selects voltage input These jumpers can only be accessed while the cover is removed see Figure 3 5 If the CombiDrive is run unloaded e g ...

Page 13: ...ns power to the inverter 5 Turn the external potentiometer or adjust the analogue control voltage until the desired frequency is achieved The unit will not switch on until a minimum of 2 V has been applied Note The frequency set by the external voltage is added to the frequency set by the internal potentiometer As with Basic Operation 2 a run stop switch can be used to start and stop the motor or ...

Page 14: ... USS data line connected to the internal RS485 telephone socket SK200 When local control is used P910 0 the motor can only be controlled via the internal potentiometer or the control terminals Control commands setpoints or parameter changes received via the RS485 interface have no effect For remote control the serial interface is designed as a 2 wire connection for bi directional data transmission...

Page 15: ...d and for which a suitable transducer is available Setpoint Scaling P211 P212 Feedback Sample Rate P205 LowPass Filter P206 P P202 I P203 P207 Acceleration Deceleration Ramp P002 P003 Motor M Process e g fan Transducer P208 P201 000 Feedback e g duct pressure P201 002 ClosedLoopModeDisabled ClosedLoopModeEnabled P210 Feedback Monitor Figure 7 Closed Loop Control 3 8 2 Hardware Setup Connect the si...

Page 16: ...sbuttonwhilethemotor isstoppedcausesit to start andrunat thepreset jogfrequency Themotor stopsas soonasthebuttonisreleased Pressingthisbuttonwhilethe motor isrunninghasnoeffect Disabledif P007or 123 0 2 Greenindicatesthat themotor isrunning Flashinggreenindicatesthat themotor isrampingupor down Redindicatesthat themotor isstationary Flashingredindicatesafault condition 3 Presstostart theinverter D...

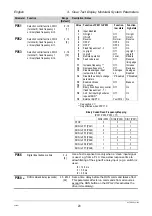
Page 17: ...f this factory setting depends on the rating of the motor Parameter Function Range Default Description Notes P000 Operating display This displays the output selected in P001 on the second line of the LCD screen If output frequency has been selected P001 0 and the inverter is OFF the display alternates between the current frequency F and the frequency that the inverter will run at when the RUN butt...

Page 18: ...oothing curve for deceleration is based on the ramp up gradient P002 and is added to the ramp down time set by P003 Therefore the ramp down time is affected by changes to P002 P005 Digital frequency setpoint Hz 0 120 00 50 00 Sets the frequency that the inverter will run at when operated in digital mode Only effective if P006 set to 0 P006 Frequency setpoint source selection 0 2 1 Sets the control...

Page 19: ...motor frequency P014 Skip frequency 1 Hz 0 120 00 0 00 A skip frequency can be set with this parameter to avoid the effects of mechanical resonance Frequencies within value of P019 of this setting are suppressed Stationary operation is not possible within the suppressed frequency range the range is just passed through P015 Automatic restart after mains failure 0 1 0 Setting this parameter to 1 ena...

Page 20: ... to give an inverse relationship between analogue input and frequency output i e Note The output frequency is limited by values entered for P012 P013 P023 Analogue input type 0 2 2 Selects analogue input type according to the setting of jumpers JP300 JP301 JP301 closed OR JP300 closed 0 0 V to 10 V 0 mA to 20 mA 1 2 V to 10 V 4 mA to 20 mA 2 2 V to 10 V 4 mA to 20 mA The inverter will come to a co...

Page 21: ... 0 Normal direction control 1 Direction control is reversed P041 Fixed frequency 1 Hz 0 120 00 5 00 Valid if P006 2 and P053 6 or 18 or P051 P052 P053 17 P042 Fixed frequency 2 Hz 0 120 00 10 00 Valid if P006 2 and P052 6 or 18 or P051 P052 P053 17 P043 Fixed frequency 3 Hz 0 120 00 15 00 Valid if P006 2 and P051 6 or 18 or P051 P052 P053 17 P044 Fixed frequency 4 Hz 0 120 00 20 00 Valid if P006 2...

Page 22: ...ill also request RUN External trip PTC Function low state Off Off Normal OFF2 OFF3 Off Off Off Local Off Off Off Analogue on P Enabled Off Off Off Yes F012 Function high state On right On left Reverse On On On Jog right Jog left Remote Reset on rising edge Increase Decrease Analogue disabled P Disabled Brake on On On No See section 3 7 Only effective when P007 0 Binary Coded Fixed Frequency Mappin...

Page 23: ...tro mechanical brake option Operation is the same as for P061 4 except that the brake control voltage is supplied directly 0 Disabled 1 3 Do not use 4 Enabled P063 External brake release delay seconds 0 20 0 1 0 Only effective if the relay output is set to control an external brake P061 4 or the electro mechanical brake option is used P062 4 In this case when the inverter is switched on it will ru...

Page 24: ...eriod Braking is effective for the period of time set by P003 The DC brake can be activated using DIN1 DIN3 braking is active for as long as the DIN is high see P051 P053 WARNING Frequent use of long periods of dc injection braking can cause the motor to overheat If DC injection braking is enabled via a digital input then DC current is applied for as long as the digital input is high This causes h...

Page 25: ... These parameters are set in the factory and should not be changed under normal circumstances P084 Nominal voltage for motor V 0 1000 P085 Nominal power for motor kW hp 0 100 0 P086 Motor current limit 0 250 150 The motor current can be limited with this parameter If the set value is exceeded the output frequency is reduced until the current falls below this limit During this process both LEDs wil...

Page 26: ...n adapter type 0 1 0 0 Option module not present 1 PROFIBUS module enables parameters relating to PROFIBUS P101 Operation for Europe or USA 0 1 0 This sets the inverter for European or USA supply and motor frequency 0 Europe 50 Hz 1 USA 60 Hz Note After setting P101 1 the CombiDrive must be reset to factory defaults i e P944 1 to automatically set P013 60 Hz P022 60 Hz P081 60 Hz P082 1680 rpm and...

Page 27: ...nverter is reset This is a copy of the code stored in P930 P141 Most recent fault code 1 0 9999 This parameter stores the last recorded fault code prior to that stored in P140 P930 P142 Most recent fault code 2 0 9999 This parameter stores the last recorded fault code prior to that stored in P141 P143 Most recent fault code 3 0 9999 This parameter stores the last recorded fault code prior to that ...

Page 28: ...e of full scale of the PI input P211 0 setpoint 0 00 100 00 0 00 Value of P210 to be maintained for 0 setpoint P212 100 setpoint 0 00 100 00 100 00 Value of P210 to be maintained for 100 setpoint P220 PI frequency cut off 0 1 0 0 Normal operation 1 Switch off inverter at or below minimum frequency P331 Analogue mode 0 4 2 0 Internal potentiometer only 1 External analogue input only 2 Internal pote...

Page 29: ...nal effect P927 P928 P930 Most recent fault code 0 9999 The last recorded fault code see section 5 is stored in this parameter It is cleared when the inverter is reset P931 Most recent warning type 0 9999 The last recorded warning is stored in this parameter until power is removed from the inverter 002 Current limit active 003 Voltage limit active 005 Inverter over temperature internal PTC P944 Re...

Page 30: ... the timeout interval is too short P093 F009 Undervoltage Check that the power supply is supplying enough voltage to the inverter F010 Initialisation fault Parameter loss Check the entire parameter set Set P009 to 0000 before power down F011 Internal interface fault Switch off power and switch on again F012 External trip Source of trip is digital input configured as an external trip input going lo...

Page 31: ...kW 1 5 kW Operating input voltage 3ø AC 380 480 Vrms 10 all units 3ø AC 460 500 Vrms 10 unfiltered only Operating input frequency 47 63 Hz Output frequency 0 50 Hz Output frequency with OPm2 or serial link 4 pole 140 Hz 140 Hz 140 Hz 140 Hz 140 Hz Input current 2 2 Arms 2 8 Arms 3 7 Arms 4 9 Arms 5 9 Arms Main fuse 10 A Min lead cross section 1 mm2 CSB three phase device Model PM220 3 PM300 3 PM40...

Page 32: ...20 mA 4 20 mA PI Input 0 10 V 0 20 mA Analogue setpoint resolution 10 bit Setpoint stability Analogue 1 Digital 0 02 Motor temperature monitoring l 2 t control PTC input Ramp times 0 650 s Control outputs 1 relay 24 V DC 1 A WARNING External inductive loads must be suppressed in an appropriate manner see section 2 1 4 Interface RS485 Inverter efficiency 97 Operating temperature 10 o C to 40 o C St...

Page 33: ...ime The brake control unit replaces the standard cover for the inverter unit Full IP65 environmental protection is maintained PROFIBUS Module Option This option allows the CombiDrive to be controlled via a PROFIBUS DP serial bus SINEC L2 DP The PROFIBUS module fits to the side of the CombiDrive using two screws Features Permits fast cyclic communications via a PROFIBUS connection Supports all PROF...

Page 34: ...meters fully counter clockwise and then apply mains power and switch on 6 Turn the internal potentiometer clockwise until the motor rotates at a speed that approximates to 15 Hz 7 The external potentiometer now has a range of between 15 Hz at its lowest setting and 50 Hz at its highest setting 7 2 USS Status Codes The following list gives the meaning of status codes displayed on the OPm2 when the ...

Page 35: ...ompliance of their apparatus with the EMC directive for the residential commercial and light industrial environment as regards the EMC performance characteristics of the power drive system Performance limits are as specified in the generic emission and immunity standards EN 50081 1 and EN 50082 1 EMC Phenomenon Standard Level Emissions Radiated Emissions EN 55022 Level B1 Conducted Emissions EN 55...

Page 36: ...P050 0 P051 1 P052 2 P053 10 P056 0 Parameter Your setting Default P058 0 0 P061 6 P062 0 P063 1 0 P064 1 0 P065 1 0 P071 0 P072 250 P073 0 P074 1 P077 0 P078 100 P079 0 P081 P082 P083 P084 P085 P086 150 P087 0 P089 P091 0 P092 6 P093 0 P094 50 00 P095 0 P099 0 P101 0 P111 P112 8 P113 P121 1 P122 1 P123 1 P124 1 P125 1 P131 P132 P134 P135 P137 P140 Parameter Your setting Default P141 P142 P143 P15...

Page 37: ...r of rotation pink 5 DIN1 Dir of rotation yellow 6 DIN2 r p m white 3 AIN r p m brown 4 AIN Notes Since the terminals are equipped with wire protection multi core wire should be twisted to fit the terminals An additional conector sleeve is not required Caution JP304 jump OV and AIN Terminal 1 and 5 must be jumped Notes It is essential to read and combly with these instructions prior to installatio...

Page 38: ...leased Pressing this button while the motor is running has no effect Disabled if P007 or 123 0 2 Green indicates that the motor is running Flashing green indicates that the motor is ramping up or down Red indicates that the motor is stationary Flashing red indicates a fault condition 3 Press to start the inverter Disabled if P007 or P121 0 4 Press to stop the inverter 5 Changes the display to show...

Page 39: ......

Page 40: ...er Strasse 12 75177 Pforzheim Postfach 910103 75091 Pforzheim Fon 49 0 7231 582 0 Fax 49 0 7231 582 1000 Internet http www stoeber de e Mail mail stoeber de 2001 STÖBER ANTRIEBSTECHNIK GmbH Co KG Impressum Nr 441554 00 00 01 2001 Subject to change without prior notice ...

Reviews: