


12
After Sales Support
Telephone:
1300 886 649
Email:
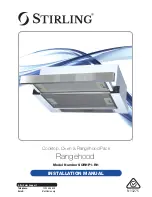
Cooktop assembly
• Make an opening with the dimensions given in Fig. 1 below for the cooktop
to be mounted on the worktop.
• Check the seal for perfect fit and overall cover. Lower the electric cooktop
into place and align correctly.
• Using a standard screwdriver, tighten the tension clamps evenly, starting at
the centre and moving diagonally until the built-in rim is tight on the worktop.
Important installation advice
• Kitchen area: Before starting with the installation, make sure the kitchen
area is dry and there is sufficient ventilation and easy access to all control
elements.
• Adjacent furniture: This is a Y-type design built-in ceramic cooktop,
which means that its back wall and one side wall can be placed next to a
high piece of furniture or a wall.
• Furniture surfaces: Coating or veneer used on fitted furniture must be
applied with a heat-resistant (100°C) adhesive. This prevents surface
deformation or detachment of the coating.
• Installation cables: Do not allow electrical fittings or cables to come into
contact with areas on the appliance that get hot.
• Wiring rules: Means for disconnection must be incorporated in the fixed
wiring in accordance with the wiring rules.
560
490
510
580
50
Cooktop Installation
Fig. 1


