

Troubleshooting
Problem
Solution
The spray bottle is not working.
Refill the water and detergent.
Ensure the head is on securely.
If the pump is defective, contact
after sales support.
The appliance will not turn on.
The appliance is not cleaning
properly.
Check the charging/operations
display. If it is illuminating slowly,
charge the battery.
Clean the rubber wiper blades -
detach the wiper blade and moisten
with water or detergent and reattach.
Water is leaking from the suction
head of the Electric Window
Cleaner.
The water tank is full past the MAX
line. Empty the water tank.
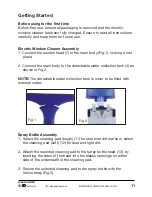
No water is coming out of spray
bottle.
Insert the long tube located inside
the spray bottle to the short tube
attached to the spray bottle head.
AFTER SALES SUPPORT
MODEL: MWC109 PRODUCT CODE: 48708 03/2015
1300 554 124
AUS
15
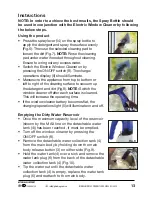
Using the product
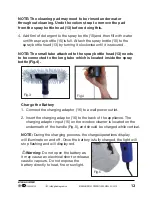
• Press the spray lever (14) on the spray bottle to
apply the detergent and spray the surface evenly
(Fig.6). Then use the selected cleaning pad to
loosen the dirt (Fig.7).
NOTE:
Rinse the cleaning
pad under water if needed throughout cleaning.
Ensure to wring out any excess water.
• Switch the Electric Window Cleaner on by
pressing the ON/OFF switch (8). The charge/
operations display (5) should illuminate.
• Manoeuvre the appliance from top to bottom or
left to right of the cleaning surface to vacuum up
the detergent and dirt (Fig.8).
NOTE:
Switch the
window cleaner off after each surface is cleaned.
This will increase the operating time.
• If the window cleaner battery becomes flat, the
charging/operations light (5) will illuminate on and off.
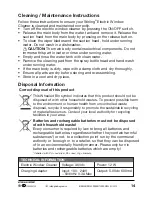
Emptying the Dirty Water Reservoir
• Once the maximum capacity level of the reservoir
(shown by the MAX line on the detachable water
tank (4)) has been reached, it must be emptied.
• Turn off the window cleaner by pressing the
ON/OFF switch (8).
• Remove the detachable water collection tank (4)
from the main body by holding down the main
body release button (3) on either side (Fig.9).
• Hold the water tank (4) over a sink and remove the
water tank plug (6) from the back of the detachable
water collection tank (4) (Fig.10).
• Tip the water out until the detachable water
collection tank (4) is empty, replace the water tank
plug (6) and reattach to the main body.


