13
BC-KM
English / USA
Only use CombiEngines supplied by
STIHL or expressly approved by STIHL
for use with the CombiTool.
This CombiTool may be operated only in
combination with the following
CombiEngines:
STIHL KM 55, KM 55 C, KM 55 R,
KM 55 RC, KM 85, KM 85 R, KM 100,
KM 100 R, KM 110, KM 110 R
The barrier bar must be mounted on
loop-handled units.
The CombiTool may also be mounted to
STIHL brushcutters with a split boom or
drive tube (T models).
Operation of this CombiTool is therefore
also permitted on the following power
tool models:
STIHL FS 55 T, FS 55 TC, FS 55 RT,
FS 55 RTC, FS 85 T, FS 85 RT, FS 83 T
und FS 83 RT
For use of barrier bar refer to power
tool instruction manual.
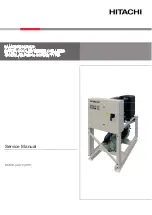
Mounting the Deflector
Pull the protective caps off the ends of
the drive tube and keep them in a safe
place.
:
Slide the deflector (
1
) onto the drive
tube (
2
) until distance "
a
" is
4" (100 mm).
:
Line up the deflector (
1
) so that it is
vertical and the fixing lug (
see
arrow
) on the drive tube points up.
:
Tighten down the clamp screws (
3
)
firmly.
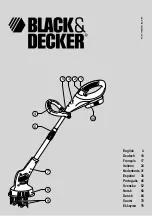
Mounting the Gearbox
:
Loosen the clamp screw (
4
).
:
Push the gearbox (
5
) onto the drive
tube (
2
) – turn the gearbox back and
forth as necessary until the housing
is approximately in line with the
mark.
Approved CombiEngines
Assembling the Unit
3
1
2
474BA000 KN
a
4
5
381BA025 KN
2