0458-712-9821-C
38
English
5 Preparing the Blower for Operation
5.1 Preparing the Blower for Operation
Perform the following steps before starting work:
► Make sure the following components are in a safe
condition:
– Blower,
– Battery,
– Charger,
► Check the battery,
► Fully charge the battery,
► Clean the blower,
► Mount the nozzle,
► Check the controls,
► If 3 LEDs flash red while you are checking the controls:
Remove the battery and contact your STIHL servicing
dealer.
Malfunction in blower.
► If you cannot carry out this work: Do not use the blower
and contact your STIHL servicing dealer.
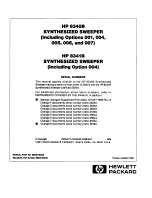
6.1 Mounting the Charger on a Wall
The charger can be mounted on a wall.
► Check the following points when mounting the charger on
a wall:
– Suitable fixing materials are used.
– The charger is level.
– The following dimensions are maintained:
– a = at least 100 mm
– b (for AL 101) = 75 mm
– b (for AL 300 and AL 500) = 120 mm
– c = 4.5 mm
– d = 9 mm
– e = 2.5 mm
6.2 Charging the Battery
The charging time depends on several factors, e.g.
temperature of the battery or the ambient temperature. The
actual charging time may differ from the specified charging
time. For specified charging times see
www.stihl.com/charging-times.
The charging process starts automatically
when the plug is inserted in a wall outlet and
the battery is fitted in the charger. The
charger switches itself off automatically when
the battery is fully charged.
The battery and charger heat up during the charging
process.
5 Preparing the Blower for Operation
6 Charging the Battery, LEDs
d
a
1
2
0000-GXX-0609-A0
a
e
e
b
3
Summary of Contents for 4523
Page 244: ...0458 712 9821 C 242 pycc 3 3 4 5 6 7 8 9 10 11 12 13 14 3 2 1 4 2000 14 E LWA...
Page 246: ...0458 712 9821 C 244 pycc 4 4 3 STIHL STIHL 4 4...
Page 247: ...0458 712 9821 C 245 pycc 4 4 5 4 5 1 5 EN 166 5 5m 16 ft...
Page 248: ...0458 712 9821 C 246 pycc 4 4 5 2 4 5 3 5 C 40 C 10 C 50 C...
Page 249: ...0458 712 9821 C 247 pycc 4 4 6 4 6 1 STIHL STIHL STIHL 4 6 2...
Page 250: ...0458 712 9821 C 248 pycc 4 15 4 6 3 4 7 STIHL...
Page 251: ...0458 712 9821 C 249 pycc 4 4 8 4 9 30 30 18 4...
Page 252: ...0458 712 9821 C 250 pycc 4 4 10 4 10 1...
Page 253: ...0458 712 9821 C 251 pycc 4 4 10 2 4 11 4 11 1 4 11 2 10 C 50 C 4 11 3...
Page 254: ...0458 712 9821 C 252 pycc 5 5 C 40 C 4 12 STIHL 5 1 4 6 1 4 6 2 4 6 3 10 2 6 2 15 1 7 1 10 1 5...
Page 261: ...0458 712 9821 C 259 pycc 17 17 1 17 1 1 3 3 STIHL 3 4 4 STIHL 3...
Page 262: ...0458 712 9821 C 260 pycc 17 17 2 1 STIHL...
Page 295: ...0458 712 9821 C 293 3 3 4 5 6 7 8 9 10 11 12 LED 13 14 3 2 1 4 2000 14 E dB A LWA...
Page 296: ...0458 712 9821 C 294 4 4 1 4 2 STIHL BGA 56 STIHL AK STIHL AK STIHL AL 101 4 5m 16 ft...
Page 297: ...0458 712 9821 C 295 4 STIHL STIHL AK STIHL AK STIHL AL 101 AL 300 AL 500 4 3 STIHL STIHL...
Page 298: ...0458 712 9821 C 296 4 4 4 4 5 4 5 1 5 m EN 166 5 m 5m 16 ft...
Page 299: ...0458 712 9821 C 297 4 4 5 2 4 5 3 10 C 50 C...
Page 300: ...0458 712 9821 C 298 4 5 C 40 C 4 6 4 6 1 STIHL STIHL STIHL 4 6 2...
Page 301: ...0458 712 9821 C 299 4 15 4 6 3...
Page 302: ...0458 712 9821 C 300 4 4 7 STIHL 4 8 4 9...
Page 303: ...0458 712 9821 C 301 4 30 mA 30 ms 18 4...
Page 304: ...0458 712 9821 C 302 4 4 10 4 10 1 4 10 2 4 11 4 11 1...
Page 305: ...0458 712 9821 C 303 4 4 11 2 10 C 50 C 4 11 3 5 C 40 C...
Page 313: ...0458 712 9821 C 311 16 16 1 STIHL 16 2 16 3 STIHL 16...
Page 314: ...0458 712 9821 C 312 17 17 1 17 1 1 3 3 STIHL 3 4 4 STIHL...
Page 315: ...0458 712 9821 C 313 17 17 2 3 1...
Page 316: ...0458 712 9821 C 314 17 LED STIHL...
Page 344: ...www stihl com 04587129821C 0458 712 9821 C 0458 712 9821 C INT2 DGESfdNcHPRpBW...