EN - 10
2.
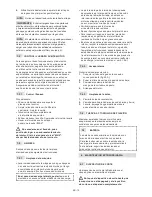
Start the engine and run it idle until it comes to a halt, so
that it uses up all the fuel that is left in the carburettor.
3.
Wait for the engine to cool..
4.
Remove the spark plug cap (fig. 22)
5.
Clean the machine thoroughly.
6.
Check the machine for any damage. If necessary,
contact the authorised service centre.
7.
Store the machine:
–
in a dry place
–
protected from inclement weather
–
covered with a sheet where possible;
–
in a place where children cannot get to it
–
making sure that keys or tools used
for maintenance are removed.
When you wish to start using the machine again, prepare
it as indicated in chapter "6. Using the machine" .
10. HANDLING AND TRANSPORTATION
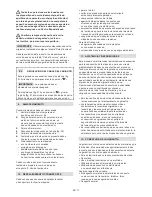
Whenever the machine is to be handled,
raised, transported or tilted you must:
•
stop the engine;
•
make sure that all moving parts have
come to a complete stop;
•
wear heavy work gloves;
•
hold the machine in the points offering a safe grip,
taking into account the weight and its division;
•
use an appropriate number of people for the weight
of the machine and the characteristics of the vehicle
or the place where it must be placed or collected;
•
make sure that machine movements do
not cause damage or injuries.
During transport:
•
fasten the machine securely with cables or chains.
•
position it so that it can not cause a hazard for anybody.
11. ASSISTANCE AND REPAIRS
This manual provides all the necessary information to
run the machine and for correct basic maintenance
operations which can be performed by the user. Any
regulations and maintenance operations not described
herein must be carried out by your Dealer or Authorized
Service Centre, which have the necessary knowledge
and equipment to ensure that the work is carried out
correctly, maintaining the correct degree of safety and
the original operating conditions of the machine.
Any operations performed in unauthorized centres or by
unqualified persons will totally invalidate the Warranty and
all obligations and responsibilities of the Manufacturer.
•
Only authorized service workshops can carry
out guaranteed repairs and maintenance.
•
The authorized service workshops only use genuine
spare parts. Genuine spare parts and attachments
have been designed specifically for machines.
•
Non-original parts and attachments are not approved;
use of non-original spare parts and attachments will
jeopardize the safety of the machine and relieve the
Manufacturer from all obligations or liabilities.
•
It is advisable to send your machine once a year
to an authorized service workshop for servicing,
assistance and safety device inspection.
12. WARRANTY COVERAGE
The warranty covers all material and manufacturing
defects. The user must follow all the instructions
provided in the accompanying documentation.
The warranty does not cover damages caused by:
•
Failure to become familiar with the documentation
accompanying the machine.
• Carelessness.
•
Incorrect or prohibited use or assembly.
• Use of non-genuine spare parts.
•
Use of attachments not supplied or
approved by the manufacturer.
The warranty does not cover:
•
Normal wear and tear of consumables, such as drive
belts, drills, headlights, wheels, bolts and wires.
•
Normal wear and tear.
•
Engines. Engines are covered by the warranty
provided by the relative manufacturer in compliance
with the specified terms and conditions.
The purchaser is protected by his own national legislation.
The purchaser’s rights envisaged by the national laws in his
own country are not in any way restricted by this warranty.
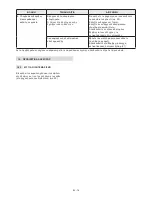
13. MAINTENANCE TABLE
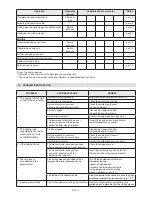
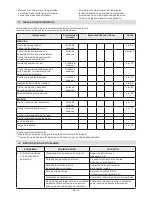
The boxes at the side are for you to mark the date or number of working hours at which the intervention was made.
Operation
Frequency
(hours)
Completed (Date or Hours)
Notes
MACHINE
Safety checks/check controls
Before
each use
par. 6.2
Check the rear discharge / side
discharge guards. Check the grass-
catcher, side discharge chute.
Before
each use
par. 6.1.2
General cleaning and inspection
After each
use
par. 7.3
Checking for any damage to the
machine. If necessary, contact the
authorised service centre.
After each
use
-
Summary of Contents for MP2 504 Series
Page 2: ......
Page 4: ...A C G F B 3 6 4 8 1 5 7 2 9 I D H E K J 2 1 ...
Page 5: ...3 B A A A A 4 ...
Page 6: ...A B A A B A 7 6 5 8 ...
Page 7: ...A D CLICK C B E A B C 10 9 ...
Page 8: ...A E A E 13 A B 12 D C A 11 ...
Page 9: ...2 1 A B D A B A B B 18 17 16 15 14 ...
Page 10: ...23 22 A B 21 A 20 A 19 ...

