5. OPERATION
CAUTION:
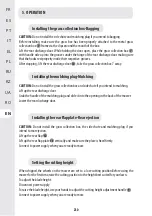
Do not install the side chute and mulching plug if you intend to bagging.
Before installing, make sure the grass box has been properly attached to the metal grass
collection box
7
frame via the clips around the mouth of the box.
Lift the rear discharge door. While holding the door open, place the grass collection box
7
with handle side up into the grooves under the hinge of the rear discharge door, making sure
that the hooks rest properly inside their respective grooves.
After stopping , lift the rear discharge door
12
, take the grass collection box 7 away.
Installing the grass collection box-Bagging
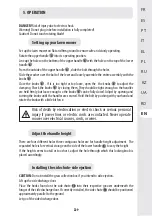
When shipped,the wheels on the mower are set to a low-cutting position.Before using the
mower for the first time,raise the cutting position to the height best suited for your lawn.
To adjust the blade height:
Disconnect power supply.
To raise the blade height, use your hands to adjust the cutting height adjustment handle
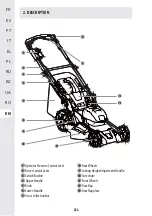
9
.
Connect to power supply when you are ready to mow.
Setting the cutting height
CAUTION:
Do not install the grass collection box and side chute if you intend to mulching.
Lift up the rear discharge door .
Grab the handle of the mulching plug and slide it into the opening in the back of the mower.
Lower the rear discharge door.
CAUTION:
Do not install the grass collection box, the side chute and mulching plug if you
intend to rear ejection.
Lift up the rear flap
12
.
Lift up the rear flap plate
13
vertically and make sure the plate is fixed firmly.
Connect to power supply when you are ready to mow.
Installing the mulching plug-Mulching
Installing the rear flap plate-Rear ejection
230
230
FR
ES
PT
IT
EL
PL
RU
EN
KZ
UA
RO
Summary of Contents for ELM2-46SP.4
Page 3: ......
Page 26: ...10 VUE ÉCLATÉE ET LISTE DES PIÈCES 25 FR ES PT IT EL PL RU KZ UA RO EN ...
Page 47: ...10 PLANO DE DESPIECE Y LISTA DE PIEZAS 46 FR ES PT IT EL PL RU KZ UA RO EN ...
Page 68: ...9 GARANTIA 10 VISTA PORMENORIZADA COM LISTA DE PEÇAS 67 FR IT EL PL RU ES PT KZ UA RO EN ...
Page 89: ...10 VISTA ESPLOSA ED ELENCO DEI COMPONENTI 88 88 FR ES PT IT EL PL RU KZ UA RO EN ...
Page 110: ...10 ΑΝΑΛΥΤΙΚΗ ΑΠΕΙΚΟΝΙΣΗ ΜΕ ΚΑΤΑΛΟΓΟ ΕΞΑΡΤΗΜΑΤΩΝ 109 109 FR IT EL PL RU ES PT KZ UA RO EN ...
Page 131: ...10 RYSUNEK ROZSTRZELONY Z LISTĄ CZĘŚCI 130 130 FR ES PT IT EL PL RU KZ UA RO EN ...
Page 153: ...10 ИЗОБРАЖЕНИЕ В РАЗОБРАННОМ ВИДЕ И СПИСОК ДЕТАЛЕЙ 152 152 FR ES PT IT EL PL RU KZ UA RO EN ...
Page 174: ... ɀȺɊɕɅɕɋԔȺɇ ɄԦɊȱɇȱɋ ɀԤɇȿ ȻԦɅȱɄɌȿɊ ɌȱɁȱɆȱ FR IT EL PL RU ES PT KZ UA RO EN 173 173 ...
Page 195: ...10 ЗОБРАЖЕННЯ В РОЗІБРАНОМУ ВИДІ ТА СПИСОК ДЕТАЛЕЙ 194 194 FR ES PT IT EL PL RU UA KZ RO EN ...
Page 216: ...10 VEDERE ÎN SPAŢIU ŞI LISTA PIESELOR COMPONENTE 215 215 FR IT EL PL RU RO ES PT KZ UA EN ...
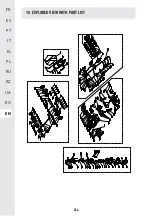
Page 237: ...10 EXPLODED VIEW WITH PART LIST 236 236 FR ES PT IT EL PL RU EN KZ UA RO ...

