background image

Ste

rlin

g

 Po

wer P

ro

d

u

c

ts

C

op

y

rig

h

1

6

8

2

3

4

5

WARNING

You will need the manual for the safety warnings and precautions, operating 

and maintenance procedures. 

Working with batteries is dangerous 

READ AND UNDERSTAND ALL INSTRUCTIONS. 

Failure to follow all instructions listed below may result in


electric shock, fire, explosion and / or serious injury.

If in doubt DO NOT USE this product 

Sterling Power Products

Digital Battery Tester

Quick Key guide 

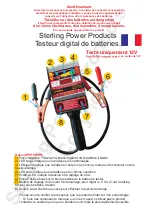
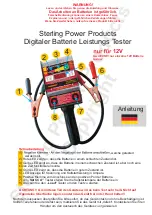
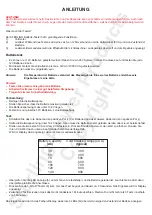
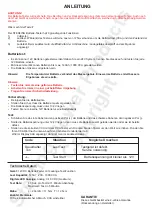
1) Negative clamp, clamp onto the negative terminal of the battery to be tested. 
2) Red LED to indicate the battery is in poor condition.
3) Yellow LED to show the battery is just not good but may do the job for a short time.
4) Green LED to show battery in good condition. 
5) LED screen to show voltage and Cold Cranking amps set. 
6) Positive clamp, clamp onto the 

Positive

 terminal of the battery to be tested. 

7) 

Set CCA

 button to adjust the CCA ( Cold Cranking Amps ) of the battery to be tested.

8) 

Load 

button to be pushed to administer the test. 

7

When unpacking, check to make sure that the product is intact and undamaged. If any parts

are missing or broken, do not use the product and please contact where you purchased the 

product to have it replaced or sorted as soon as possible.

12V only per test

for 24-36V +  break into 12V banks 


Instructions 

Summary of Contents for Digital Battery Tester

Page 1: ... Red LED to indicate the battery is in poor condition 3 Yellow LED to show the battery is just not good but may do the job for a short time 4 Green LED to show battery in good condition 5 LED screen to show voltage and Cold Cranking amps set 6 Positive clamp clamp onto the Positive terminal of the battery to be tested 7 Set CCA button to adjust the CCA Cold Cranking Amps of the battery to be teste...

Page 2: ... 12V battery at a time For larger banks or cables or distributor of a running engine The engine voltages they must be broken down to an individual 12V should always be off if adjustments are to be made battery No larger than about 140Ah 1000 CCA 13 When connecting the battery cables to the battery avoid creating sparks always connect and disconnect clamps exactly as described in rule number 14 bel...

Page 3: ...ive minute period Allow one minute for cool down between tests Note If a battery does not have the charge expected have a Attach the positive and negative clips from the tester to qualified technician check the specific gravity There may be the battery The tester should start up To enter charging an electrical drain or charging system trouble If charging system test repeatedly press Set CCA button...

Page 4: ...t this help is at our discretion and not a legal requirement c Voltage over 15V indicates faulty voltage volts for engines with less than 300 inches of cubic regulator displacement CID 5000cc For example if the load 3 When charging system test is complete remove Black voltage is 11V use 10 6V for minimum cranking voltage Clamp from battery first then remove Red Clamp 3 Disable the ignition system ...

Page 5: ...r 2 LED rouge indique que la batterie est endommagée 3 LED jaune indique que la batterie n est plus très bonne mais peut fonctionner encore quelque temps 4 LED verte indique que la batterie est en bonne condition 5 Ecran à LED indique la tension et le réglage du CCA 6 Pince Positive fixez sur la borne positive de la batterie à tester 7 Bouton de réglage du Courant de démarrage pour régler le CCA C...

Page 6: ...de l appareil Le câble rouge 6 sur le dessin doit être fixé sur la borne positive de la batterie La pince noire 1 sur le dessin est à fixer sur la borne négative de la batterie 15 Vérifiez que le boîtier métallique du testeur de batteries n entre pas en contact avec des connexions de la batterie ou d autres appareils électriques 16 Ne bousculez pas le testeur de batteries vous risquez de modifier ...

Page 7: ... entreprendre le test Réglez le CCA du testeur en fonction de celui de la batterie Poussez le bouton réglage du CCA les valeurs augmentent de 100 en 100 jusqu à ce que le CCA correspondant votre batterie apparaisse Le maximum est 999 CCA Paramétrez un CCA arrondi à la centaine inférieure à celui de votre batterie n utilisez pas une valeur supérieure Si on pousse de nouveau le bouton le mode test d...

Page 8: ...de 12V déconnectez la batterie et rechargez la avant d entreprendre le test ATTENTION Ce testeur de batteries devient très chaud pendant son utilisation le toucher au mauvais endroit peut occasionner des brûlures importantes l appareil peut rester chaud un moment ne le placez pas sur une surface sensible à la chaleur portez le par la poignée Avertissement Ne testez ne chargez pas une batterie gelé...

Page 9: ...and ist aber noch eine kurze Zeit funktionieren sollte 4 Grüne LED zeigt an dass die Batterie in gutem Zustand ist 5 LED Anzeige für Spannung und Kaltstartleistung in Ampere 6 Positive Klemme zum Anschluss an den positiven Pol der Batterie 7 Am Set CCA Taster stellen Sie die Kaltstartampere der Batterie ein 8 Drücken Sie den Load Taster um den Test zu starten ACHTUNG Am hinteren Teil des Gerätes w...

Page 10: ...trische System des Fahrzeuges schädigen 14 Vor dem Anschluss des Batterietesters überprüfen Sie immer die Funktion der Kabelklemmen Das rote Kabel wird an den positiven Pol angeschlossen und das schwarze Kabel an den negativen Pol der Batterie 15 Achten Sie immer darauf dass das Metallgehäuse nicht in Kontakt mit den Polen der Batterie oder anderen elektrischen Kontakten 16 Lassen Sie den Batterie...

Page 11: ...er 12 4V liegen dann muss die Batterie zuerst geladen werden oder sie ist bereits defekt Stellen sie die korrekten CCA mit dem CCA Taster ein Drücken Sie den Taster um den Wert zu erhöhen Runden Sie Ihren CCA Wert nach unten ab auf den nächsten Hunderterwert ab Wird im Display AAA angezeigt dann ist man im Ladetestmodus Überprüfen Sie die LED Anzeige 5 Jetzt können Sie feststellen ob die Batterie ...

Page 12: ...Pol Sollte die Batteriespannung unter 12 4V liegen dann muss die Batterie zuerst geladen werden oder sie ist bereits defekt Stellen sie die korrekten CCA mit dem CCA Taster ein Drücken Sie den Taster um den Wert zu erhöhen Runden Sie Ihren CCA Wert nach unten ab auf den nächsten Hunderterwert ab Wird im Display AAA angezeigt dann ist man im Ladetestmodus ACHTUNG Der Batterie Tester wird sehr heiß ...

Reviews: