66
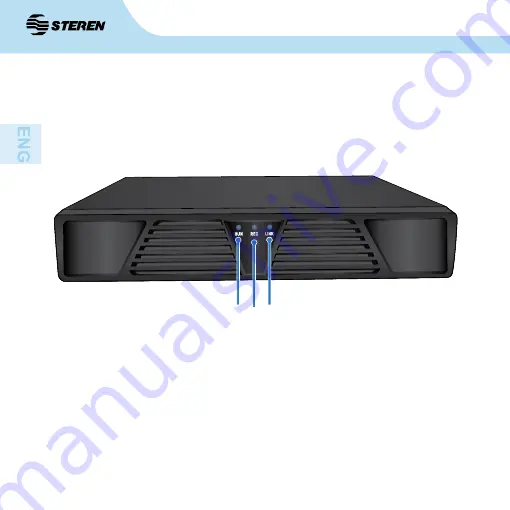
CONTROLS
1. Power LED. 2. REC: lights on to indicate that a recording is made. 3. Link: tuns on when the device is connected to a network.
Front panel
2
1 3
Page 1: ......
Page 2: ...e cómo utilizar apropiadamente el producto Para apoyo compras y todo lo nuevo que tiene Steren visite nuestro sitio web www steren com DVR CON DISCO DURO DE 500 GB Y 4 CÁMARAS La información que se muestra en este manual sirve únicamente como referencia sobre el producto Debido a actualizaciones pueden existir diferencias Por favor consulte nuestra página web www steren com para obtener la versión...
Page 3: ...iores Hay riesgo de electrocución si una persona no autorizada o calificada abre la carcasa del DVR Evite la instalación del DVR en un lugar sometido a fuertes movimientos o vibraciones No utilice ni instale el DVR bajo la luz solar directa Asegúrese de que haya una ventilación adecuada alrededor del DVR No inserte ningún objeto en los orificios de ventilación No exponga el equipo a temperaturas e...
Page 4: ...Confirmar Recuerde que predeterminadamente este usuario no cuenta con contraseña note que el sistema llenará este campo con caracteres falsos Cuando haga clic con el botón derecho del mouse o presione MENU en el panel frontal se abrirá la barra de herramientas en la cual podrá seleccionar el menú principal MENÚ y otras opciones Se recomienda formatear el disco duro antes de comenzar a grabar ver c...
Page 5: ...tánea ya que tiene multiplexor para poder visualizar las 4 cámaras al mismo tiempo o de manera individual El DVR se controla por medio del panel frontal o mouse Los conectores de video son tipo BNC para la conexión de las cámaras y el conver tidor de voltaje alimenta tanto las cámaras como el DVR No requiere ningún accesorio adicional Cámaras con Visión Nocturna DVR con multiplexor incorporado Fác...
Page 6: ...6 CONTROLES 1 LED de encendido 2 REC enciende para indicar que se realiza una grabación 3 Link se activa cuando el dispositivo está conectado a una red Panel frontal 2 1 3 ...
Page 7: ...AOUT Salida de audio conector RCA para salida de audio 5 VGA permite conectar un monitor VGA 6 NET utilice un cable RJ 45 LAN para conectarse a una red LAN 7 Conectores USB conecte dispositivos como memorias USB para realizar respaldos de las grabaciones y configuraciones de firmware Además permite conectar un mouse 8 RS 485 permite conectar cámaras PTZ o PT 9 Entrada de alimentación 10 Interrupto...
Page 8: ...eseado y dé clic izquierdo para visualizarlo en pantalla completa Visualización simultánea En la visualización de 1 canal haga clic sobre la pantalla para ir a la vista simultánea Ver barra de herramientas En la visualización de cámaras haga clic con el botón derecho para mostrar la barra de herramientas Use para salir de las opciones de menú INSTALACIÓN Y USO DELRATÓN ...
Page 9: ...e de sonido externa Conexión de monitor o pantalla Conecte una pantalla a la salida BNC VOUT o use un monitor en la entrada VGA Conexión de alimentación Conecte el adaptador de corriente en la entrada de alimentación que se encuentra en el panel trasero Conexión a red Ethernet Conecte un cable de red al conector RJ 45 para tener acceso remoto vía Internet o Ethernet Conexión USB En los puertos USB...
Page 10: ...10 En caso de ser necesario use adaptadores con conector hembra RCA a conector macho BNC en las conexiones de audio y video ...
Page 11: ...a de inicio de sesión Una vez que se le solicite una cuenta de usuario para operar el DVR seleccione Admin para ingresar bastará con dar clic en Confirmar Recuerde que predeterminadamente este usuario no cuenta con contraseña note que el sistema llenará este campo con caracteres falsos Encienda el DVR y espere a que inicie el sistema ...
Page 12: ...l para visualizar y respaldar grabaciones Apagado No es necesario detener la reproducción para desactivar el equipo simplemente use el interruptor de encendido y apagado para apagar el DVR 5 Para realizar y detener grabaciones manualmente Una vez que seleccione esta opción deberá elegir qué cámaras realizarán las grabaciones 6 Abre el menú de operación para cámaras PTZ o PT 7 Opción que permite aj...
Page 13: ...tón REC y el DVR no tiene ninguna configuración de grabación evento horario alarma Indica detección de movimiento Aparece cuando las cámaras perciben movimientos Para más información sobre cómo ajustar los tipos de grabación consulte la sección 8 Grabación Vista simultánea Vista individual La visualización de la pantalla puede ser de dos modos ...
Page 14: ...xtra contenidos en el disco duro Para dar formato recuerde que toda grabación deberá ser detenida Antes de realizar cualquier grabación es necesario formatear el disco duro 1 Inicie sesión como administrador Admin 2 Dé clic derecho con el ratón para ingresar a la barra de herramientas y seleccione Menú 3 Ingrese a Herram HDD 4 Se mostrará la información del disco duro Haga clic en Format para inic...
Page 15: ...s canales activos y el indicador azul REC del panel frontal del DVR se activará para indicar que el proceso de grabación está en curso Para detener la grabación ingrese a este menú y deseleccione los canales Para iniciar la grabación es fundamental que haya formateado el disco duro El DVR tiene 2 métodos de grabación Grabación Manual Una vez que aparezca la siguiente ventana seleccione los canales...
Page 16: ... Primeramente deberá seleccionar el canal y el día al que desea aplicar los ajustes 5 Establezca en los campos Periodo 1 4 las horas deseadas para la grabación y en las casillas siguientes seleccione la modalidad de grabación a aplicar Grabación programada Prog rojo esta opción programa el horario de grabación es decir el CCTV 972 comenzará a grabar cuando alcance la hora y el día configurado ...
Page 17: ...on la reproducción de grabaciones deberá ingresar al explorador de registros Buscar Abra la barra de herramientas dando clic derecho con el ratón y seleccione Buscar REPRODUCCIÓN Y RESPALDO DE VIDEOS MTD verde indica que la grabación será accionada cuando exista detección de movimiento Alarm amarillo indica que la grabación será accionada cuando esté por comenzar a grabar Recuerde debe ingresar a ...
Page 18: ...squeda de registros simplemente seleccione los canales tipo de grabación y dé clic en Buscar En esta modalidad deberá dar clic sobre el registro deseado para su visualización Recuerde usar los botones Anter y Próximo para explorar el contenido Una vez que se muestren las grabaciones podrá visualizar solamente un canal selecciónelo haciendo clic sobre él También puede seleccionar una cámara presion...
Page 19: ...ivo USB Al final se confirmará la exportación con un mensaje en la pantalla En caso de que el CCTV 972 no permita exportar un video pruebe cambiando de puerto la memoria USB Retire el medio de almacenamiento externo USB y conéctelo a su computadora Abra en su computadora el medio de almacenamiento externo memoria USB para buscar los archivos exportados Recuerde que el nombre del video será el mism...
Page 20: ...eces más lenta que la velocidad de reproducción normal Aumentar velocidad Pulse este botón para que la reproducción sea más rápida que la velocidad normal Si pulsa este botón nuevamente la velocidad de grabación aumen tará consecutivamente a uno de estos tres niveles 2x 2 veces más rápida que la velocidad de reproducción normal 4x 4 veces más rápida que la velocidad de reproducción normal 8x 8 vec...
Page 21: ...1 Conectar por medio de un cable de red el DVR a un puerto LAN del módem Consulte a su administrador de red para más información IP estática Para usar esta modalidad recuerde que el campo DHCP deberá estar deseleccionado Al desactivar esta funcion tanto la dirección IP Net Mask y Gateway y DNS deberán ser asignados manualmente por el usuario Recuerde que estos parámetros deberán estar en el rango ...
Page 22: ...rección IP y los rangos en los campos Net Mask Gateway y DNS 4 Para operar de modo local LAN teclee en el la ventana de Internet Explorer use sólo este navegador la dirección IP que fue asignada para el DVR Para operar de modo remoto WAN teclee en el explorador la dirección de la IP pública Nota en caso de haber seleccionado en el campo Puerto HTTP un rango diferente a 80 deberá introducir el dire...
Page 23: ...ternet Seguridad Internet Nivel personalizado Habilitar controles Active X Una vez que ingrese al DVR observará una ventana de operación remota y local ésta se opera de la misma manera que en los menús del DVR Para visualizar los canales simplemente dé clic en en el boton Start All ver todos 6 Una vez que aparezca la pantalla de inicio del DVR introduzca el mismo usuario Admin si el equipo tiene l...
Page 24: ...derecho del ratón en la pantalla de visualización de canales y seleccione la opción MENU El apartado MENU se conforma de 4 menús principales que a su vez contienen submenús de ajustes HDD Muestra el estado del disco duro conectado su capacidad el espacio libre y si ha sido formateado Si presiona Format el disco duro seleccionado será formateado todos los datos se borrarán por completo HERRAMIENTAS...
Page 25: ...uario con el botón derecho del ratón Una v aparecerá a su lado Presione Modificar Edite las funciones que puede controlar el usuario seleccionando las casillas correspondientes Si desea cambiar la contraseña presione el botón que está junto al nombre del usuario Presione Confirmar para guardar los cambios Borrar usuario Selecciónelo con el botón derecho del ratón y presione Borrar Oprima Confirmar...
Page 26: ...n del DVR Actualizar Ejecuta alguna actualización del firmware o panel guardada en una memoria USB o a través del protocolo FTP Si utiliza esta última opción tendrá que especificar también la dirección IP del servidor Tiempo Configuración de la hora y fecha Presione Confirmar para guardar los cambios ...
Page 27: ...o esté lleno Tiempo de bloqueo Esta opción permite bloquear el equipo luego de estar inactivo Para ingresar al sistema deberá introducir su contraseña Auto cambio Selecciona el tiempo para la vista de canales en secuencia Las opciones son 05 s 10 s 20 s 30 s 1 min 2 min 5 min o nunca desactivado Estandar Permite seleccionar entre el formato PAL o NTSC Para México y EUA use NTSC El sistema de video...
Page 28: ...rencia del canal seleccionado principal o secundaria mainstream o substream respectivamente Tipo de BR Permite elegir entre tasa de bits constante CBR o variable VBR FR Selecciona la cantidad de cuadros por segundo que grabará el canal seleccionado Resolución Modifica la resolución de la imagen Puede elegir entre D1 o CIF Si desea establecer la misma configuración para otro o todos los canales uti...
Page 29: ...d de la imagen Video En este menú podrá configurar los ajustes de los canales Bloqueo Cada cámara puede definir regiones múltiples para protección de privacidad es decir en pantalla aparecerán bloques que censurarán un área establecida en la vista de canales Para iniciar seleccione esta opción e ingrese a Área Copiar a en caso de que desee copiar los parámetros a otros canales selecciónelos en la ...
Page 30: ...o PTZ Configura los parámetros del DVR Timbre Activa el timbrado de la alarma Alarmout Selecciona el canal al que se le aplicarán los ajustes Tipo de alarma Abierto o apagado Alar mail Permite ajustar el correo donde recibirá la alarma Contraseña Contraseña de su correo Servidor SMTP Número del servidor Alarmin Contiene todo lo referente a la configuración de entrada de alarma Alarmout Opción de s...
Page 31: ...cciona la modalidad de grabación a aplicar Protecc Contiene todo lo referente a los horarios y modos de grabación Copiar a esta opción permite seleccionar el canal al que desea copiar los ajustes Prog El CCTV 972 comenzará a grabar cuando alcance la hora y el día especificado MTD Grabar cuando las cámaras detecten movimiento Estos ajustes se mostrarán sobre la línea de tiempo Alarma Activa la alar...
Page 32: ...ción para evitar problemas si su ruteador genera automáticamente una dirección diferente en el futuro IP Dirección IP de dispositivo Puerto 1 Puerto de dispositivo device port Puerto 2 Puerto móvil Puerto HTTP Este puerto es útil para establecer comunicación con el módem desde el explorador de Internet De fábrica está configurado el número 80 comúnmente usado en este tipo de aplicaciones PPPoE Cua...
Page 33: ...e una computadora vinculada al mismo ruteador del DVR para conocer la nueva dirección de IP Para prevenir un cambio de dirección de IP por parte de su proveedor de Internet puede solicitarle una dirección de IP estática o utilizar un servicio de direcciones IP dinámicas para obtener un nombre de dominio vinculado a su dirección dinámica Para más información consulte el apartado Instalación y uso d...
Page 34: ...que la cámara detectará movimiento Por defecto toda el área de la cámara está activada para detectar movimiento cuadros rojos Para bloquear alguna zona dé clic para que el cuadro se vuelva transparente El cuadro amarillo indica el centro del área de grabación Al terminar de fijar el área de detección dé clic derecho con el ratón y presione Confirmar para guardar los cambios Atrasar Activa o desact...
Page 35: ...ontraseña Reiniciar Reinicia el DVR Apagar Apaga el DVR Después de elegir esta opción deberá presionar el interruptor de encendido que está en la parte posterior 1 Seleccione el tipo de evento que busca Alarma Oper Local Oper rem Excepción o Todo 2 Establezca un periodo de búsqueda 3 Presione Buscar 4 Para desplazarse por la lista de eventos ingrese los números de página de manera ascendente empez...
Page 36: ... 2 Según sus necesidades seleccione el mismo valor de Baud rate velocidad de baudios tanto en la cámara como en el DVR 3 Según sus necesidades y de acuerdo con los ajustes de su cámara ajuste el Data bit 8 7 ó 6 bits el índice del bit de detención 1 o 2 Stop Bit Chequear y F control 4 Seleccione el Protocolo Samsung PelcoO PelcoP Panasonic del DVR de acuerdo con su cámara Importante este valor deb...
Page 37: ...y seleccione la opción PTZ 2 Cuando observe la pantalla de controles seleccione el canal que desea manipular En la pestaña de velocidad seleccione una modalidad según su necesidades las opciones son Rápido Normal o Despacio Finalmente use las fechas para operar la cámara PTZ o PT Conectar cámaras PTZ o PT Usar cámaras PTZ o PT 1 Inserte los cables RS485 de la cámara en las entradas 485 y 485 del p...
Page 38: ...reo y Aux son funciones que dependen de la cámara conectada La función Preset le permite guardar un punto predeterminado de visualización Ingrese a MENU OPCIONES PTZ PRE AJUSTAR Use los botones de dirección para fijar la posición En el campo Preset ingrese el número de identificación deseado y seleccione Opc Finalmente confirme el ajuste Fijar y usar punto predeterminado Preset ...
Page 39: ...espera Asegúrese de fijar el tiempo suficiente para que se complete el recorrido y la visualización 4 Finalmente en el campo Punto de la parte inferior ingrese el punto al que se le aplicarán los cambios y confirme con Añadir Repita este proceso ejecutando los mismos pasos pero seleccionando puntos y preset diferentes confirme con Añadir 2 Seleccione el Punto y su Pre ajuste correspondiente Progra...
Page 40: ... al menú de herramientas haga clic derecho y seleccione la opción PTZ A continuación dé clic en el botón Cambiar y con la opción Pre ajust o Navegar seleccionada ingrese el número de punto deseado Confirme con Iniciar Usar un Preset o Navegar ...
Page 41: ... visión de 60 Lente 6 mm Iluminación 0 Lux f 1 2 Apuntador Mouse Alimentación 5 V 100 mA x USB Convertidor de voltaje para DVR Alimentación 100 240 V 50 60 Hz 600 mA Salida 12 V 2 A Convertidor de voltaje para cámaras Alimentación 100 240 V 50 60 Hz 500 mA Salida 12 V 1 A El diseño del producto y las especificaciones pueden cambiar sin previo aviso ...
Page 42: ...pia casa comercial donde adquirió el producto Si la presente garantía se extraviara el consumidor puede recurrir a su proveedor para que le expida otra póliza previa presentación de la nota de compra o factura respectiva DATOS DEL DISTRIBUIDOR Nombre del Distribuidor __________________________ Domicilio ______________________________________ Producto ______________________________________ Marca __...
Page 43: ......
Page 44: ...iew this manual thoroughly to ensure proper installation and operation of this product For support shopping and everything new at Steren visit our website www steren com CCTV 972 Four cameras and DVR set The instructions of this manual are for reference about the product There may be differences due to updates Please check our web site www steren com to obtain the latest version of the instruction...
Page 45: ...s a risk of electric shock if a not authorized or qualified person open the DVR housing Avoid the installation of the DVR in a location subject to strong movements or vibrations Do not use or install the DVR direct sunlight Make sure that there is adequate ventilation around the DVR Not insert any object into the vent holes Do not expose the equipment to extreme temperatures Verify that the electr...
Page 46: ... on Select the Admin account Automatically the password appears when you select the Admin user Once connected the camera viewing screen appears When you click with the right button of the mouse it opens the tools bar in which you can select the main menu MENU and other options To exit the administrator account Enter the main menu by pressing MENU select SHUTDOWN LOGOUT Illustrations icons and scre...
Page 47: ...me it includes a multiplexer to watch four cameras at the same time or individually Use the front panel to control the DVR or if you prefer use the mouse It has BNC connectors and converter to power the DVR and the cameras No additional accessory required Night vision cameras Multiplexer Easy to install 500 GB HDD included Package content One DVR One mouse One power converter Four video cables for...
Page 48: ...6 6 CONTROLS 1 Power LED 2 REC lights on to indicate that a recording is made 3 Link tuns on when the device is connected to a network Front panel 2 1 3 ...
Page 49: ...nnector 4 AOUT audio output RCA Jack for audio output 5 VGA allows you to connect a VGA monitor 6 NET use an RJ 45 LAN cable to connect to a LAN 7 USB connectors connect devices such as USB flash drives to perform backups of the recordings and firmware configurations It also allows you to connect a mouse 8 RS 485 it allows you to connect PT or PTZ cameras 9 Power supply input 10 On off switch Rear...
Page 50: ...e the cursor to the desired channel and left click to view it in full screen Simultaneous display In 1 channel display click on the screen to go to the simultaneous view View toolbar In the camera viewing click with the right button to display the toolbar Use to exit from the menu options MOUSE INSTALLATIONAND USE ...
Page 51: ... connect the DVR to the external sound source Monitor or display connection Connect a display to output BNC VOUT or use a monitor VGA input Power connection Connect the power adapter to the power input located on the rear panel Ethernet network connection Connect a network cable to the RJ 45 connector for remote access via the Internet or Ethernet USB connection Ports USB can connect units as a mo...
Page 52: ...10 10 If necessary use adapters with RCA female connector to BNC male connector for audio and video connections ...
Page 53: ... BASIC FUNCTIONSAND QUICK START Right click to open the login window When you are prompted for a user account to operate the DVR select admin and the password will be activated automatically Accept with OK Turn the DVR on and wait for the system to start ...
Page 54: ...s useful for viewing and support recordings Off You don t need to stop recording to turn off the device simply use the power on off switch to turn off the DVR 5 To start and stop recording manually Once you select this option you must select which cameras will be recording 6 Open the operation menu for PT or PTZ cameras 7 Option that allows you to adjust the volume control on the DVR 8 Enter the m...
Page 55: ...cording video regardless of video type Means the manual recording status Means Motion Detection Status For more information about how to set the recording types refer to section 8 Recording Simultaneous view Individual view The screen display can be in two ways ...
Page 56: ...blished in the CCTV 972 Only videos and extra data in the hard disk will be deleted Before any recording you need to format the hard disk 1 Log on as Administrator Admin 2 Right click with the mouse to enter to the toolbar and select Menu 3 Enter to Tools HDD 4 The information on the hard disk is displayed Click Format to start the formatting of the hard disk and accept with OK Wait for the proces...
Page 57: ...tive channels and the blue REC indicator on the front panel of the DVR turn on to indicate that the recording process is in progress To stop recording enter this menu and deselect the channels To start recording it is essential that you ve formatted the hard disk The DVR has 2 methods of recording Manual recording Once the next window appears select the channels that will be recording and confirm ...
Page 58: ...Schedule submenu 4 First you must select the channel and day you want to apply the settings 5 Set in the 1 4 period in the recording fields and in the boxes below select the recording mode to apply Scheduled recording SCH red this option program recording schedules i e the CCTV 972 will begin to record when it reaches the configured day and time 8 RECORDING ...
Page 59: ...es To start recording playback you must enter to the records search Explorer Open the toolbar by right clicking with the mouse and select Playback PLAYBACKAND BACKUP VIDEOS MTD green indicates that the recording will be operated when there is motion detection Alarm yellow indicates that the recording will be triggered when you are about to start recording Remember you must enter to MENU SETUP MTD ...
Page 60: ...u want to display Then click on Play by time If you want to search for records simply select the channels type and click on Search In this mode you will need to click on a record for viewing it Remember to use the Prev and Next buttons to explore the content Once the recordings to be displayed can display only one channel select it by clicking it ...
Page 61: ... The export will be confirmed at the end with a message on the screen In case that the CCTV 955 does not allow exporting a video try changing the USB port Remove external storage USB and connect it to your computer Open the means of external storage USB memory on your computer to search for exported files Remember that the name of the video will be the same as the assigned by the DVR Below an exam...
Page 62: ...layback speed 1 8 x 8 times slower than normal playback speed Increase speed press this button to make play faster than normal speed If you press this button again the recording speed will increase to one of these three levels consecutively 2 x 2x faster than normal playback speed 4 x 4 times faster than normal playback speed 8 x 8x faster than normal playback speed Press to move forward or backwa...
Page 63: ...nd the gateway must be assigned manually Remember these parameters must be within the modem range 2 To assign the IP address to the DVR enter to MENU SETUP NETWORK LAN and choosse a modality to set the configurations The following instructions are only for reference Look for how to open ports and configure the modem with your Internet service provider ISP Consult a technician in case of not knowin...
Page 64: ...e modem automatically assigns the address and ranges in the IP address Net Mask Gateway and DNS fields 4 To monitor it locally LAN enter the IP address you assigned to the DVR in the Internet Explorer window To monitor remote WAN mode enter the public IP Note if you have selected in the HTTP port field a different range than 80 enter the public IP address followed by a colon and the port number th...
Page 65: ...Once the DVR home screen appears enter your default username Admin and password Once you enter them you will see a remote and local operation window that operates in same way as the DVR menus Finally to watch the channels simply select the Start All button 6 Once the start screen appears select the Admin user if the DVR has default settings you can leave the box Password blank and confirm pressing...
Page 66: ...ht button of the mouse on the channel display screen and select the MENU option The MENU section is made up of 4 main menus which in turn contain settings submenus HDD Shows the status of the connected hard disk capacity and free space and if it has been formatted If you press Format the selected hard drive will be formatted All data will be erased completely TOOLS ...
Page 67: ...th the right button of the mouse A v appears beside him Press Modify Edit functions that can be controlled by the user by selecting the appropriate check boxes If you want to change the password press the button that is next to the user name Press Ok to save your changes Delete select it with the right button of the mouse and press Delete Press Ok to save your changes Press Exit to return to the p...
Page 68: ...lays the name model and version of the DVR Upgrade Run any firmware or panel update saved on a USB stick or via the FTP protocol If you use this option you must also specify the server IP address Time Time and date settings Press Ok to save your changes ...
Page 69: ...full Lock Time This option allows you to lock your device after being inactive You must enter your password to enter the system Auto Switch Select the time for the view of channels in sequence The options are 05 s 10 s 20 s 30 s 1 min 2 min 5 min or never disabled Standard Allows you to select between PAL or NTSC format For Mexico and the United States use NTSC Video by default of the DVR system i...
Page 70: ...ansfer of the selected channel primary or secondary main or sub respectively CBR VBR Allows you to choose between constant CBR or variable VBR bit rate Frame Rate Select the number of frames per second that will record the selected channel Resolution Change the resolution of the image You can choose between D1 or CIF If you want to set the same settings to one or all channels use the tab on the bo...
Page 71: ...Saturation Use these controls to configure the image quality Video in this menu you can configure the channel settings Blind Each camera can define multiple regions for privacy protection i e it creates blocked areas in camera view To start select this option and enter Area Copy to where you want to copy the parameters to other channels select the tab of this application and click on the copy to b...
Page 72: ... Type Low and high volt PTZ DVR configuration parameters Buzzer Activates the alarm ringing tone Alarmout Select the channel to which the settings are applied Type Open or Closed Email Set the email where you will receive the alarm Password Email password SMTP Server Server number Alarmin Contains everything related to configuring alarm input Alarmout alarm out option and e mail address ...
Page 73: ...e boxes beside you select record mode to apply Schedule This submenu contains settings regarding schedules and recording modes Copy to This option allows you to select the channel you want to copy the settings SCH The CCTV 955 will begin recording at the specified day and time MTD Record when cameras detect motion These settings will be displayed on the timeline ...
Page 74: ...nter the address information to avoid problems if your router automatically generates a different direction in the future IP device IP address Dev Port set the device port Mobile port set the mobile port HTTP Port this port is useful to establish communication with the modem from your Internet browser Number 80 commonly used in this type of application is factory configured PPPoE When you select P...
Page 75: ... If this change occurs you will need to log in from a computer linked to the same router on the DVR to know the new IP address To prevent a change of IP address from your Internet provider you can request a static IP address or use a service of dynamic IP addresses for a domain linked to its dynamic address name For more information see Installing and using a PTZ camera PTZ Enter this menu to conf...
Page 76: ...ea Determine the area in which the camera detects movement By default the entire area of the camera is enabled to detect motion red boxes To block any area click that box becomes transparent The yellow box indicates the center of the recording area When you finish setting the detection area right click with your mouse and press Confirm to save your changes Duration activates or deactivates the ala...
Page 77: ...r the password again Restart restart the DVR Shutdown turns off the DVR After you choose this option you must press the power switch that is in the rear 1 Select the type of event you are looking for Alarm Oper Local Ops Remote Ops Exception or All 2 Establish a search period 3 Press Search 4 To scroll through the event list enter page numbers in ascending order starting with 2 and press Jump ...
Page 78: ... PTZ camera 1 Select the DVR channel where you will connect the PT or PTZ camera 2 Depending on your needs select the same Baudrate both the camera and DVR 3 According to your needs and according to the settings of your camera setting Data 6 7 or 8 bits the index of the bit stop bit 1 or 2 check and f control 4 Select Samsung PelcoO PelcoP Panasonic link protocol of your camera Important this valu...
Page 79: ... options are Slow Normal or Fast Finally use the arrows to operate the PTZ or PT camera Connect PT or PTZ cameras Use PT or PTZ cameras 1 Insert the RS485 cables from the camera in the 485 and 485 inputs on the rear panel of the DVR taking care of polarization 2 Connect the camera cable to the channel you selected in step 1 of the PT or PTZ camera settings instructions If necessary use an adapter ...
Page 80: ...nd Track are functions that depend on the connected camera The Preset function allows you to save a predetermined view point Enter to MENU Setup PTZ PRESET Use the direction buttons to lock the position In the Preset field enter the desired identification number and select options Finally confirm the setting Fix and use default point Preset ...
Page 81: ... one point to another and the waiting period Be sure to set enough time for to complete the route and display 4 Finally in the bottom cruise point field enter the point which applies the changes and confirm with Add Repeat this process by following the same steps but select different preset and points confirm with Add 2 Select the point and its corresponding preset Schedule a trace route 5 To dele...
Page 82: ...t or navigate enter the Tools menu by right clicking and select the PTZ option Then click the Switch button and with the Preset or Cruise option selected enter the desired number Confirm with Start Use a preset or navigate ...
Page 83: ...nsumption 10 kWh month Stand by power consumption 105 kWh year Camera Input 12 V 300 mA Angle of vision 60 Lens 6 mm Lux 0 Lux f 1 2 Mouse Input 5 V 100 mA by USB Convertidor de voltaje para DVR Input 100 240 V 50 60 Hz 600 mA Output 12 V 2 A Convertidor de voltaje para cámaras Input 100 240 V 50 60 Hz 500 mA Output 12 V 1 A ...
Page 84: ...arranty service at any of the addresses mentioned later THIS WARRANTY IS VOID IN THE NEXT CASES If the product has been damaged by an accident acts of God mishandling leaky batteries failure to follow enclosed instructions improper repair by unauthorized personnel improper safe keeping among others a The consumer can also claim the warranty service in the purchase establishment b If you lose the w...
Page 85: ......
Page 86: ......