background image

ESPAÑOL-10

ESP

AÑO

L

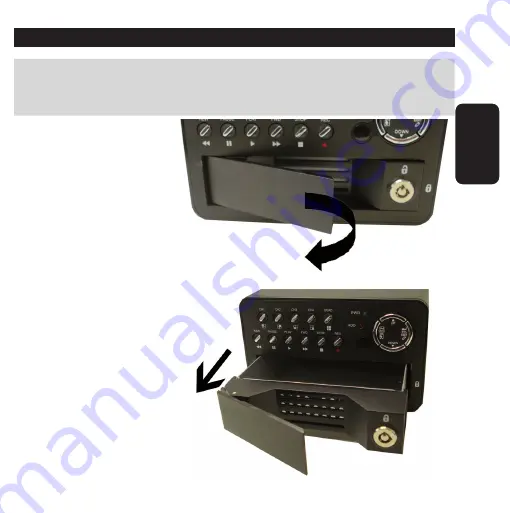
INSTALACION DEL DISCO DURO (no incluido)

Asegúrese de tener conocimientos básicos de instalación de 

computadoras, en caso contrario acuda con un técnico 

especializado.

1.- Jale hacia el frente la 

palanca del 

compartimiento 

removible del disco duro.

al lea este instructivo para evitar cualquier mal funciona-

miento. Guárdelo para futuras referencias.

Summary of Contents for CCTV-940

Page 1: ......

Page 2: ...L 14 Ajuste de cámara 15 Ajuste de grabación 15 Modo de grabación 16 Velocidad de cuadros 16 Calidad de video 17 Grabación programada 17 Submenú 19 Auto grabación 19 Contraseña 19 Cambio de contraseña 19 Imagen 20 Hora 20 Idioma 21 Configuración del disco duro 21 Activación de sobreescritura 21 Tamaño del disco duro 21 Espacio del disco duro 21 Formateo del disco duro 21 ESPAÑOL ...

Page 3: ...2 Duración de alarma 22 Ajuste de detección 22 Sensibilidad de canales 23 Selección de áreas 23 Reinicio de fábrica 24 SELECCION DE SALIDA NTSC PAL 24 GRABACION 25 TIEMPO DE GRABACION 26 REPRODUCCION 27 INSTALACION DE SOFTWARE PARA XP 27 ESPECIFICACIONES 34 ...

Page 4: ...ga el equipo a la luz directa del sol o polvo o humedad Siempre utilice un paño suave limpio y seco para la limpieza del equipo Si el cordón de alimentación es dañado éste debe ser reemplazado por el fabricante o su agente de servicio o por personal calificado para evitar algún riesgo CARACTERISTICAS Este equipo le permite grabar la señal de 4 diferentes cámaras para circuito cerrado de TV Interfa...

Page 5: ...rmite seleccionar la cámara conectada al canal 3 4 CH4 Permite seleccionar la cámara conectada al canal 4 5 Quad Permite visualizar las 4 cámaras al mismo tiempo en una sola ventana 6 HDD LED indicador de disco duro enciende cuando el disco duro esta trabajando en forma normal ESPAÑOL 05 ESPAÑOL 1 2 3 4 5 6 7 8 9 10 11 12 13 14 15 16 17 18 19 20 ...

Page 6: ...r el disco duro 12 Menu Esc Menú Accede al menú principal del DVR Esc Sale de un submenú 13 Sensor IR Recibe la señal IR del control remoto 14 Rec Comienza la grabación 15 Stop En modo de reproducción detiene la reproducción actual en modo de grabación detiene la grabación actual 16 Palanca para retirar introducir el compartimiento removible del disco duro 17 Adelantar En modo de reproducción adel...

Page 7: ...nto específico del vídeo PANEL POSTERIOR 1 VIDEO OUTPUT Permite conectar un monitor a través de un conector BNC VIDEO INPUT 2 CH1 Entrada de vídeo por conector BNC Cámara 1 3 CH2 Entrada de vídeo por conector BNC Cámara 2 4 CH3 Entrada de vídeo por conector BNC Cámara 3 5 CH4 Entrada de vídeo por conector BNC Cámara 4 1 2 3 4 5 6 7 8 ...

Page 8: ...equipo CONTROL REMOTO 1 CH1 Permite seleccionar la cámara conectada al canal 1 2 CH2 Permite seleccionar la cámara conectada al canal 2 3 CH3 Permite seleccionar la cámara conectada al canal 3 4 CH4 Permite seleccionar la cámara conectada al canal 4 5 Play Comienza la reproducción de un archivo previamente grabado 6 Avance En modo de reproducción adelanta a un punto específico el vídeo ESPAÑOL 08 ...

Page 9: ...overse a través de las opciones hacia abajo 10 Sel Edit Permite cambiar los valores de configuración 11 Menú Accesa al menú principal 12 Pausa En modo de reproducción hace una pausa al vídeo actual 13 Grabación Permite comenzar a grabar 14 Regreso En modo de reproducción regresa a un punto específico del vídeo 15 Quad Despliega en pantalla las 4 cámaras al mismo tiempo ESPAÑOL 09 ESPAÑOL ...

Page 10: ...nocimientos básicos de instalación de computadoras en caso contrario acuda con un técnico especializado 1 Jale hacia el frente la palanca del compartimiento removible del disco duro al lea este instructivo para evitar cualquier mal funciona miento Guárdelo para futuras referencias ...

Page 11: ... el interior del compartimiento 5 Vuelva a colocar el compartimiento dentro del equipo Si desea resguardar el disco duro use las llaves para cerrar el compartimiento removible Se recomienda usar el disco duro en modo Esclavo o Cable Select para ello asegúrese que el jumper del disco duro se encuentre en modo Esclavo o cable select ESPAÑOL 11 ESPAÑOL al lea este instructivo para evitar cualquier ma...

Page 12: ...O INPUT y así sucesivamente hasta conectar 4 cámaras si así lo desea 3 Conecte un monitor en la entrada VIDEO OUTPUT con conector BNC 4 Inserte el adaptador de corriente en la entrada DC12V y el extremo contrario conéctelo a un contacto eléctrico ESPAÑOL 12 ESPAÑOL MONITOR CAMARA 1 CAMARA 2 CAMARA 3 CAMARA 2 ADAPTADOR DE CORRIENTE ...

Page 13: ...la información en caso de tener información del disco duro Para más detalles dirijase a la sección del submenú Formateo del disco duro Posteriormente en el monitor se desplegará las 4 cámaras con la fecha y hora Para configurar el equipo entre al menú principal oprimiendo el botón Menú ESPAÑOL 13 ESPAÑOL al lea este instructivo para evitar cualquier mal funciona miento Guárdelo para futuras refere...

Page 14: ...lector de grabación Record Select c Modo de grabación Record Mode d Velocidad de los cuadros Record Frame Rate e Calidad de vídeo Video quality f Grabación programada Record Schedule g Sub Menu h Ajuste de disco duro Hard Disk Setup i Ajuste de Movimiento Motion Setup j Reinicio a parámetros de fábrica Restore Factory Default ESPAÑOL 14 ESPAÑOL ...

Page 15: ...uede configurar que cámaras son las que se visualizarán Presione el botón de Selección Edición para cambiar los parámetros o presione los botones de Canales 1 2 3 y 4 para configurar cada canal de forma separada Si el canal no es utilizado el sistema desplegará en la pantalla la palabra OFF b Ajuste de grabación Record Setup El grabador puede grabar hasta 4 cámaras en una sola pantalla en modo mos...

Page 16: ...sione el botón de QUAD por 3 segundos y cada canal que se esté grabando o reproduciendo se mostrará en pantalla completa y cambiará al siguiente canal de forma indefinida hasta que presione una vez más el botón QUAD Modo de mosaico Quad Comprime y graba los 4 canales de vídeo en un solo archivo d Velocidad de cuadros Record FrameRate La velocidad de cuadros por segundo de grabación seleccionada af...

Page 17: ...bación mayor será el espacio re querido en disco duro Presione el botón SEL para seleccionar la opción de acuerdo a sus necesidades Para salir oprima el botón Menú f Grabación programada Record Schedule Mediante esta opción podrá configurar el modo de grabación a lo largo del día ya sea por tiempo sensor o movimiento ESPAÑOL 17 ESPAÑOL ...

Page 18: ...tan cada hora del día Para seleccionar una hora utilice los botones deUp Down posteriormente utilice el botón Sel Edit para cambiar el parámetro y finalmente presione el botón de Menú para salir y guardar los cambios Por ejemplo Si configura de la siguiente forma TTTA 6 9 Significará que apartir de las 6 00 horas grabará de forma continua hasta las 8 00 horas y a las 9 00 horas solo grabará si se ...

Page 19: ...ión o ingresar a un menú Presione el botón SEL para activar on o desactivar off esta función Cambio de contraseña Password Change La contraseña predeterminada se obtiene presionando el botón CH1 6 veces Para cambiar la contraseña introduzca la contraseña por defecto 111111 Posteriormente deberá introducir otro código de 6 dígitos New Password Deberá confirmar Confirm password el nuevo código para ...

Page 20: ...n para seleccionar una opción Presione el botón SEL para disminuir o incrementar el valor del parámetro Finalmente presione Menú para salir de este modo de configuración Hora Time Setup Esta opción permite cambiar la hora y fecha del grabador Presione el botón SEL para entrar a esta opción Utilice los botones de Up Down para seleccionar un dígito Posteriormente presione SEL para actualizar cada dí...

Page 21: ...disco duro se agote Tamaño del disco duro HDD size Muestra en pantalla el tamaño del disco duro instalado en el grabador Espacio utilizado del disco duro HDD Used Muestra el espacio utilizado del disco duro instalado en la grabadora Formateo del disco duro HDD Format Permite dar formato al disco duro instalado en la grabadora Tenga presente que el dar formato borrará todo el contenido del disco du...

Page 22: ... en segundos en que los simbolos de movimiento se desplegarán en pantalla Puede elegir entre apagado off 05 10 15 20 25 30 segundos o continúo Cont Para cambiar los valores presione el botón de Select para salir presione el botón menú Ajuste de detección de movimiento Motion detector setup Aqui podrá configurar la sensibilidad de detección de movimiento para cada uno de los canales asi como un áre...

Page 23: ...et Esta opción permite elegir el área que estará activa o no para que se accione la detección de movimiento La imagen estará dividida en 144 bloques 12x12 si el área está activa para grabación vera el bloque transparente en caso contrario el bloque tendrá una sombra Utilice los botones de Up Down Adelantar Regresar para seleccionar un bloque y para activarlo o desactivarlo presione el botón de SEL...

Page 24: ... haya olvidado presione el botón de Pausa 10 veces para hacer que el grabador reinicie todo los valores En caso de que se encuentre en modo de grabación apague el grabador y retire el disco duro Encienda el grabador nuevamente y presione el botón de Pausa 10 veces SELECCIÓN DE SALIDA NTSC PAL Apague el equipo y desconecte la corriente eléctrica Retire la cubierta del grabador y localice el jumper ...

Page 25: ...aparecen los siguientes mensajes 1 Porcentaje de uso del disco duro en la esquina superior izquierda 2 R Símbolo de grabación 3 Nombre del canal 4 QUAD o EACH indicando el modo de grabación únicamente en modo EACH podrá visualizar la pantalla completa 5 Indicador de estatus REC 6 Información de disco duro Muestra información del disco duro disco ESPAÑOL 25 ESPAÑOL ...

Page 26: ... utiliza un disco de 120GB con 7 cuadros por segundo en calidad normal El tiempo estimado es de 332 horas ESPAÑOL 26 ESPAÑOL Gb x Mb x Kb Kb cuadros x cuadro segundos x segundos x minutos 120 x 1024 x 1024 15 x 7 x 60 x 60 125829120 378000 332 8 hrs Formato Calidad Cuadros 30 15 7 1 Alta 20 58 117 251 1748 Normal 15 78 155 333 2330 Baja 12 97 194 416 2913 NTSC Formato Calidad Cuadros 25 12 6 1 Alt...

Page 27: ...odas las grabaciones presione Menú durante la reproducción de un archivo y utilice los botones de Up Down para seleccionar una grabación finalmente presione Reproducir play para comenzar la reproducción INSTALACION DEL SOFWARE EN XP 1 Introduzca el CD de instalación 2 Abra el explorador de windows y localice el archivo Setup 3 3 y ejecútelo 3 Presione Next para continuar con la instalación ESPAÑOL...

Page 28: ... los terminos y presione Next para continuar 5 Agregue el nombre de usuario y la organización Si desea que cualquier usuario pueda emplear este software seleccione Anyone who En caso contrario seleccione Only for me Después presione Next para continuar ESPAÑOL 28 ESPAÑOL ...

Page 29: ...6 Seleccione la carpeta destino donde se copiarán los archivos de este programa posteriomente presione Next para continuar con la instalación 7 Presione el botón Install ESPAÑOL 29 ESPAÑOL ...

Page 30: ...8 Para terminar con la instalación presione el botón Finish 9 Abra la aplicación instalada Dvr Viewer ESPAÑOL 30 ESPAÑOL ...

Page 31: ...rograma 2 Grabación Guardará la grabación contenida del grabador a la computadora en formato MYS o en AVI El archivo creado se guardará en la carpeta donde se instaló el programa Si selecciona el formato AVi será necesario seleccionar el tipo de compresión en caso de no conocer este dato seleeccione por defecto Cuadros completos Posteriormente comenzará el proceso de captura de vídeo ESPAÑOL 31 ES...

Page 32: ...s imagenes 4 Imprimir Permite seleccionar una impresora para imprimir la imagen capturada en pantalla en ese momento 5 Lista de eventos Permite seleccionar un evento específico para reproducir Seleccione el evento y presione el control Ok ESPAÑOL 32 ESPAÑOL ...

Page 33: ...izar la Cámara 1 CH1 Cámara 2 CH2 3 y 4 También puede visualizar en modo mosaico Quad 8 Regreso rápido 9 Regreso paso a paso 10 Regreso normal 11 Pausa Realiza una pausa durante la reproducción 12 Play Comienza la reproducción 13 Avance paso a paso 14 Avance rápido 15 Control de nivel de volumen 16 Barra de reproducción 17 Botón de cierre de programa ESPAÑOL 33 ESPAÑOL ...

Page 34: ...remoto Entrada 3V 2 x AAA Convertidor Entrada 100 240V 50 60 Hz 1A Salida 12V 3A El diseño del producto y las especificaciones pueden cambiar sin previo aviso ESPAÑOL 34 ESPAÑOL al lea este instructivo para evitar cualquier mal funciona miento Guárdelo para futuras referencias ...

Page 35: ...va la garantía 4 El lugar donde puede adquirir partes componentes consumibles y accesorios así como hacer válida esta garantía es en cualquiera de las direcciones mencionadas posteriormente ESTA PÓLIZA NO SE HARA EFECTIVA EN LOS SIGUIENTES CASOS 1 Cuando el producto ha sido utilizado en condiciones distintas a las normales 2 Cuando el producto no ha sido operado de acuerdo con el instructivo de us...

Page 36: ...610259N4 ELECTRONICA STEREN DE GUADALAJARA S A López Cotilla No 51 Centro 44100 Guadalajara Jal RFC ESG810511HT6 ELECTRONICA STEREN DE MONTERREY S A Colón 130 Pte Centro 64000 Monterrey N L RFC ESM830202MF8 ELECTRONICA STEREN DE TIJUANA S A de C V Calle 2a Juárez 7636 Centro 22000 Tijuana B C N RFC EST980909NU5 En caso de que su producto presente alguna falla acuda al centro de distribución más ce...

Page 37: ......

Page 38: ...ONS 11 SYSTEM BOOT 12 MAIN MENU 13 Camera Setup 14 Record Setup 14 Record mode 15 Record Frame Rate 15 Video Quality 16 Record Schedule 16 Sub menu 17 Auto record 17 Password 17 Password change 17 Picture setup 18 Time setup 18 Lenguage setup 19 Hard Drive Setup 19 Overwrite 19 HDD size 19 HDD format 19 Motion setup 20 ...

Page 39: ...rd duration 20 Motion alarm duration 20 Motion detector setup 20 Restore factory default 22 NTSC PAL OUTPUT SELECT 22 RECORDING 23 RECORDING LENGTH 24 PLAYBACK 25 INSTALLTION OF SOTWARE IN XP 25 SPECIFICATIONS 32 ...

Page 40: ...light dust or humidity Always use a soft and dry cloth in order to clean this device If the power cord is damaged it must be replaced immediately by the manufacturer your service agent or any qualifies personnel FEATURES This device allows you to record the signal from four different closed circuit television cameras at the same time in NTSC or PAL USB interface Compact and functional size Securit...

Page 41: ...elect the camera connected to channel 2 3 CH3 Allows you to select the camera connected to channel 3 4 CH4 Allows you to select the camera connected to channel 4 5 Quad Allows you to view all four cameras at the same time on one screen 6 HDD light on when the Hdd is in use 1 2 3 4 5 6 7 8 9 10 11 12 13 14 15 16 17 18 19 20 ...

Page 42: ...options down 11 Security lock 12 Menú Accesses the main menu 13 IR sensor Receives the infrared signal from the remote control 14 Rec Begins to recording 15 Stop In playback mode allows you to stop the current playback In recording mode stops the current recording 16 Removable rack 17 Play Begins the playback of a saved file 18 Fordward In playback mode allows you to skip forward to a specific poi...

Page 43: ...deo output Allow you to connect a monitor through a BCN connector 2 CH1 Allows you to view the camera 1 3 CH2 Allows you to view the camera 2 4 CH3 Allows you to view the camera 3 5 CH4 Allows you to view the camera 4 6 Power input 7 USB port You can playback a record in the computer 8 Ground system 1 2 3 4 5 6 7 8 ...

Page 44: ...estarts the playback of a saved file 6 Forward In playback mode allows you to skip forward to a specific point in the video 7 Stop Stops current playback or current recording 8 Up Allows you to move through the menu options up 9 Down Allows you to move through the menu options down 10 Select Allows you to confirm or change a selection 11 Menu enter to the main menu 1 2 3 4 5 6 7 8 9 10 11 12 13 14...

Page 45: ...to return to a specific point from the video 15 Quad Allows you to view all 4 cameras on the same screen at the same time HARD DRIVE INSTALLATION not included Make sure taht you have to kown the computers if not go with a qualified person 1 Pull to the front the removable rack al lea este instructivo para evitar cualquier mal funcionamiento Guárde ...

Page 46: ...disk 4 Place the hard disk inside the recorder 5 If you want to protect the hard disk use the keys to close the removable rack We recommend using the HDD in Slave or Cable Select mode so make sure jumper on the hard disk are is in Slave mode or cable select mode al lea este instructivo para evitar cualquier mal funcio namiento Guárdelo para futuras referencias ENGLISH ENGLISH 10 ...

Page 47: ...abeled as CH1 Use this same process for up to four cameras if you wish 3 Connect a monitor to one of the BNC output jacks labeled as VIDEO OUTPUT 4 Plug an AC power adapter into the DC power connector then connect it into an AC outlet MONITOR CAMERA 1 CAMERA 3 CAMERA 2 CAMERA 3 CAMERA 4 TO AC DC ADAPTER ENGLISH ENGLISH 11 ...

Page 48: ...first remember to format the hard disk will be lost all the information if you have information on your hard disk For more details refer to the section of the menu Format the hard disk At the beginning the monitor will display 4 cameras with next information Date and hour al lea este instructivo para evitar cualquier mal funciona miento Guárdelo para futuras referencias Este Kit es ideal para estu...

Page 49: ...ress Menu to enter main menu there you can see next sub menus a Camera Select b Record select c Record mode d Record frame rate e Video quality f Record schedule g Sub menu h Hard disk setup i Motion setup j Restore factory default ...

Page 50: ...you can configure which camera or cameras are enabled to visualize Press SEL EDIT to change the parameters or press Channel buttons CH1 CH2 CH3 CH4 to configure each channel separately If a channel is not in use the system will display OFF b Record Select The recorder can record up to 4 signals from the cameras in one screen Quad Mode but you can configure which camera or cameras are ...

Page 51: ...recording or playing will switch to next channel indefinitely until you press Quad again Quad Mode Compress and record 4 video channels in one file Selected frame rate will affect the objects movement in the recorded video Higher frame rate smoother movement you will get but you will need more space in HD Default value are 25fps d Record Frame Rate As we mentioned the selected frame rate will affe...

Page 52: ... according your needs To store the changes press Menu f Record Schedule Use this option to set a record schedule per day You can choose from motion recording No recording T Continuous Recording default option A Recording triggered by motion This option works with a wide variety of external devices such as PIRs gas sensors etc The recorder will not record until the external sensor will be triggered...

Page 53: ... move then will not record anything g Sub menu Auto Record Activate the function ON if you want to record automatically after 5 minutes without any operation To turn the function off select OFF Password Allows you to activate or deactivate Password function in case the Password is on you must type it to stop a record or to enter a menu Password Change Press CH1 6 times and you will get the default...

Page 54: ...Brightness Use Up Down buttons to select an option Press Sel to diminish or increase the value of the parameter respectively Use Channel buttons to select the desired channel to modify Finally press Menu to leave this setup Time setup This option allows you to set date and time Use Up Down buttons to select a digit Then press Select to update each digit of date and time Finally press Menu to store...

Page 55: ...ecording will be stopped when the hard disk space is empty HDD size Displays the size of the hard disk installed HDD Used Displays the used space on your hard disk HDD Format Allows you to format the primary hard disk Be aware that formatting your hard disk will erase all information contained within your hard disk We recommend to format the HD the first time you use it in the recorder Otherwise t...

Page 56: ...nge press the select button and to exit press the menu button Motion Alarm Duration It indicates how long the alarm lasts after a motion is triggered You can select between off 05 10 15 20 25 30 seconds or cont To change press the select button to exit press the menu button Motion detector setup First step is to set the motion recording method Please refers to Record Schedule for more information ...

Page 57: ...the parameter Channel 1 4 area set This option allows you to select the active area which it helps to activate the alarm The image will be divided in 144 blocks 12x12 if the area is active you will see a transparent block if the area is not active you will see a shadow in the block Use Up Down Forward Backward to select a block and set it up pressing Sel Edit button ...

Page 58: ...word and you forget it press Pause button 10 times this process will restart the system If you are in recording mode power the recorder off and remove the HD Then power on the recorder and press Pause button 10 times NTSC PAL OUTPUT SELECT Power off the recorder and unplug the AC power adapter Then remove the case and locates the jumper 10 remove it and select PAL or NTSC according your needs L ...

Page 59: ...ton 3 In the screen you will see next messages 1 Upper left corner used HD space percentage 2 Recording Symbol 3 Name of the channel 4 QUAD or EACH indicates the recording mode only in EACH mode you will see the image in full screen 5 Status indicator REC Play FF1 FF2 FF3 REW Pause 6 HD information Displays information about the HD ESPAÑOL ...

Page 60: ...mple use a 120GB HD at 7fps in normal quality Estimated time 332 hours Gb x Mb x Kb Kb frame x frame seconds x seconds x minutes 120 x 1024 x 1024 15 x 7 x 60 x 60 125829120 378000 332 8 hrs Format Quality Frame Rate 30 15 7 1 High 20 58 117 251 1748 Normal 15 78 155 333 2330 Low 12 97 194 416 2913 NTSC Format Quality Frame Rate 25 12 6 1 High 20 70 146 291 1748 Normal 15 93 194 388 2330 Low 12 11...

Page 61: ...rd If you want to see a list of previous recordings press Menu while playing a file then use Up Down buttons to select a file finally press Play to playback the selected file INSTALLATION OF SOFTWARE IN XP 1 Insert the CD of installation 2 Open and run the Setup 3 3 file 3 Press Next to continue with the installation ...

Page 62: ...H ENGLISH 26 4 Accept the license so press the next button 5 ADD the name and the organization If you wish that Anyone use this program press Anyone who or select Only for me To continue press the next button ...

Page 63: ...ENGLISH ENGLISH 27 6 Select the folder where you save the files after press the next button 7 Press the Install button ...

Page 64: ...ENGLISH ENGLISH 28 8 To end press the Finish button 9 Open Dvr Viewer ...

Page 65: ...ll be to saved in folder from installation 2 Recording The record will be to saved in the computer in MYS or Avi format the file will be to saved in folder from installation If you select the Avi format you have to select the compression if you don t known the type select complete frames 1 2 3 4 5 6 7 8 9 10 11 12 13 14 15 16 17 18 ...

Page 66: ...ENGLISH ENGLISH 30 3 Here the caputure directory will show 4 Print You can print a picture from the screen 5 Event list Select a event to playback and press the ok button ...

Page 67: ...dd s content from the DVR In PC mode Open the MYS file from PC 7 Camera 1 2 3 or 4 controls also in quad mode 8 Quick return 9 Return to step 10 Normal return 11 Pause 12 Play 13 Progress to step 14 Quick progress 15 Volume control 16 Bar playback 17 To Close ...

Page 68: ...Remote control Input 3V 2 x AAA Converter Input 100 240V 50 60 Hz 1A Output 12V 3A Product details and specifications are subject to change without previous notice al lea este instructivo para evitar cualquier mal funciona miento Guárdelo para futuras referencias ...

Page 69: ...natural days from the day the claim was received 4 Steren sell parts components consumables and accessories to customer as well as warranty service at any of the addresses mentioned later THIS WARRANTY IS VOID IN THE NEXT CASES If the product has been damaged by an accident acts of God mishandling leaky batteries failure to follow enclosed instructions improper repair by unauthorized personnel imp...

Page 70: ...ailer Address Product Brand Part number Serial number Date of delivery In case your product fails or have questions please contact your nearest dealer If you are in Mexico please give a call to our Call Center Call Center 01 800 500 9000 ...

Reviews: