background image

19

SPEAKERS

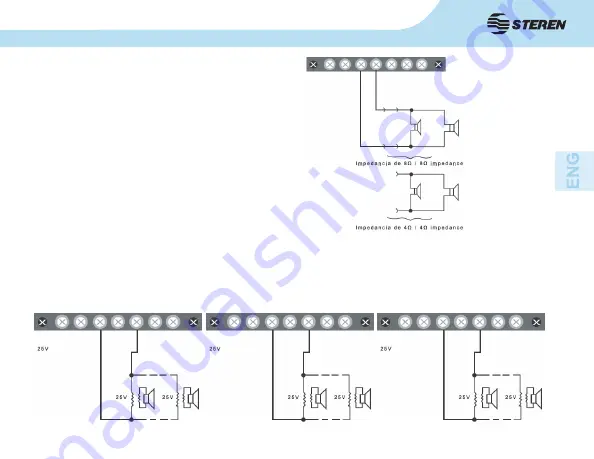
You can use speakers with 4ohm impedance 

on this equipment. Even you can use with 25, 

70 or 100V line output.

The  ends  has  been  designed  to  plug  low-

impedance  speakers  (4  ohm  as  minimum) 

when the line voltage output is not necessary 

or  in  case  that  the  distance  between  the 

amplifier and the speakers are too short (less 

than 50 meters). If you connect a speaker with 

different impedance (4ohm), the amplifier will 

show lacks on the power output.

25V, 70V, 100V LINE OUTPUT

If you want to use speakers in a bigger distance than 50 meters from the amplifier, we recommend 

you to install transformers, one per speaker to prevent an excessive waste of power. The sum of the 

power must be the same or less than the power of the amplifier.

Summary of Contents for AMP-045CD

Page 1: ...Manual de instrucciones S6 B V0611a AMP 045CD Amplificador de audio con CD sirena y prioridad ...

Page 2: ...cesarias para instalar y operar su nuevo Amplificador Steren Por favor revise este manual completamente para estar seguro de instalar y poder operar apropiadamente este producto Para apoyo compras y todo lo nuevo que tiene Steren visite nuestro sitio Web en www steren com AMP 045CD AMPLIFICADOR DE AUDIO CON CD SIRENA Y PRIORIDAD ...

Page 3: ...po eléctrico no coloque el cable de energía por debajo de alfombras o tapetes ni coloque objetos pesados encima de los cables Si el cable de energía se encuentra dañado debe ser reemplazado inmediatamente con cables que cuenten con las mismas especificaciones de fábrica Maneje el cable de energía con cuidado Cuando desconecte el cable de energía del tomacorriente nunca jale del cable Si no piensa ...

Page 4: ...res de calor y las ranuras de ventilación que forman parte del gabinete están especialmente diseñados para remover ese calor Colocar otros equipos electrónicos cerca de esos sistemas de disipación de calor podría afectar el rendimiento del amplificador y los otros objetos colocados encima de él El material de empaque utilizado en la protección del amplificador ha sido diseñado especialmente para a...

Page 5: ...or de uso Enciende cuando el equipo esta en uso 3 Indicador de salida de señal 4 Entrada de micrófono 1 5 Entrada de micrófono 2 6 Entrada de auxiliar Conecte un equipo de audio externo 7 Selector de micrófono auxiliar Selecciona entre micrófono o equipo de audio externo 8 Control de volumen auxiliar 9 Control de volumen micrófono 2 10 Control de volumen micrófono 1 11 Interruptor de sirena Activa...

Page 6: ...ador CONTROLES DEL CD 1 Encendido apagado Enciende apaga el reproductor de CD 2 Abrir cerrar Open close Al presionar la bandeja del CD se abre o se cierra 3 Reproducir pausa Play pause Presione para comenzar la reproducción del CD 4 Volumen Level Permite ajustar el nivel de volumen 5 Parada Stop Detiene la reproducción actual 6 Regresar B Skip Rew Regresa a una pista previa 7 Adelantar F Skip FF S...

Page 7: ... principal la energía será suministrada automáticamente por la batería CÓMO CONECTAR MICRÓFONOS Su nuevo amplificador cuenta con 2 entradas para micrófono tipo no balanceado Todas las entradas tienen control independiente y el MIC1 cuenta con prioridad cuando se conecta otro micrófono Cuando se seleccione MIC1 la señal del MIC2 se silenciará AUXILIAR A través de esta entrada puede conectar un sint...

Page 8: ...a entre el amplificador y las bocinas sea corta menos de 50 metros Si se conecta una carga diferente a 4 ohms el amplificador mostrará deficiencias en la potencia LÍNEA DE SALIDA DE 25V 70V 100V Si desea utilizar bocinas a una distancia mayor a 50 metros desde el amplificador se recomienda que se instalen transformadores uno en cada bocina para prevenir una pérdida excesiva de potencia La suma tot...

Page 9: ...or de nivel de salida Cuando está iluminado en rojo la señal de audio puede oírse distorsionada baje el volumen 7 Si desea utilizar en reproductor de CD integrado presione el botón de encendido 8 La pantalla de LCD se encenderá presione el botón de abrir 9 Inserte un disco de audio Presione nuevamente el botón de cerrar 10 Presione Reproducir Play para comenzar la reproducción del disco 11 Cuando ...

Page 10: ...l de tono al centro Aux 65dB debajo de energía nominal Micrófono 55dB debajo de energía nominal Todos los controles al mínimo Controles de tono Bass 10dB a 100Hz Treble 10dB a 10kHz Entrada Aux 20dB 2 10 kΩ desbalanceado Mic 52dB 2 10 kΩ desbalanceado Indicadores Indicador de uso Indicador de nivel de salida de señal Consumo 115Wmax Dimensiones 400 x 100 x 305mm Peso 7 65kg Color Negro Consumo nom...

Page 11: ...solicitar que se haga efectiva la garantía ante la propia casa comercial donde adquirió el producto Si la presente garantía se extraviara el consumidor puede recurrir a su proveedor para que le expida otra póliza de garantía previa presentación de la nota de compra o factura respectiva DATOS DEL DISTRIBUIDOR Nombre del Distribuidor Número de serie Fecha de entrega Producto Amplificador de audio co...

Page 12: ...12 Instruction Manual S6 B V0611a AMP 045CD Audio amplifier with CD player siren and priority ...

Page 13: ...ooting necessary to install and operate your new Steren s Audio amplifier Please review this manual thoroughly to ensure proper installation and operation of this product For support shopping and everything new at Steren visit our website www steren com AMP 045CD AUDIO AMPLIFIER WITH CD PLAYER SIREN AND PRIORITY ...

Page 14: ...is product As with all electrical devices do not run power cords under rugs or carpets or place heavy objects on power cords Damaged power cords should be replaced immediately with cords meeting factory specifications Handle the AC Power Cord Gently When disconnecting the power cord from an AC outlet always pull the plug never pull the cord If you do not intend to use the amplifier for a considera...

Page 15: ...ion slots that form part of the cabinet are specially designed to remove this heat Placing other electronic equipment near these heat dissipation systems may possibly affect the long term reliability of both your amplifier and the objects placed above it The carton and shipping materials used in protecting your new amplifier were specially designed to cushion it from the shocks and vibration of sh...

Page 16: ...Use indicator Lights on when the equipment is in use 3 Output signal indicator 4 Microphone 1 input 5 Microphone 2 input 6 Auxiliary input Connect an external audio system 7 Mic aux selector Choose between the mic or an external audio system 8 Auxiliary volume knob 9 Microphone 2 volume knob 10 Microphone 1 volume knob 11 Siren switch Activates deactivates the built in siren 12 Treble Set the treb...

Page 17: ...er s metallic parts CD PLAYER CONTROLS 1 On Off Power on off the CD player 2 Open Close By pressing this button you can open or close the CD tray 3 Play Pause Press to start to play a CD or make a pause during reproduction 4 Level Set the volume level 5 Stop Stops the playback 6 B Skip Rew Jump to previous track 7 F Skip FF Jump to next track 8 Repeat Allow one to enter to repeat mode repeat one a...

Page 18: ...ent system the equipment will be automatically powered by the battery HOW TO PLUG MICROPHONES Your new amplifier counts with up to 2 microphone inputs non balanced All the inputs counts with an independent control and the MIC1 input jack counts with priority function when you plug another microphone When choose MIC1 the signal from MIC2 will be muted AUXILIARY Through this input you can connect a ...

Page 19: ...tance between the amplifier and the speakers are too short less than 50 meters If you connect a speaker with different impedance 4ohm the amplifier will show lacks on the power output 25V 70V 100V LINE OUTPUT If you want to use speakers in a bigger distance than 50 meters from the amplifier we recommend you to install transformers one per speaker to prevent an excessive waste of power The sum of t...

Page 20: ...erences 6 Check the output signal graphic indicator If the red LED lit on then the audio signal may be distorted down the volume level 7 If you want to use the CD player press on off button 8 The LCD screen lights on press open close button 9 Place an audio CD into the CD tray Press open close button once again 10 Press play to start to play the CD 11 When you don t want to use the amplifier press...

Page 21: ...5dB less than nominal power All controls to the minimum level Tone control Bass 10dB to 100Hz Treble 10dB to 10kHz Input Aux 20dB 2 10 kΩ non balanced Mic 52dB 2 10 kΩ non balanced Indicators Use indicators Output level meter Consumption 115W Dimensions 15 7 x 3 9 x 12in Weight 16 8lb Color Black Nominal consumption 3 24 kWh day Stand by power consumption not applicable Power input 110 120V 60Hz 1...

Page 22: ...22 NOTES NOTAS ...

Page 23: ... the day the claim was received 4 Steren sell parts components consumables and accessories to customer as well as warranty service at any of the addresses mentioned later THIS WARRANTY IS VOID IN THE NEXT CASES If the product has been damaged by an accident acts of God mishandling leaky batteries failure to follow enclosed instructions improper repair by unauthorized personnel improper safe keepin...

Page 24: ...Este instructivo puede mejorar con tu ayuda llámanos a Help us to improve this instruction manual call us at www steren com 01800 500 9000 Centro de Servicio a Clientes Customer Service Center ...

Reviews: