background image

COAX JUMPER CONNECTIONS


Tech Support: 

consumer.steppir.com/support  |  425.453.1910  |  [email protected] 

39 


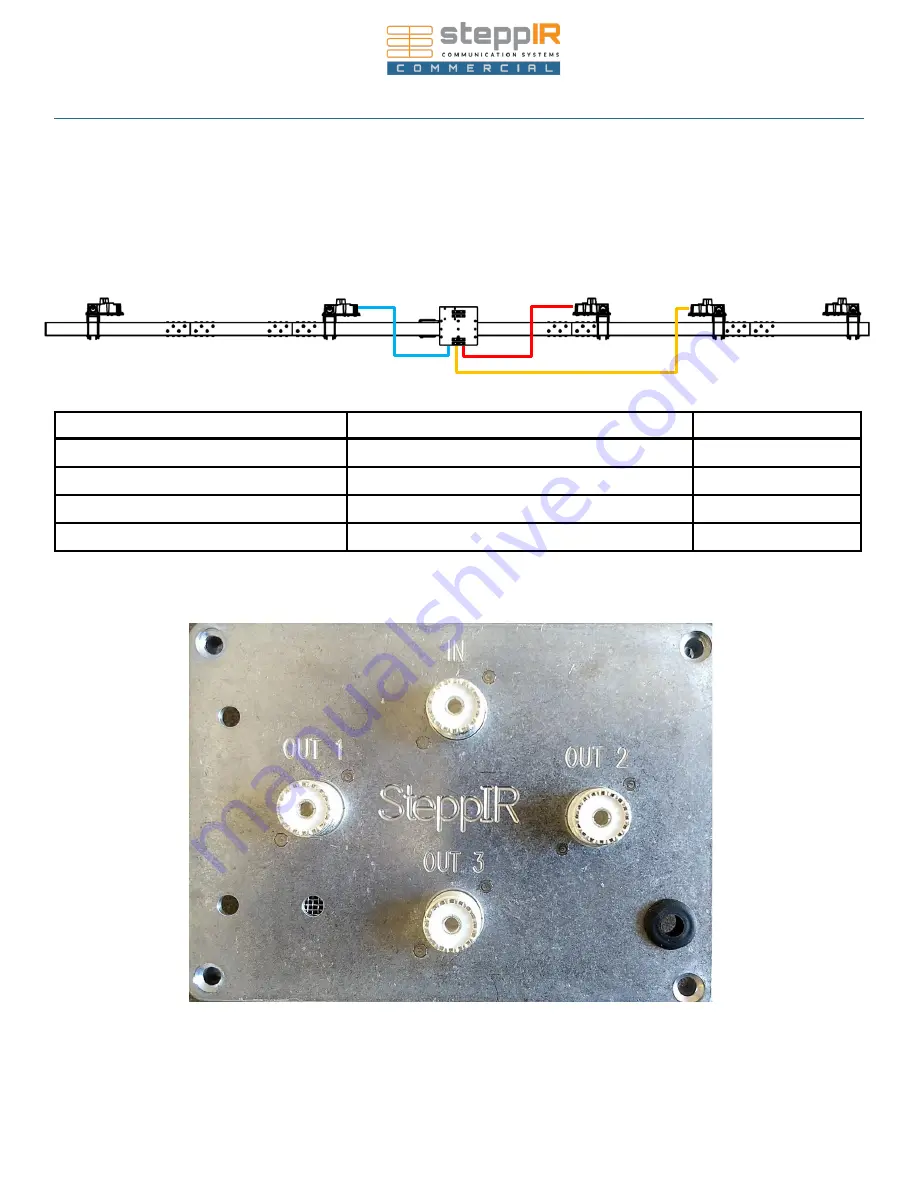
Use the provided coax jumpers and connect the EHU coax ports to the coax antenna switch as shown.


Apply dielectric grease to the center conductors of all coax connections.


Tighten the coax connectors with pliers.


Use provided coax seal or silicone tape (not provided) to seal the coax connections (both at the EHUs and at the 
coax switch box).


D2 

D1


DVR


OUT 1


COAX SWITCH SO239 CONNECTOR


COAX PURPOSE


JUMPER LENGTH


IN 

FEEDLINE FROM SHACK 

N/A 

OUT 1 

COAX JUMPER TO DRIVEN EHU 

11 FT 6 IN 

OUT 2 

COAX JUMPER TO DIRECTOR 1 EHU 

4 FT 

OUT 3 

COAX JUMPER TO DIRECTOR 2 EHU 

8 FT 


COAX ANTENNA SWITCH


OUT 2


OUT 3


Summary of Contents for HFT540C

Page 1: ...HFT540C Assembly Manual REV 2 0 4 7 2 2021 13406 SE 32nd St Bellevue WA 98005 www steppir com 425 453 1910 sales steppir com ...

Page 2: ...ssemblies which can be performed simultaneously Working on multiple sub assemblies in parallel can speed up the assembly time Critical bolt torques are listed on the appropriate assembly step Make sure to tighten from the nut with a torque wrench and use anti seize or threadlock where applicable Recommended Tools Materials Sawhorses at least 2 Heat Gun Speed Square Level Torque Wrench Safety Wire ...

Page 3: ... 60 7002 8 Hex Bolt 5 16 18 x 75 60 7003 71 Hex Bolt 5 16 18 x 2 75 60 0093 3 Hex Bolt 5 16 18 x 4 5 60 0115 23 Hex Bolt 5 16 18 x 4 60 0066 14 Hex Bolt 5 16 18 x 5 5 60 0204 6 Hex Bolt 5 16 18 x 5 60 0141 9 Hex Bolt 5 16 18 x 6 60 7004 5 Hex Bolt 5 16 18 x 7 5 60 7005 28 Hex Bolt 5 16 18 x 7 60 0215 32 Hose Clamp 16 SS 60 6000 15 10 Hose Clamp 24 SS 60 6000 20 4 Hose Clamp 48 SS 60 6000 35 13 Loc...

Page 4: ...Thimble 1 2 heavy duty SS 60 7010 8 Turnbuckle 1 2 x 8 SS 60 7011 5 Turnbuckle 1 4 x 4 Eye to Eye S S 60 0083 9 Turnbuckle 5 16 x 8 Eye to Eye S S 60 0159 9 Washer 10 60 0018 25 Washer 0 5 ID x 1 5 OD 60 7012 14 Washer 1 4 60 0041 37 Washer 5 16 60 0033 350 Wire Clip 3 16 S S 60 7013 52 Eyebolt 1 2 x 4 60 7014 2 Double cable clamp 3 16 60 7015 18 Boom Box Item Part Number Quantity 4 Square Boom Se...

Page 5: ...tity Control Cable 4c 21 5001 01 50 Control Cable 6c 21 5013 30 Dacron 3 16 21 7002 01 255 Phillystran 4000i 21 8004 80 Phillystran 2100i 21 8002 165 Coax jumper 11 6 PL259 RG213 21 6301 96 1 Coax jumper 4 PL259 RG213 21 6301 30 1 Coax jumper 8 PL259 RG213 21 6301 80 1 Controller Box Item Part Number Quantity OptimizIR Controller with whitescreen fix 70 4005 01 1 Stereo Splitter 21 6040 1 DB25 Fie...

Page 6: ...60 7027 1 Glue kit 72 0009 03 3 Threadlocker No 42 10 ML Medium Strength 60 7030 1 6 In Safety Wire Twisting Pliers 60 7031 1 Electrical Tape 3M Super 88 09 0005 1 Electrical Tape MERCO 09 0001 1 Coax Seal sold per inch 09 1022 40 0 032 S S lock wire full roll 60 7017 1 Anti seize TM 1 10 1028 21 2 Element Truss Attachment Plate 2in 10 1607 21 8 Element Truss Attachment Plate 4in 10 1607 31 8 Coax...

Page 7: ...5MHZ DIRECTOR 1 8 225 13 315MHZ DIRECTOR 2 13 315 30MHZ DRIVEN 6 8 13 315MHZ DIRECTOR 1 13 315 30MHZ INACTIVE 6 8 13 315MHZ DRIVEN 13 315 30MHZ REFLECTOR 6 8 30MHZ ANTENNA OVERVIEW ELEMENT FUNCTIONS FORWARD DIRECTION Tech Support consumer steppir com support 425 453 1910 support steppir com 7 ...

Page 8: ...ANTENNA OVERVIEW DIMENSIONS Tech Support consumer steppir com support 425 453 1910 support steppir com 8 40 ft 71 5 ft ...

Page 9: ...l to remove dust dirt Step 2 Use applicator gun to apply glue to the sanded outer diameter of the 1 75 pole as well as sanded inner diameter of the 2 0 OD pole Step 3 Insert the smaller pole into the larger pole Twist a few times to spread the glue around and then back the pole out Remove excess glue from the inside of the smaller pole Step 4 Add more glue if necessary and repeat until the mating ...

Page 10: ...proper length boom section 10ft in the middle followed by 9ft and then 6ft on the ends The orientation of the boom splice matters The boom joints are pre marked A B C and D Make sure these mark ings line up Once installed tighten the bolts to a final torque of 20 ft lb G C B A 20 ft lb B E F C D G Key QTY Part Number Description A 1 10 1200 01 4 Square Boom Section 10ft B 2 10 1200 11 4 Square Boo...

Page 11: ... we have marked the bolt heads that we torqued down with a red paint pen to indicate that they have been fully tightened The boom can be placed on sawhorses for easier ac cess We recommend placing the sawhorses under the 9ft boom sections near the joint with the 10ft section Orient the boom with the drain holes located at either end of the boom facing down ...

Page 12: ...uring from the back of the antenna mark the boom with a permanent marker at the locations listed in the table below Label the marks with the indicated labels for future reference FRONT BACK Description Label Distance in Distance cm Reflector Element Mounting Plate REF 3 7 62 Truss Attachment T1 53 75 136 5 Driven Element Mounting Plate DVR 80 203 2 Director 1 Element Mounting Plate D1 168 426 7 Ma...

Page 13: ... There are two important things to note 1 The mounting plate must be installed with the four threaded 10 32 holes facing UP 2 The plate should be oriented with the wider spaced tapped holes closer to the boom center The imaginary black arrow shown on the plate should point towards the center of the boom regardless of where the plate is located NARROWER SPACING WIDER SPACING CENTER OF BOOM Note the...

Page 14: ...ll be installed on the boom Use the markings on the booms to position the element plates cor rectly The position of the element plates is very important as the performance of the antenna depends on accurate element placement Note the orientation of each element plate they are NOT all the same Center of Boom Mast Plate Goes Here ...

Page 15: ...is NOT symmetrical and must be installed with the wid er spaced threaded holes closer to the center of the antenna Use a speed square to position the element plate perpendicular to the boom as shown in the photo below Tighten the hex bolts to 11 ft lb with the torque wrench on the nut side C 5X C C A C 11 ft lb MARKING ON BOOM B B D D D D Key QTY Part Number Description A 1 10 1605 31 Element Moun...

Page 16: ...loser to the front of the antenna Note If you are side mounting the antenna on a tower you may need to mount the mast plate on the opposite side of the boom This is okay as long as you make sure that the boom truss mast attachment holes are still closer to the front of the antenna Tighten the hex bolts down to 30 ft lb with the torque wrench on the nut side Key QTY Part Number Description A 1 10 1...

Page 17: ...ntenna is mounted onto the mast Then in stall the hex bolts and nuts Do not tighten the hardware until the antenna is installed onto the mast Remember to install and tighten the set screws after the antenna is mounted to the mast This will help prevent the antenna from twisting around the mast Key QTY Part Number Description A 8 10 1601 61 Saddle 3 B 8 60 0141 Hex Bolt 5 16 x 5 C 8 60 0046 Nut 5 1...

Page 18: ...just until the mounting bracket square tube begins to bow inward Note you may need to shift the location of the coax switch and junction box assembly over one saddle if you chose to mount the mast plate on the opposite side of the boom relative to what is shown in this manual Key QTY Part Number Description A 1 10 1619 11 Coax Switch Connector Junction Dual Mounting Bracket B 1 70 2038 Connector J...

Page 19: ...hen removing the cable jacket too much pressure can cause damage to the other wires Trim the reinforcing thread so that you end up with a cable end that looks like figure 10 05 Only three of the four wires are used along with the shield wire The green wire needs to be trimmed as shown in figure 10 06 Use electrical tape to cover the end of the trimmed green wire to ensure that there is no opportun...

Page 20: ... off in the earlier step Always dip your bare copper wire ends into the provided connector protector before securing to the terminal connec tions Insert wires as shown in figure 10 12 Form a knot in the control cable as shown in figure 10 13 This will serve nicely as a strain relief Be careful not to over stress the control cable while forming your knot Alternatively a tie wrap works well SHIELD B...

Page 21: ...at the mounting holes are lined up as shown in figure 10 23 Locate the flathead threaded screws included in the plastic baggie The screws will be inserted from the bottom of the housing as shown in figure 10 24 Tighten so that the lid is firmly in place and the gasket is compressed You will likely need to take the lid off for the final wiring test but leaving it in place is necessary in order to p...

Page 22: ... below Cut the control cable to the correct lengths as indicated in the table below There will be two or three feet of slack on each element Director 3 D3 Director 2 D2 Director 1 D1 Driven DVR Reflector REF 40 30 Passive 40m Driven Normal Driven relay 40m Driven Normal Passive relay 20m Driven Normal Passive relay 40 30 Passive 70 3414 01 70 3415 01 70 3412 01 70 3413 01 70 3414 01 4 Conductor 6 ...

Page 23: ...of the insulation from each of the individual 22 AWG wires leaving bare copper Figure 3 1 shows the control cable should look like when you are finished with the trimming 6 conductor is shown 5 Dip each of the copper wires into connector protector Figure 3 12 shows what the connector protector will look like 6 Remove the green phoenix terminal plug from the EHU header and use a flathead screwdrive...

Page 24: ...ough acts as a strain relief so that the cable will not be pulled out of the EHU It is a good idea to leave a small amount of slack between the plug and the point which the tray starts as shown in figure 3 16 10 Cut the provided coax seal into 1 inch strips as shown in figure 3 17 You will need three strips per EHU The remainder can be used to seal the driven element SO239 connectors 11 Apply coax...

Page 25: ...asket is fully compressed G Note that 4 of the bolt holes are not occupied F these will be used to attach the EHU to the ele ment plate in the next step These empty loca tions are shown below with red X markings Empty A D F D D G F D F F F C B F G E F G F G F E G Key QTY Part Number Description A 1 EHU B 1 10 1501 23 Cover for EHU w drain hole C 1 10 1502 01 EHU Gasket D 4 60 0017 Pan Screw 10 32 ...

Page 26: ...elow provides an overview of the placement of the EHUs on the antenna Director 3 D3 Director 2 D2 Director 1 D1 Driven DVR Reflector REF 40 30 Passive 40m Driven Normal Driven relay 40m Driven Normal Passive relay 20m Driven Normal Passive relay 40 30 Passive 70 3414 01 70 3415 01 70 3409 01 70 3413 01 70 3414 01 ...

Page 27: ...port 425 453 1910 support steppir com 27 D D C D C A B B B B 3X D Key QTY Part Number Description A 1 EHU see previous page for correct type B 4 10 1613 13 Aluminum Spacer 10 ID x 5 height C 4 60 0018 Washer 10 D 4 60 0101 02 Pan Screw 10 32 x 1 25 w locking strip ...

Page 28: ...m support 425 453 1910 support steppir com 28 D 2X D D C D C A B B B B Key QTY Part Number Description A 1 EHU see previous page for correct type B 4 10 1613 12 Aluminum Spacer 10 ID x 25 height C 4 60 0018 Washer 10 D 4 60 0101 01 Pan Screw 10 32 x 1 w locking strip ...

Page 29: ...tion of the control cable to the SteppIR controller Follow the steps below to connect it to your control cable 1 Apply the provided dielectric grease to the exposed copper portion of each wire 2 Connect each wire to the appropriate terminal and tighten using a flat head screwdriver Note that the terminals may be closed by default If so turn the ter minal screw ccw 10 turns to open it before insert...

Page 30: ...Blue Blue White Stripe Blue Red Stripe Blue Black Stripe Orange Orange Red Stripe Orange Black Stripe Green Black Red Stripe Orange Green Stripe White Black Red Red Black White Black White Red Green White Stripe Green Black Stripe Red Red White Stripe White Red Strip Red Black Stripe Red Green Stripe Not Used G Shield Goes Here 1 2 3 4 5 6 7 8 9 10 11 12 13 14 15 16 17 18 19 20 21 22 23 24 25 G ...

Page 31: ...lus shield wire all wires used J3 DIRECTOR 1 6 wire control cable plus shield wire all wires used J4 DIRECTOR 3 4 wire control cable plus shield all wires used J5 DIRECTOR 2 6 wire control cable plus shield all wires used P1 CONTROL CABLE FROM GROUND The first 13 wires of the 24 the conductor cable used Pins 1 13 plus the shield wire P2 CONTROL CABLE FROM GROUND The remaining 11 wires of the 24 co...

Page 32: ...ack Red Green White Shield J2 J3 J5 PLUG J1 PLUG Black Red Green White Blue Brown Shield B R G W S B R G W B R G W Blu Br S B R G W Blu Br Wire the loose ends of the control cables coming from the EHUs to the J1 J5 plugs as shown below Review the drawing on page 31 for information about which plug correlates to which element ...

Page 33: ... BLUE BLUE WHITE STRIPE BLUE RED STRIPE BLUE BLACK STRIPE BLACK RED STRIPE SHIELD WIRE 1 2 3 4 5 6 7 8 9 10 11 12 13 S GREEN WHITE STRIPE GREEN BLACK STRIPE RED RED WHITE STRIPE ORANGE GREEN STRIPE WHITE BLACK RED RED BLACK WHITE BLACK WHITE RED WHITE RED STRIPE RED BLACK STRIPE RED GREEN STRIPE NOT USED 14 15 16 17 18 19 20 21 22 23 24 25 24 Wire Control Cable P1 PLUG 24 Wire Control Cable P2 PLU...

Page 34: ...Connect the other end of the wire that you connected to the coax switch box earlier to the J6 plug in the connector junction box following the drawing below Note that the green wire is not used Be sure to trim the green wire on each end of the control cable and tape over it to avoid potential electrical shorts Note that the R4 position on the J5 plug and R1 position on the J6 plug are not used ...

Page 35: ...sub field splice Measure on the indicated pin pairs using a multi meter set to measure Ohms Pin Pair Antenna Element Expected Resistance 1 2 Driven 20 Ohms 3 4 20 Ohms 5 6 Director 1 20 Ohms 7 8 20 Ohms 9 10 Reflector 20 Ohms 11 12 20 Ohms 14 15 Director 2 20 Ohms 16 17 20 Ohms 18 19 Director 3 20 Ohms 20 21 20 Ohms 13 23 Relay 2 140 or 360 Ohms 13 24 Relay 3 280 or 720 Ohms Your results may be sl...

Page 36: ...isplay stop and address the fault before proceeding Step 3 Press the setup button and scroll to Motors Test Step 4 Test each motor by extending and retracting it using out in or cycle Make sure that the correct motor re sponds for example REF signals the Reflector DVR signals the Driven element and so on If the wrong motor re sponds a plug may be switched in the junction box or the antenna may be ...

Page 37: ...ECT the control cable BEFORE exiting Create Modify This is to prevent the elements from moving when changing the controller to the first test frequency 7 Set the controller to normal direction by selecting the button labeled Normal the green LED next to the button should light 8 Set the controller frequency to any frequency in the 20m band 9 When the Tuning LED stops flashing RECONNECT the control...

Page 38: ...ement There should be a short circuit between the center pin of the Director 1 coax connector and each of the copper tapes The Driven EHU should show a open circuit between the coax connector center pin and each of the copper tapes Director 2 will show CONTINUITY between the coax center pin and each of the copper tapes This is correct and ok since the EHU is disconnected by the coax switch box The...

Page 39: ...rs of all coax connections Tighten the coax connectors with pliers Use provided coax seal or silicone tape not provided to seal the coax connections both at the EHUs and at the coax switch box D2 D1 DVR OUT 1 COAX SWITCH SO239 CONNECTOR COAX PURPOSE JUMPER LENGTH IN FEEDLINE FROM SHACK N A OUT 1 COAX JUMPER TO DRIVEN EHU 11 FT 6 IN OUT 2 COAX JUMPER TO DIRECTOR 1 EHU 4 FT OUT 3 COAX JUMPER TO DIRE...

Page 40: ...ed the seal is secure and wa terproof This product requires a heat gun for activation of the adhesive When positioning the heat shrink place it so that the joint of the telescoping pole is centered in the middle of the heat shrink Using a heat gun hair dryers will NOT work apply heat evenly around the entire area of heat shrink Note there are 4 blue colored lines imprinted on the tubing The joint ...

Page 41: ...sed black ring Slide the other rein forcing sleeve over the tip of the pole and position it as shown below You may need to insert a flathead screw driver into the slot and twist to open up the sleeve to be able to slide it into position A 2X Key QTY Part Number Description A 1 10 1013 02 Telescoping fiberglass pole B 3 10 1059 01 Heat Shrink Tubing C 1 70 1007 01 Foam Plug Assembly D 2 10 1630 51 ...

Page 42: ...oam ring washer hose coupler 2X 72 0039 CPVC Glue Kit Use the provided glue kit PN 72 0039 to bond the CPVC sections Apply the glue to the outer diameter ONLY before inserting into the coupler and twisting Work quickly as the glue will dry quickly and become less effective ASSEMBLE THE 50 FT ELEMENT AND CPVC 2X 89 0 62 25 A B Key QTY Part Number Description A 1 70 2030 01 Fiberglass Extension 1 75...

Page 43: ...s Extension Tapered 17 5ft B 2 10 1630 41 Stress Relief Tube 3 OD x 2 75 Length PREPARE THE 70 FT ELEMENT CPVC 6X Apply the glue to the outer diameter ONLY 89 0 89 0 89 0 Key QTY Part Number Description A 1 70 2022 01 CPVC 3 4 x 89 w out coupler B 1 70 2021 01 CPVC 3 4 x 89 w coupler C 1 70 2025 53 CPVC Assembly with 2 foam ring washer hose ASSEMBLE THE 70 FT ELEMENTS AND CPVC 6X ...

Page 44: ...egarding the assembly is shown on the following page read both pages before completing this step of the assembly Key QTY Part No Description A 2 Fiberglass Telescoping Pole Assembly see page 43 B 8 10 1601 61 Saddle 3 C 1 10 1605 41 Element Mounting Plate Top D 8 60 7005 Hex Bolt 5 16 18 x 7 5 SS E 8 10 1613 21 Spacer 3 8 ID x 3 4 Tall Aluminum F 8 60 0046 Nut 5 16 Nylock G 8 60 0033 Washer 5 16 ...

Page 45: ...m 45 Orient the upper mounting plate so that the holes screwdriver access holes line up with the element housing unit mounting screws Center the aluminum sleeves on the saddles Orient the sleeves with the slot horizontal as shown note that the black vinyl caps and hose clamps shown here will be installed in a later step ...

Page 46: ...anti seize on all SS hardware Key QTY Part No Description A 2 Fiberglass Telescoping Pole Assembly see page 42 B 8 10 1601 22 Saddle 2 C 1 10 1605 41 Element Mounting Plate Top D 8 60 0215 Hex Bolt 5 16 18 x 7 SS E 8 10 1613 01 Spacer 5 16 x 1 Aluminum F 8 60 0046 Nut 5 16 Nylock G 8 60 0033 Washer 5 16 H 8 10 1613 11 Spacer 5 16 x 1 4 Aluminum ...

Page 47: ...B F D G G B G F G A F D D F F D D Use anti seize on all SS hardware Key QTY Part No Description A 2 Fiberglass Telescoping Pole Assembly see page 41 B 8 10 1601 03 Saddle 1 75 C 4 60 7004 Hex Bolt 5 16 x 6 D 8 60 0046 Nut 5 16 Nylock E 4 10 1613 01 Spacer 5 16 x 1 Aluminum F 8 60 0033 Washer 5 16 G 4 10 1613 11 Spacer 5 16 x 1 4 Aluminum H 4 60 0204 Hex Bolt 5 16 x 5 5 ...

Page 48: ...xtension The Vinyl cap is secured with a hose clamp and the CPVC tube assembly can slide in and out to connect with the EHU CPVC stub via a rubber hose The 70ft Element assembly is show below The hose clamps and vinyl cap sizes will vary on the 70 50 and 36ft element see the following page for details Butt the vinyl cap up against the reinforcing sleeve do not install the cap under or over the sle...

Page 49: ...5 with hole B 2 60 6000 35 Hose Clamp 48 C 2 60 6000 15 Hose Clamp 16 VINYL CAP INSTALL 50FT ELEMENT B C C B Key QTY Part No Description A 2 60 7025 Vinyl Cap 1 75 x 1 5 with hole B 2 60 6000 35 Hose Clamp 48 C 2 60 6000 15 Hose Clamp 16 VINYL CAP INSTALL 36FT ELEMENT Key QTY Part No Description A 2 60 7024 Vinyl Cap 1 5 x 1 5 with hole B 2 60 6000 20 Hose Clamp 24 C 2 60 6000 15 Hose Clamp 16 ...

Page 50: ...38 as well as 8 FERNCO rubber quick disconnect boots Slide the small end of the rubber quick disconnect boot over the telescoping pole base and then insert the telescop ing poles into the fiberglass extensions Press the poles in until they bottom out Secure the rubber boot by tightening the hose clamps Tighten twice waiting at least 15 minutes between to allow the rubber to cold flow 2X ...

Page 51: ...cription A 1 10 1618 61 Boom Truss Boom B 1 10 1618 71 Boom Truss Mast C 1 10 1021 43 Boom Plate 8 D 8 10 1601 41 Saddle 2 5 E 8 60 0066 Hex Bolt 5 16 x 4 SS F 8 60 0046 Nut 5 16 Nylock G 4 60 7006 Nut 1 2 Nylock H 2 60 7014 Eyebolt 1 2 x 4 Use included washer I 4 60 7011 Turnbuckle 1 2 x 8 J 2 60 7000 Hex Bolt 1 2 x 2 5 K 12 60 7012 Washer 5 ID x 1 5 OD L 1 60 0112 Set Screw 10 32 x 1 4 M 3 60 70...

Page 52: ...pport 425 453 1910 support steppir com 52 Key QTY Part No Description A 1 Boom Truss Assembly B 4 60 0115 Hex Bolt 5 16 x 4 5 SS C 4 60 0046 Nut 5 16 Nylock D 4 10 1601 41 Saddle 2 5 E 1 60 0112 Set Screw 10 32 x 1 4 A C D E B Use anti seize on all SS hardware ...

Page 53: ...n all SS hardware Install the boom truss couplers refer to the boom markings for the correct placement Tighten the hex bolts to 30 ft lb with the torque wrench on the nut side Key QTY Part No Description A 2 10 1601 81 Boom Truss Attachment Square Saddle B 8 60 7001 Hex Bolt 3 8 x 6 5 SS C 4 10 1601 71 Square Saddle D 8 60 0050 Nut 3 8 Nylock ...

Page 54: ...TRUSS THE BOOM OVERVIEW Tech Support consumer steppir com support 425 453 1910 support steppir com 54 ...

Page 55: ... Make sure to place a thimble inside the eye of each guy grip before twisting it together Leave 3 of slack measured from the yellow mark Refer to this video for clarification on how to assemble the guy grips www youtube com watch v q366DoJoMkM note this video is not ours but the technique shown is the same Zip tie the ends of the grips to prevent them from loosening and place a rubber cap on both ...

Page 56: ... to secure the bolt Install the 1 2 shackles 60 7007 on the boom truss attachment couplers Install 2 twisted shackles 60 7009 on each of the 1 2 shackles Orient them such that the head of the pins point away from each other as shown Mount the other end of each thimble grip Phillystran assembly to the pin of the twisted shackle as shown below Apply blue Loctite to the shackle pin threads and tighte...

Page 57: ... Tighten the turnbuckles incrementally so that the tension on each rope stays approximately the same Be careful to avoid overtightening one line which could cause the boom to twist or flex in correctly Place a level near each end of the boom so that you can tell when the boom is level Once the boom has been leveled use the provided locking wire to lock the twisted shackle bolts and the turnbuck le...

Page 58: ...x 48 B 4 10 1601 32 Saddle 2 25 C 2 60 0083 Turnbuckle 1 4 x 4 eye to eye SS D 4 60 7048 Thimble 3 16 Heavy Duty SS E 1 60 6000 35 Hose Clamp 48 SS F 1 60 7021 Vinyl Cap 2 25 x 1 5 Black w o hole G 1 60 0066 Hex Bolt 5 16 18 x 4 H 5 60 0046 Nut 5 16 Nylock I 26 60 0033 Washer 5 16 J 8 10 1613 11 Spacer 1 4 Aluminum K 4 60 0115 Hex Bolt 5 16 18 x 4 5 L 1 60 0112 Set Screw 10 32 x 1 4 M 2 60 0159 Tu...

Page 59: ...ping H G 8X E C Butt up against alumi A num ring F 8X Key QTY Part No Description A 2 60 7020 Resin Clamp 1 75 B 2 60 7019 Resin Clamp 1 C 1 10 1607 31 Element Truss Attachment Plate 2in D 1 10 1607 21 Element Truss Attachment Plate 2in E 2 60 7048 Thimble 3 16 SS F 2 60 0029 Hex Bolt 1 4 20 x 3 G 4 60 0030 Nut 1 4 20 Nylock H 2 60 0078 Hex Bolt 1 4 20 x 1 75 Use anti seize on all SS hardware ...

Page 60: ...consumer steppir com support 425 453 1910 support steppir com 60 Key QTY Part Number Description A 21 8002 Phillystran 2100i 230 70ft element 115 50ft element B 6 60 0045 Wire Clip 3 16 C 2 60 0044 Rubber cap D 09 0001 Electrical tape C D B A 8X B D C 8X ...

Page 61: ...ghtenings Generally if you tighten them in a consistent order by the time you tighten the last element you can go back and retighten them all in the same order 6 Pull the rope to the other attachment point the 5 16 x 8 turnbuckle at the top of the mast Make sure to attach to the larger 5 16 turnbuckle and not the smaller 1 4 turnbuckle 7 Pull the rope tight and then cut it 12 inches past where it ...

Page 62: ...rt 425 453 1910 support steppir com 62 Key QTY Part Number Description A 21 7002 01 Dacron 3 16 336 70ft element 220 50ft element B 2 60 7015 Double cable clamp 3 16 C 4 60 0175 Lock Washer 10 32 Split S S installed on cable clamp D 09 0001 Electrical Tape D B C A 8X B C D 8X ...

Page 63: ...ut it 12 inches past where it meets the eye of the turnbuckle 9 Repeat steps 3 6 Make sure that you apply tension to the rope before fully tightening the nuts any slack left in the line will need to be taken up by the turnbuckle and Dacron likes to stretch before it can apply tension to the line The turnbuckle has only 4 of travel so if you leave too much slack in the line you might not be able to...

Page 64: ...les Element Truss Turnbuckles All turnbuckles should be secured with safety wire to prevent them from loosening due to vibrations For best results use a pair of safety wire pliers as shown below For instruction on using the safety wire pliers refer to this youtube video https www youtube com watch v FJ bkk_lIXQ ...

Page 65: ...ies listed and rec ord the SWR the resonant frequency and minimum SWR using an antenna analyzer When finished snap a picture of the results and send it to commercial forms steppir com Step 3 Analyze the results SWR 3 1 is OK and can be tuned to 1 5 1 or less once the antenna is in the air SWR 3 1 indicates an issue with the wiring controller or motors Address the cause of the high SWR Contact sup ...

Page 66: ...port 425 453 1910 support steppir com 66 Print a copy of this page fill it out and email a photo of it to commercial forms steppir com Controller Frequency MHz SWR at controller freq Resonant Frequency MHz Minimum SWR 30 000 20 000 15 000 13 000 10 000 7 000 ...

Page 67: ...out and email a photo of it to commercial forms steppir com Controller Frequency MHz Resonant Frequency MHz SWR at res freq Band Correction Factor SWR after Band Cor 29630 28540 27090 25640 24190 23100 22380 21650 20930 20200 19480 18750 18030 17300 16580 15850 15130 14400 13680 12950 12230 11500 10780 10050 9440 8950 8460 7990 7510 7040 ...

Reviews: