background image

hydraulic floor jack

eng

13

It is prohibited to stay or carry out works under the lifted load held only by the jack. Stay away from moving 
hinged joints of the jack.
Never exceed the maximum rated lifting capacity of the jack. Overload of the jack may result in its failure 
and cause personal injury.
The safety valve is adjusted for safe operation of the item with maximum rated load of 2.5 tons. It is 
prohibited to change factory settings of the safety valve at your own discretion; it may cause failure of the item 
and personal injury.
It is permitted to use only the components and adapters recommended for use by the manufacturer.  
It is prohibited to disassemble the jack on your own initiative, as well as make changes and modifications  
in the construction of the jack.
The operator working with the jack should be cautious, competent, should have passed a training course 
and have a qualification in safety techniques when working with servo motors and their moving parts,  
and should preserve safety measures while operating the jack. 
All warning labels should always be legible and these operating instructions should be kept intact during 
the whole service life of the jack.
Failure to heed these rules may result in causing personal injury and failure of hydraulic equipment.

BEfORE USE

Test the jack. Close the release valve by turning it with the help of the handle clockwise until it is firmly 
closed. Insert the handle into the pump unit handle sleeve and make sure that it is reliably fixed in the slot. 
Pump handle several times up and down; when this is done, the lifting arm of the jack should start rising.
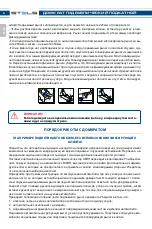
Principle of operation of the lifting arm safety pin
- While the lifting arm moves upwards under the action of the pump, the teeth of the back side of the 
lifting arm drive the safety pin forward.
- In the positions equal in height to somewhat higher than 225, 295 and 350 mm the safety pin jumps over  
the relevant tooth, and a characteristic click is heard. It means that the safety pin is ready to interlock  
the lifting arm. For further interlocking, it is sufficient to open the release valve, the lifting arm will go a little down,  
and the teeth will be pressed against the safety pin. The lifting arm is interlocked and the saddle is on a height  
of 225 mm from the surface.
- To unlock the lifting arm, it is necessary to close the release valve, to insert the handle into the pump 
unit handle sleeve and pump it up and down several times. The lifting arm starts rising, thus relieving the 
safety pin. 
- If we continue raising the arm lever, then similarly we may interlock the lifting arm at the height of 295 mm,  
and then at the height of 350 mm.
- If operation of the safety pin is not required, then when the lifting arm is in the extreme down position, pump 
six full strokes with the handle after which lower the locking lever down and latch it in the clip. Thus, the safety 
pin will not be engaged by the teeth during further operation. If the lifting arm is raised higher than six handle 
strokes, the interlocking lever may be activated for interlocking at any height. Prior to lowering the lifting arm 
make sure that the interlocking lever is snatched in the clip. Otherwise, the lifting arm will be pressed against 
 the safety pin and stop lowering down. With the help of the handle, rotate the release valve counterclockwise 
by no more than three full turns, and when the lifting arm goes down fully, close the release valve by turning 
it with the help of the handle counterclockwise until it is fully closed. When the lifting arm is fully lowered  
the locking lever is automatically unlocked.

Summary of Contents for 51132

Page 1: ...tion and maintenance for hydraulic floor jack STELS Please pay particular attention to safety phrases Violation of safety procedures may lead to equipment failure or cause injuries Дата изготовления указана на изделии Date of manufacture is indicated on the product ВНИМАНИЕ Прочитайте данное руководство перед эксплуатацией изделия и сохраните его для дальнейшего использования IMPORTANT Read this m...

Page 2: ...РОЙСТВО 4 ТРЕБОВАНИЯ БЕЗОПАСНОСТИ 5 ПОДГОТОВКА К ЭКСПЛУАТАЦИИ 5 ПОРЯДОК РАБОТЫ С ДОМКРАТОМ 6 ОБСЛУЖИВАНИЕ И УХОД 7 ВОЗМОЖНЫЕ ПРОБЛЕМЫ ПРИ ЭКСПЛУАТАЦИИ 8 ПОДГОТОВКА К УТИЛИЗАЦИИ 8 РЕАЛИЗАЦИЯ И УТИЛИЗАЦИЯ 8 ТРАНСПОРТИРОВКА 9 ХРАНЕНИЕ 9 ГАРАНТИЙНЫЙ СРОК 9 ГАРАНТИЙНЫЕ ОБЯЗАТЕЛЬСТВА 9 СРОК СЛУЖБЫ 9 Дата изготовления 9 Импортер 9 ...

Page 3: ... на заданной высоте Модель оснащена страховочным фиксатором позволяющим блокиро вать перемещение подъемного рычага на высоте 225 295 и 350 мм КОМПЛЕКТ ПОСТАВКИ 1 2 3 4 1 Домкрат 1 шт 2 Рукоятка 1 шт 3 Руководство по эксплуатации 1 шт 4 Пластиковый кейс 1 шт ТЕХНИЧЕСКИЕ ХАРАКТЕРИСТИКИ 2 5T 140 mm 385 mm Характеристика 51132 Грузоподъемность т 2 5 Высота подхвата мм 140 Высота подъема мм 385 Вес изд...

Page 4: ... 4 1 Рама 2 Подъемный рычаг 3 Седло опорная основа 4 Рукоятка 5 Штифт фиксирующий высоту подъема 6 Блокирующий рычаг 7 Клипса 8 Передние колеса 9 Задние колеса 10 Гидравлический блок 11 Маслозаливная горловина 12 Приемное гнездо насоса 13 Запорный клапан 14 Предохранительный клапан ...

Page 5: ...тельного клапана это приведет к выходу из строя изделия и травмам Разрешается использовать только комплектующие и переходники рекомендованные производи телем Запрещается самостоятельно производить разборку домкрата а также вносить изменения в его конструкцию Оператор работающий с домкратом должен пройти курс по технике безопасности при работе с серводвигателями и их движущимися частями и соблюдать...

Page 6: ...трена ПОРЯДОК РАБОТЫ С ДОМКРАТОМ на примере поднятия автомобиля без использования фиксирующего штифта Убедитесь что автомобиль и домкрат находятся на твердой и ровной поверхности и домкрат имеет возможность смещаться вперед назад во время подъема и опускания автомобиля Неровная не твердая или наклонная поверхность создаст опасные для выполнения работы условия Поставьте автомобиль на стояночный тор...

Page 7: ...часовой стрелки до тех пор пока автомобиль не начнет опускаться Следите за тем чтобы опускание автомобиля происходило медленно и плавно ВНИМАНИЕ Резкое опускание может привести к срыву автомобиля с домкрата и травми рованию оператора После того как автомобиль полностью и устойчиво опустится на колеса дождитесь когда подъ емный рычаг домкрата отойдет от ответной части автомобиля Затем откатите домк...

Page 8: ...пор пока подъемный рычаг не примет крайнее верхнее положение и прокачайте еще несколько раз чтобы удалить воздух заполнивший поршень 5 Аккуратно приоткройте пробку маслозаливной горловины чтобы выпустить собравшийся воздух 6 Поверните запорный клапан против часовой стрелки на один полный оборот опустите подъемный рычаг в крайнее нижнее положение При необходимости примените силу 7 Закройте запорный...

Page 9: ...ничен ГАРАНТИЙНЫЙ СРОК Гарантийный срок службы изделия составляет 12 месяцев с момента продажи при условии соблюдения правил техники безопасности правил работы с изделием и условий обслуживания ихранения Потребительвправеобратитьсявсервисныйцентр см переченьвгарантийномталоне для последующего технического обслуживания или ремонта ГАРАНТИЙНЫЕ ОБЯЗАТЕЛЬСТВА На изделие распространяется гарантия произ...

Page 10: ...TERISTICS 11 COMPONENTS 12 SAFETY INSTRUCTIONS 12 BEFORE USE 13 JACK OPERATING PROCEDURE 14 MAINTENANCE 15 TROUBLESHOOTING CHART 15 PREPARATION TO UTILIZATION 15 SELLING AND UTILIZATION 16 Transportation 16 Storage 16 WARRANTY PERIOD 16 Warranty 16 Service life period 16 Date of manufacture 16 IMPORTER 16 ...

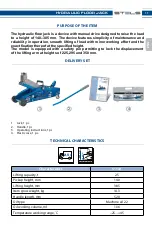
Page 11: ...at the specified height The model is equipped with a safety pin permitting to lock the displacement of the lifting arm at heights of 225 295 and 350 mm DELIVERY SET 1 2 3 4 1 Jack 1 pc 2 Handle 1 pc 3 Operating instructions 1 pc 4 Plastic case 1 pc TECHNICAL CHARACTERISTICS 2 5T 140 mm 385 mm Characteristics 51132 Lifting capacity t 2 5 Pickup height mm 140 Lifting height mm 385 Item gross weight ...

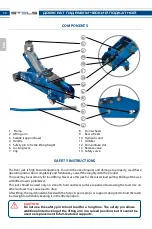
Page 12: ...elf thoroughly with the product This jack may be used only for load lifting Never use this jack for the raised load pulling Pulling of the jack with lifted load is prohibited This jack should be used only on smooth hard and level surface capable of sustaining the load Use on other surfaces may cause load to drop After lifting the load should be fixed with the help of special props or supports desi...

Page 13: ...g Principle of operation of the lifting arm safety pin While the lifting arm moves upwards under the action of the pump the teeth of the back side of the lifting arm drive the safety pin forward In the positions equal in height to somewhat higher than 225 295 and 350 mm the safety pin jumps over the relevant tooth and a characteristic click is heard It means that the safety pin is ready to interlo...

Page 14: ...vehicle body is positioned exactly against the center of the saddle 2 The vehicle may not slip off the jack 3 The lifting arm of the jack will not damage any parts and components of the vehicle Lift the vehicle to the required height by pumping the handle of the jack Install special stands or props under the body of the vehicle Lock the interlocking lever in the clip Slowly turn the release valve ...

Page 15: ...vel is lower top up oil to the required level Use only recommended type of oil 3 Return the oil filler plug back home 4 Close the release valve and lift fully and lower the lifting arm of the jack several times This will help fully distribute oil in the whole system In most cases this helps to restore the serviceability of the item 5 Check operation of the jack Air is trapped in the system of the ...

Page 16: ...emperatures from 0 to 40 C and relative humidity less than 80 out of the reach of children Shelf life is unlimited WARRANTY PERIOD The warranty period of the item makes up 12 months since the date of selling provided the safety rules rules of operation with the item and servicing and storage conditions have been duly preserved The consumer has the right to address the service center see the warran...

Reviews: