background image

 
Speedclean Eco 30 

2011_V1 

page 10 of 16 


5.4 

Power Source Instructions 

The filter pump system you have purchase is equipped with a standard electrical cord and plug which should only 
be connected to a power outlet protected by a qualified Ground –Fault-Circuit-Interrupter (GFCI) with I

Δ

N


 30mA 

that has been installed by a professional electrician and adheres to local codes and regulations. Electrical installa-
tions should be carried out, taking the safety zone into consideration, by a locally licensed electrician to the rele-
vant national specifications for swimming pool construction (in Austria, EN1, part 4, §49; in Germany, DIN 57100, 
Part 702 and VDE 0100, Part 702. To avoid electric shock, power cord extensions should not be used. 


5.5 

Setting up the filtration system 


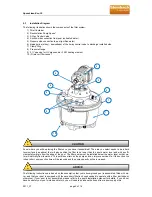
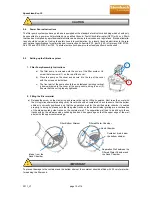
1.  Filter Pump Assembly Instructions 

a)  The filter pump is screwed onto the cover of the filter system. Un-

screw the two screws (1) on the top of the cover: 

b)    Place the pump on the cover and secure it to the top of the cover 

with the screws on both sides. 

c)    The front part of the pump should then be fastened (pointing vertical-

ly downwards) onto the cover at the pump nozzle, using the nut (2). 
Ensure that the nut is properly tightened. 


2.  Filling the filter material 

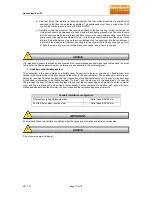
a)  Release the screw on the clamp ring and remove the ring by lifting it upwards. Next raise the cover with 

the O-ring (circumferential sealing cord). Once this has been completed, check to ensure that the bottom 
strainer is correctly positioned and that the separation wall for the purified water chamber is seated 
properly. In doing so, please note that the guide tracks on the bottom strainer grating are a continuation 
of the side-mounted guide tracks on the container wall. The separation wall has to be slid onto these 
tracks with by the side-mounted positioning hooks on its upper edge so that the upper edge of the wall 
abuts with the upper container edge: 


To prevent damage to the container and the bottom strainer, the container should be filled with 20 cm of water be-
fore adding the filter sand. 


IMPORTANT 

CAUTION 

Intake from the 
Sand Chamber 

Filtered Water Chamber 

Sand Chamber 

Filter Bottom Strainer

Separation Wall between the 
Filtered Water Chamber and 
the Sand Chamber 

Container drain below 
the bottom strainer 

Summary of Contents for Speedclean Eco 30

Page 1: ...Speedclean Eco 30 2011_V1 page 1 of 16 Owner s Manual Speedclean Eco 30 Universal Pool Filter System Art Nr 00 40250 ...

Page 2: ...ings This heading is used when injury or accidents may occur if the operating instructions work instructions work pro cedures etc are either NOT strictly adhered to or not carried out all This heading is used when damage to the device may occur if the operating instructions work instructions work procedures etc are either NOT strictly adhered to or not carried out all This heading is used to call ...

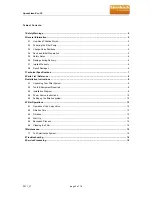
Page 3: ...ges 6 3 Technical Specifications 7 4 Parts List Reference 8 5 Installation Instructions 8 5 1 Unpacking Your Filter System 8 5 2 Tools Equipment Required 8 5 3 Installation Diagram 9 5 4 Power Source Instructions 10 5 5 Setting up the filtration system 10 6 Filter Operations 12 6 1 Operation of the 3 way Valve 13 6 2 Filtration Time 13 6 3 Filtration 13 6 4 Start Up 13 6 5 Backwash Process 14 6 6 ...

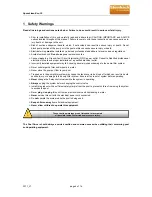
Page 4: ... may fail causing severe injuries or damage to the pump filter system Never submerge the filter and or pump in water Never place the pump or filter in your pool Trapped air in the pump filter system may cause the tank cover to be blown off which can result in death serious injury or damage to the pump filter system Ensure all air is out of system before operating Never change the 3 way control val...

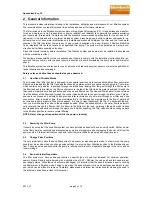
Page 5: ...t particles are trapped by the bed of sand and filtered out The cleaned filtered water is then returned from the bottom of the filter tank through the control valve and back to the pool through the return hose This se quence is continuous and automatic and provides total recirculation of pool water through your filter and hose connections After a period of time the accumulated dirt in the filter c...

Page 6: ...age to product as a result of shipping is not the re sponsibility of the supplier and must be immediately reported to the shipper The shipper assumes the liability for damages during delivery the supplier is not responsible for it 2 7 Implied Warranty The manufacturer warranties safe operation and reliability only under the following conditions The filter system is installed and operated according...

Page 7: ...nsert quick close latch UV desinfection system compatible Speedclean Eco 30 Flow Volume Q 3 8 m h Operating Pressure 0 4 bar Rated Voltage 230V 1N AC 50Hz Power 200 Watt Protection Class IP X5 Cable length including plug 1 5 m Max ambient temperature 35 C Sand Volume approx 12 kg Dimensions LxWxH 400x400x470mm Weight without filling approx 12 kg Performance chart Speedclean Eco 30 ...

Page 8: ...tems are not included with your new filter system but will be required for proper installation and operation 2 Screwdriver Quartz Sand with a particle size of 0 40 0 80mm in accordance with DIN EN 12904 approx 12 kg A small container of Vaseline G F C I Ground Fault Circuit Interrupter An absolutely level 0 60 x 0 60 m surface made of filter gravel crushed rock or compressed concrete with an open ...

Page 9: ...filter to be lower than the pool s water level and with a suffi cient safety margin from the edge of the pool The filter pump must be installed below the water level so that wa ter will naturally flow towards it This puts less strain on the pump and can improve service life If the suction line is kept short pump suction time will be reduced and the pump capacity will be increased The following ins...

Page 10: ...front part of the pump should then be fastened pointing vertical ly downwards onto the cover at the pump nozzle using the nut 2 Ensure that the nut is properly tightened 2 Filling the filter material a Release the screw on the clamp ring and remove the ring by lifting it upwards Next raise the cover with the O ring circumferential sealing cord Once this has been completed check to ensure that the ...

Page 11: ...t and that no sand is permit ted to enter the filtered water chamber as this can cause deposits in the swimming pool 1 Hooking up the filtration system The connection to the pool is made by a flexible hose To connect to the pool one end of a flexible hose is at tached to the suction side of the filter pump and the other to the pool skimmer The purified water return is con nected by running a flexi...

Page 12: ...e time In this position water is directed through the top of the filter where it compresses and flattens down the sand Contaminants are trapped by the sand as water makes it way to the bottom strain er out of the filter and back to the pool Backwash Position 2 Function Clean filter of captured debris This is the position needed to clean the filter and sand You ll know it is time to backwash when t...

Page 13: ...ate to the desired setting 6 2 Filtration Time The water contained in the swimming pool should be circulated through the pump at least 3 5 times in a 24 hour period depending on the load on the system and its size The time required depends on the capacity of the filtra tion system and the size of the swimming pool We recommend a minimum operating time of 12 hours per day If the pool is used intens...

Page 14: ... of the sand has finished 6 5 Backwash Process Disconnect the Motor Pump from the Power Source Attach backwash hose not included to backwash port Place the Multi Port Valve in the Backwash position Nr 2 Reconnect to power source Run filter in backwash mode until discharge water is clear approx 5 minutes Disconnect the Motor Pump from the Power Source Place the Multi Port Valve in the Filtration po...

Page 15: ...en the filter is located out of doors Winterize the system before the first frost replace the sand in the springtime before placing the filter into operation again Before loosening any threaded connections on the filtration system be sure that the intake and return hoses are closed or plugged to prevent water flow over the motor Before starting work you must first pull out the plug re spectively t...

Page 16: ...r a filter control system Check settings Sand in Pool If the sand is newly replaced the un dersized grains are still present Backwash several times until the backwash water is clear Valve Position Nr 2 Separation wall in filter is im properly installed Check the separation wall for prop er positioning Filter bottom strainer is damaged Replace the filter bottom strainer Repairs on the pump should o...

Page 17: ......

Page 18: ...zákazníci Návod k používání ve Vašem jazyce naleznete na webových stránkách www steinbach at manual Nemáte li přístup k internetu můžete si návod písemně vyžádat přímo u nás Rádi Vám jej bezplatně zašleme Milý zákazník Návod vo Vašom jazyku nájdete na www steinbach at manual Ak by ste nemali žiaden prístup k internetu môžete si návod písomne vyžiadať priamo u nás Radi Vám ho bezplatne pošleme Уваж...

Reviews: