The Sauna Room shall be provided with proper ventilation.
WIRE ROOM LIGHT
#14 AWG 90°C
4"
Note: Control panel and power unit must be installed in a dry
place; away from spa, pool or shower; not outdoors. A
receptacle shall not be installed inside the sauna room.
Load center shall be supplied by
electrical contractor during field
wiring, and shall be Cutler Hammer
model CH4F or equivalent. Load
center can be located in other
serviceable places, as well as
location shown on this diagram.
Load Center
Control Panel
Power Unit
Sensor
Room Light
INSTALL HEATER WITH #6-2"
SHEET METAL SCREWS
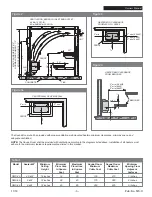
42"
NOTE:
CONTROL AND
CONTACTOR
MUST BE
INSTALLED IN A
DRY PLACE AWAY
FROM SPA, POOL,
SHOWER, AND
NOT OUTDOORS.
HIGH LIMIT
SWITCH
MAX. SAUNA
HEIGHT 8'-0"
NORMAL
SAUNA
HEIGHT 7'-0"
MIN. SAUNA
HEIGHT 6'-2"
7" TO
12"
FLEX METAL CONDUIT
90°C WIRE
Figure 1 - Digital Sauna Control S170-1 & S170-3
Owners Manual
11/10
Pub. No. 570-C
- 2 -
Installation of Wall Model Heater, Control and Power Unit
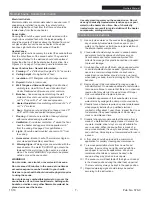
1. Remove heater from carton and attach to the wall with
supplied screws. If wall thickness is less than ¾", use
2"x4" wood bracing in the wall cavity behind the heater.
Observe proper clearances as per Figures 1-5.
2. See applicable wiring diagram (figures 6) for heater
model. Heater must be hard wired directly, with no pigtails
or plug connections. Wiring must be done by a licensed,
certified electrician. All wiring must adhere to local and
national codes. Use proper AWG wire size and use
copper wire suitable for 90°C within the wall cavity. Use
grounding terminals provided in sauna heater, and power
unit, to properly ground the equipment in accordance with
local and national codes.
3. Refer to Table 2 to determine applicable control for heater.
For units with Digital Sauna Control S170-1 or S170-3
refer to Pub. No. 572 for installation instructions.
4. Inside the heater box there are two signs. Place the metal
"CAUTION" sign on the interior wall of the sauna room
directly above the heater in a visible place. Place the
metal "WARNING" sign on the outside of the sauna door.
The maintenance instructions are at the end of this
manual.
5. Before testing the heater, fill the rock cavity with the
igneous rocks provided with the heater and fasten the
metal rock guard at the top of the heater. See Page 8 for
specific instructions regarding washing and placement of
the stones as well as heater operation.


