4 / 4
4 / 4
7
4
6
S
8
S
5
Fabricant/Producer:
Stäubli Electrical Connectors AG
Stockbrunnenrain 8
4123 Allschwil/Switzerland
Tél.
+41 61 306 55 55
Fax
+41 61 306 55 56
mail [email protected]
www.staubli.com/electrical
© b
y Stäubli Electrical Connector
s A
G, Switz
erland – MA213-06 – 01.2017, Inde
x a
, Mark
eting Communications – Sous réserv
e de modifications / Subject to alterations
Démontage
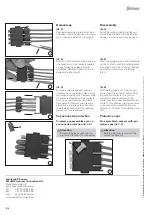
Disassembly
(ill. 4)
Plier légèrement la patte d’arrêt vers
l’extérieur� Selon la position de monta-
ge, on pourra s’aider d’un tournevis�
(ill. 4)
Bend the retaining latch slightly out-
wards� Depending on the installation
position, a screwdriver may be used�
(ill. 5)
Depuis le côté d’embrochage, exercer
une pression sur les contacts jusqu’à
ce que la plaque-support soit dé-
verouillée� Répéter l’opération sur la
deuxième patte d’arrêt�
(ill. 5)
From the plugging side, exert pressure
on the contacts until the holding plate
is pushed out of the retention� Repeat
operation on the second retaining
latch�
(ill. 6)
Extraire la plaque-support avec les
contacts du corps isolant� Dans le cas
de contacts mâles, il est recommandé
d’exercer la pression sur les contacts
avec un contact femelle non-câblé.
Cela permet d’exercer une pression
plus élevée et protège la surface ter-
minale des fibres contre l’endomma-
gement et l’encrassement�
(ill. 6)
Pull holding plate out of the contact
carrier with the contacts� When deal-
ing with pin contacts, it is recom-
mended to exert pressure on the
contacts with an unassembled socket
contact� This enables greater pressure
to be exerted and protects the end
surface of the fibres from damage and
dirt�
Capuchons de protection
Protective caps
Contacts pré-assemblés avec ca
-
puchons de protection (ill. 7-8)
Pre-assembled contacts with pro
-
tective caps (ill. 7-8)
Attention
Enlever tous les capuchons de
protection (S) avant la connexion�
Attention
Before plugging, remove all the
protective caps (S)�


